[CloudNeta] EKS 워크샵 스터디 (1) - EKS 소개 #1
이번 게시글에서는 EKS 워크샵 스터디 제 1주차 내용을 작성합니다.
이 글은 2부로 나누어집니다.
- 1주차 - EKS 소개 #1 (현재 보고계신 글)
- 1주차 - EKS 소개 #2
EKS 에 대한 소개와 간략한 배포, 그리고 클러스터 접근모드에 대한 내용을 살펴봅니다.
이번 장에서는 아래 내용을 다룹니다:
- EKS 아키텍처 살펴보기
- EKS 배포를 테라폼으로 해보기
- EKS Cluster Endpoint Access 모드 별 동작 살펴보기
- EKS Fully Private Cluster 동작 구성과 고려사항
EKS란?
쿠버네티스 클러스터의 운영은 AWS에게 맡기고, 실제 쿠버네티스 운영을 AWS의 환경 하에 작업할 수 있도록 하는 서비스입니다. 다시말해 클러스터의 운영, 구축, 보안, 유지/관리를 AWS와 통합시켜서 관리하고, 운영에 집중하게 하는 것이죠.
EKS 생성방법에 따라 아래 두 가지 방안으로 쓸 수 있습니다.
- EKS 표준: 컨트롤플레인 관리
- EKS Auto Mode: EKS 표준 + 노드 관리까지 한번에 처리 (리소스 동적확장, 비용최적화, 운영체제 패치, AWS 보안서비스와 통합)
그림으로 보시면 아래와 같습니다:
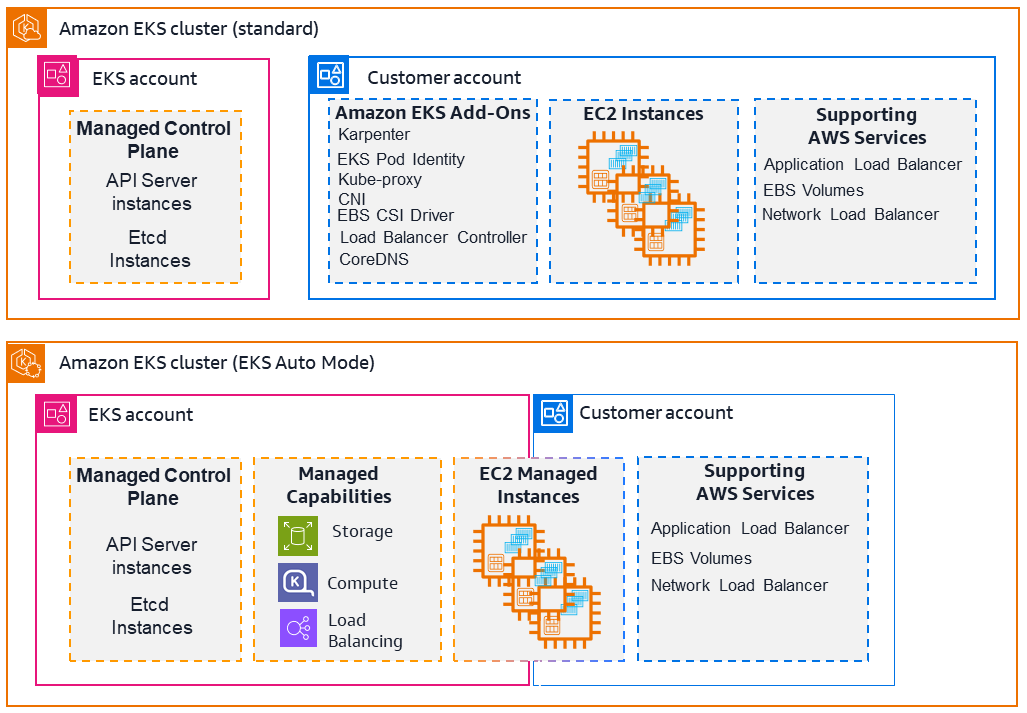
EKS가 관리해주는 부분
- 관리 인터페이스
eksctl로 하거나kubectl을 그대로 사용하되, AWS 권한을 부여받은 후 주소를 등록하여 사용할 수도 있습니다.
- 액세스 제어
- EKS는 AWS IAM과 Kubernetes의 인증/인가 체계를 양방향으로 통합합니다.
- 클러스터 접근 제어: IAM 사용자/역할을 Kubernetes
RBAC권한에 매핑하여, 누가 kubectl이나 AWS Console로 클러스터 리소스를 조회/수정할 수 있는지 제어합니다(Access Entry, aws-auth ConfigMap). - 워크로드 권한 제어: Kubernetes
ServiceAccount를 IAM Role에 연결하여, Pod 내 프로세스가 S3, DynamoDB 등 AWS 리소스에 접근할 수 있게 합니다(Pod Identity, IRSA)[1].
- 컴퓨팅 리소스
- 자체 관리노드(EC2 직접 관리)
- 관리형 노드 그룹(EC2 프로비저닝, 업데이트)
- EKS Auto Mode(EC2 기반인데 자동업데이트까지 AWS가 처리)
- Fargate(노드 개념없이 파드단위로 수행)
- Hybrid Nodes(온프렘 물리/가상머신을 EKS 클러스터와 함께 관리)
- 스토리지
- EBS 볼륨으로 자동화
- S3, EFS, FSX, 등등을 관리
- 보안
- 관리해주는 부분이 있지만 기본적으로 공동책임입니다.
- 노드, 컨테이너 및 운영체제, 애플리케이션, 네트워크 구성, 데이터 민감도 등에 대해서는 관리자가 책임을 두어야 합니다.
- Observability
- controlplane 로깅을 필요에 따라 수집할 수 있습니다.
- 노드의 메트릭과 워크로드의 메트릭을 필요에 따라 수집할 수 있습니다.
- 수집된 데이터들을 관리하여 살펴볼 수 있습니다.
- k8s 호환성
- k8s 호환 애플리케이션 및 커뮤니티 도구나 플러그인을 활용할 수 있습니다.
Pricing
- 클러스터 버전, EKS Auto mode 요금, EKS Hybrid Nodes의 vCPU 등에 따라 책정됩니다
- 워커노드 구성에 대한 AWS 리소스 비용도 별도 청구입니다. 이를테면 아래 요소에 대해 별도 청구가 됩니다:
- EC2 인스턴스
- EBS 볼륨
- 공인 IPv4 주소
EKS 배포
EKS 배포이후, 컨트롤플레인과 워커노드가 어떻게 되어있나 살펴보겠습니다.
배포를 위한 인프라 코드는 아래 링크에서 보실 수 있습니다.
EKS 컨트롤플레인 살펴보기
위 게시글을 통해 kubectl 구성까지 끝낸 후, 클러스터 정보를 직접 살펴봅시다.
# 권한이 없으면 이런식으로 나오고요,
➜ kubectl cluster-info

aws: [ERROR]: An error occurred (NoCredentials): Unable to locate credentials. You can configure credentials by running "aws login".
E0316 14:29:22.276247   64044 memcache.go:265] "Unhandled Error" err="couldn't get current server API group list: Get \"https://<REDACTED>.gr7.ap-northeast-2.eks.amazonaws.com/api?timeout=32s\": getting credentials: exec: executable aws failed with exit code 253"


# 권한이 있다면 이렇게 잘 나옵니다.
➜ kubectl cluster-info
Kubernetes control plane is running at https://<REDACTED>.gr7.ap-northeast-2.eks.amazonaws.com
CoreDNS is running at https://<REDACTED>.gr7.ap-northeast-2.eks.amazonaws.com/api/v1/namespaces/kube-system/services/kube-dns:dns/proxy

To further debug and diagnose cluster problems, use 'kubectl cluster-info dump'.
엔드포인트 살펴보기
그럼 이 클러스터의 기본 엔드포인트를 살펴봅시다.
EKS 컨트롤플레인의 API 서버 주소를 의미합니다.
EKS는 컨트롤플레인을 알아서 운영해주는데, 이 엔드포인트 주소를 가지고 붙을 수 있게 하는 거죠.
$ CLUSTER_NAME=myeks
$ aws eks describe-cluster --name $CLUSTER_NAME | jq
결과는 이렇게 나옵니다.
aws eks describe-cluster 결과 보기
{
  "cluster": {
    "name": "myeks",
    "arn": "arn:aws:eks:ap-northeast-2:<REDACTED>:cluster/myeks",
    "createdAt": "2026-03-16T14:06:15.352000+09:00",
    "version": "1.34",
    "endpoint": "https://<REDACTED>.gr7.ap-northeast-2.eks.amazonaws.com",
    "roleArn": "arn:aws:iam::<REDACTED>:role/myeks-cluster-20260316050551277100000001",
    "resourcesVpcConfig": {
      "subnetIds": [
        "subnet-0a66c507cd1ae00f3",
        "subnet-0d7424286c386a2b7",
        "subnet-0d9d5d7e487c0dafe"
      ],
      "securityGroupIds": [
        "sg-0e62731af4197ef62"
      ],
      "clusterSecurityGroupId": "sg-05df504d6bff7a7ba",
      "vpcId": "vpc-00ff35baf1e738380",
      "endpointPublicAccess": true,
      "endpointPrivateAccess": false,
      "publicAccessCidrs": [
        "0.0.0.0/0"
      ]
    },
    "kubernetesNetworkConfig": {
      "serviceIpv4Cidr": "10.100.0.0/16",
      "ipFamily": "ipv4",
      "elasticLoadBalancing": {
        "enabled": false
      }
    },
    "logging": {
      "clusterLogging": [
        {
          "types": [
            "api",
            "audit",
            "authenticator",
            "controllerManager",
            "scheduler"
          ],
          "enabled": false
        }
      ]
    },
    "identity": {
      "oidc": {
        "issuer": "https://oidc.eks.ap-northeast-2.amazonaws.com/id/<REDACTED>"
      }
    },
    "status": "ACTIVE",
    "certificateAuthority": {
      "data": "<REDACTED>"
    },
    "platformVersion": "eks.17",
    "tags": {
      "Terraform": "true",
      "Environment": "cloudneta-lab"
    },
    "encryptionConfig": [
      {
        "resources": [
          "secrets"
        ],
        "provider": {
          "keyArn": "arn:aws:kms:ap-northeast-2:<REDACTED>:key/aa8a0e01-9533-4970-aa93-fd45ea479b95"
        }
      }
    ],
    "accessConfig": {
      "authenticationMode": "API_AND_CONFIG_MAP"
    },
    "upgradePolicy": {
      "supportType": "EXTENDED"
    },
    "computeConfig": {
      "enabled": false,
      "nodePools": []
    },
    "storageConfig": {
      "blockStorage": {
        "enabled": false
      }
    },
    "deletionProtection": false,
    "controlPlaneScalingConfig": {
      "tier": "standard"
    }
  }
}
클러스터 주소에 dig 해봅시다.
➜ dig +short $APIDNS
52.79.150.59
54.116.106.230

➜ curl -s ipinfo.io/52.79.150.59
{
  "ip": "52.79.150.59",
  "hostname": "ec2-52-79-150-59.ap-northeast-2.compute.amazonaws.com",
  "city": "Incheon",
  "region": "Incheon",
  "country": "KR",
  "loc": "37.4565,126.7052",
  "org": "AS16509 Amazon.com, Inc.",
  "postal": "21505",
  "timezone": "Asia/Seoul",
  "readme": "https://ipinfo.io/missingauth"
}
EKS 노드 그룹 살펴보기
그렇다면 노드 그룹의 정보도 살펴보죠.
➜ aws eks describe-nodegroup --cluster-name $CLUSTER_NAME --nodegroup-name $CLUSTER_NAME-node-group | jq
{
  "nodegroup": {
    "nodegroupName": "myeks-node-group",
    "nodegroupArn": "arn:aws:eks:ap-northeast-2:<REDACTED>:nodegroup/myeks/myeks-node-group/18ce7a88-45b0-26ca-79aa-897adb6c7286",
    "clusterName": "myeks",
    "version": "1.34",
    "releaseVersion": "1.34.4-20260311",
    "createdAt": "2026-03-16T14:13:51.176000+09:00",
    "modifiedAt": "2026-03-16T14:44:37.827000+09:00",
    "status": "ACTIVE",
    "capacityType": "ON_DEMAND",
    "scalingConfig": {
      "minSize": 1,
      "maxSize": 4,
      "desiredSize": 2
    },
    "instanceTypes": [
      "t3.medium"
    ],
    "subnets": [
      "subnet-0a66c507cd1ae00f3",
      "subnet-0d7424286c386a2b7",
      "subnet-0d9d5d7e487c0dafe"
    ],
    "amiType": "AL2023_x86_64_STANDARD",
    "nodeRole": "arn:aws:iam::<REDACTED>:role/myeks-node-group-eks-node-group-20260316050607772700000005",
    "labels": {},
    "resources": {
      "autoScalingGroups": [
        {
          "name": "eks-myeks-node-group-18ce7a88-45b0-26ca-79aa-897adb6c7286"
        }
      ]
    },
    "health": {
      "issues": []
    },
    "updateConfig": {
      "maxUnavailablePercentage": 33
    },
    "launchTemplate": {
      "name": "default-20260316051342767300000008",
      "version": "1",
      "id": "lt-030f587db6333ef76"
    },
    "tags": {
      "Terraform": "true",
      "Environment": "cloudneta-lab",
      "Name": "myeks-node-group"
    }
  }
}
그럼 노드정보도 한번 볼까요?
쉽게말하면 k get nodes 한 내용에서 추가 컬럼을 더 살펴보는 겁니다. 이러면 인스턴스 타입, capacity type, zone 정보까지 다 나오죠.
➜ k get node
NAME                                               STATUS   ROLES    AGE   VERSION
ip-192-168-1-199.ap-northeast-2.compute.internal   Ready    <none>   37m   v1.34.4-eks-f69f56f
ip-192-168-2-160.ap-northeast-2.compute.internal   Ready    <none>   37m   v1.34.4-eks-f69f56f

➜ kubectl get node --label-columns=node.kubernetes.io/instance-type
NAME                                               STATUS   ROLES    AGE   VERSION               INSTANCE-TYPE
ip-192-168-1-199.ap-northeast-2.compute.internal   Ready    <none>   39m   v1.34.4-eks-f69f56f   t3.medium
ip-192-168-2-160.ap-northeast-2.compute.internal   Ready    <none>   39m   v1.34.4-eks-f69f56f   t3.medium

# 이렇게 컬럼이 잘못기재되면 안나오고
➜ kubectl get node --label-columns=node.kubernetes.io/capacityType
NAME                                               STATUS   ROLES    AGE   VERSION               CAPACITYTYPE
ip-192-168-1-199.ap-northeast-2.compute.internal   Ready    <none>   39m   v1.34.4-eks-f69f56f
ip-192-168-2-160.ap-northeast-2.compute.internal   Ready    <none>   39m   v1.34.4-eks-f69f56f

# 어느 레이블 컬럼에 맞는지 제대로 해야 나오죠
➜ kubectl get node --label-columns=eks.amazonaws.com/capacityType
NAME                                               STATUS   ROLES    AGE   VERSION               CAPACITYTYPE
ip-192-168-1-199.ap-northeast-2.compute.internal   Ready    <none>   40m   v1.34.4-eks-f69f56f   ON_DEMAND
ip-192-168-2-160.ap-northeast-2.compute.internal   Ready    <none>   40m   v1.34.4-eks-f69f56f   ON_DEMAND

# 한번에보기는 이렇게 할 수 있습니다.
➜ kubectl get node --label-columns=node.kubernetes.io/instance-type,eks.amazonaws.com/capacityType,topology.kubernetes.io/zone
NAME                                               STATUS   ROLES    AGE   VERSION               INSTANCE-TYPE   CAPACITYTYPE   ZONE
ip-192-168-1-199.ap-northeast-2.compute.internal   Ready    <none>   37m   v1.34.4-eks-f69f56f   t3.medium       ON_DEMAND      ap-northeast-2a
ip-192-168-2-160.ap-northeast-2.compute.internal   Ready    <none>   37m   v1.34.4-eks-f69f56f   t3.medium       ON_DEMAND      ap-northeast-2b
그럼 이어서 인증관련 내용도 살펴볼까요?
➜ kubectl get node -v=6
I0316 14:56:19.198880   84746 cmd.go:527] kubectl command headers turned on
I0316 14:56:19.256942   84746 loader.go:402] Config loaded from file:  /home/l4in/.kube/config
I0316 14:56:19.257162   84746 envvar.go:172] "Feature gate default state" feature="WatchListClient" enabled=false
I0316 14:56:19.257193   84746 envvar.go:172] "Feature gate default state" feature="ClientsAllowCBOR" enabled=false
I0316 14:56:19.257199   84746 envvar.go:172] "Feature gate default state" feature="ClientsPreferCBOR" enabled=false
I0316 14:56:19.257203   84746 envvar.go:172] "Feature gate default state" feature="InOrderInformers" enabled=true
I0316 14:56:19.257207   84746 envvar.go:172] "Feature gate default state" feature="InformerResourceVersion" enabled=false
I0316 14:56:20.003858   84746 round_trippers.go:632] "Response" verb="GET" url="https://<REDACTED>.gr7.ap-northeast-2.eks.amazonaws.com/api/v1/nodes?limit=500" status="200 OK" milliseconds=743
NAME                                               STATUS   ROLES    AGE   VERSION
ip-192-168-1-199.ap-northeast-2.compute.internal   Ready    <none>   41m   v1.34.4-eks-f69f56f
ip-192-168-2-160.ap-northeast-2.compute.internal   Ready    <none>   41m   v1.34.4-eks-f69f56f
kubeconfig 을 흔히 보는 yaml 양식에 맞게 다시 보시죠.
➜ k config view
apiVersion: v1
clusters:
- cluster:
    certificate-authority-data: DATA+OMITTED
    server: https://<REDACTED>.gr7.ap-northeast-2.eks.amazonaws.com
  name: arn:aws:eks:ap-northeast-2:<REDACTED>:cluster/myeks
contexts:
- context:
    cluster: arn:aws:eks:ap-northeast-2:<REDACTED>:cluster/myeks
    user: arn:aws:eks:ap-northeast-2:<REDACTED>:cluster/myeks
  name: myeks
current-context: myeks
kind: Config
users:
- name: arn:aws:eks:ap-northeast-2:<REDACTED>:cluster/myeks
  user:
    exec:
      apiVersion: client.authentication.k8s.io/v1beta1
      args:
      - --region
      - ap-northeast-2
      - eks
      - get-token
      - --cluster-name
      - myeks
      - --output
      - json
      command: aws
      env: null
      interactiveMode: IfAvailable
      provideClusterInfo: false
그리고 EKS 클러스터에 사용하는 임시 토큰도 살펴보시죠. JWT 토큰이 아닌 점에 유의하시기 바랍니다.
➜ aws eks get-token --cluster-name $CLUSTER_NAME --region ap-northeast-2 | jq
{
  "kind": "ExecCredential",
  "apiVersion": "client.authentication.k8s.io/v1beta1",
  "spec": {},
  "status": {
    "expirationTimestamp": "2026-03-16T06:13:51Z",
    "token": "k8s-aws-v1.<REDACTED>"
  }
}
시스템 파드정보 살펴보기
그렇다면 이 인증정보로 파드정보도 살펴봅시다.
kubectl 로 RBAC 범위 내의 작업이 된다는 것이지, 컨트롤플레인에 접속하는 것이 아닙니다! 즉,
- 컨트롤플레인에 쉘 접근은 안됩니다
- 컨트롤플레인 컴포넌트 일부(상술한
etcd,kube-apiserver,kube-controller-manager,kube-scheduler)는 안보입니다- kubeadm으로 띄웠다면 StaticPod로 다 볼 수 있었겠지만요. 이 관리를 AWS가 위임해주는거죠
➜ k get pods -n kube-system
NAME                      READY   STATUS    RESTARTS   AGE
aws-node-klqxp            2/2     Running   0          118m
aws-node-rlmg4            2/2     Running   0          118m
coredns-d487b6fcb-7hk2d   1/1     Running   0          117m
coredns-d487b6fcb-tjln6   1/1     Running   0          117m
kube-proxy-9x6j7          1/1     Running   0          117m
kube-proxy-r5skf          1/1     Running   0          117m

➜ k get pods -n kube-system -owide
NAME                      READY   STATUS    RESTARTS   AGE    IP              NODE                                               NOMINATED NODE   READINESS GATES
aws-node-klqxp            2/2     Running   0          121m   192.168.2.160   ip-192-168-2-160.ap-northeast-2.compute.internal   <none>           <none>
aws-node-rlmg4            2/2     Running   0          121m   192.168.1.199   ip-192-168-1-199.ap-northeast-2.compute.internal   <none>           <none>
coredns-d487b6fcb-7hk2d   1/1     Running   0          120m   192.168.2.58    ip-192-168-2-160.ap-northeast-2.compute.internal   <none>           <none>
coredns-d487b6fcb-tjln6   1/1     Running   0          120m   192.168.1.138   ip-192-168-1-199.ap-northeast-2.compute.internal   <none>           <none>
kube-proxy-9x6j7          1/1     Running   0          120m   192.168.1.199   ip-192-168-1-199.ap-northeast-2.compute.internal   <none>           <none>
kube-proxy-r5skf          1/1     Running   0          120m   192.168.2.160   ip-192-168-2-160.ap-northeast-2.compute.internal   <none>           <none>

➜ k get pod -A
NAMESPACE     NAME                      READY   STATUS    RESTARTS   AGE
kube-system   aws-node-klqxp            2/2     Running   0          123m
kube-system   aws-node-rlmg4            2/2     Running   0          123m
kube-system   coredns-d487b6fcb-7hk2d   1/1     Running   0          122m
kube-system   coredns-d487b6fcb-tjln6   1/1     Running   0          122m
kube-system   kube-proxy-9x6j7          1/1     Running   0          122m
kube-system   kube-proxy-r5skf          1/1     Running   0          122m
가만보면 온프렘 쿠버네티스에서의 코어 리소스가 안보입니다.
kube-apiserveretcdkube-schedulerkube-controller-manager
그리고 aws-node 라는 요소가 있습니다. 이것은 후술할 VPC CNI 플러그인 입니다. ENI로 파드에 VPC IP를 직접 할당하죠.
또한 kube-system 의 k get deploy,ds,pod,cm,secret,svc,ep,endpointslice,pdb,sa,role,rolebinding -n kube-system 명령을 내려, 어떤 요소가 있나 살펴봅시다.
kube-system 의 오브젝트 상세보기
➜ kubectl get deploy,ds,pod,cm,secret,svc,ep,endpointslice,pdb,sa,role,rolebinding -n kube-system
Warning: v1 Endpoints is deprecated in v1.33+; use discovery.k8s.io/v1 EndpointSlice
NAME                      READY   UP-TO-DATE   AVAILABLE   AGE
deployment.apps/coredns   2/2     2            2           125m

NAME                        DESIRED   CURRENT   READY   UP-TO-DATE   AVAILABLE   NODE SELECTOR   AGE
daemonset.apps/aws-node     2         2         2       2            2           <none>          127m
daemonset.apps/kube-proxy   2         2         2       2            2           <none>          125m

NAME                          READY   STATUS    RESTARTS   AGE
pod/aws-node-klqxp            2/2     Running   0          125m
pod/aws-node-rlmg4            2/2     Running   0          125m
pod/coredns-d487b6fcb-7hk2d   1/1     Running   0          125m
pod/coredns-d487b6fcb-tjln6   1/1     Running   0          125m
pod/kube-proxy-9x6j7          1/1     Running   0          125m
pod/kube-proxy-r5skf          1/1     Running   0          125m

NAME                                                             DATA   AGE
configmap/amazon-vpc-cni                                         7      127m
configmap/aws-auth                                               1      126m
configmap/coredns                                                1      125m
configmap/extension-apiserver-authentication                     6      129m
configmap/kube-apiserver-legacy-service-account-token-tracking   1      129m
configmap/kube-proxy                                             1      125m
configmap/kube-proxy-config                                      1      125m
configmap/kube-root-ca.crt                                       1      128m

NAME                                TYPE        CLUSTER-IP      EXTERNAL-IP   PORT(S)                  AGE
service/eks-extension-metrics-api   ClusterIP   10.100.102.66   <none>        443/TCP                  129m
service/kube-dns                    ClusterIP   10.100.0.10     <none>        53/UDP,53/TCP,9153/TCP   125m

NAME                                  ENDPOINTS                                                       AGE
endpoints/eks-extension-metrics-api   172.0.32.0:10443                                                129m
endpoints/kube-dns                    192.168.1.138:53,192.168.2.58:53,192.168.1.138:53 + 3 more...   125m

NAME                                                             ADDRESSTYPE   PORTS        ENDPOINTS                    AGE
endpointslice.discovery.k8s.io/eks-extension-metrics-api-4rcw7   IPv4          10443        172.0.32.0                   128m
endpointslice.discovery.k8s.io/kube-dns-hd2lp                    IPv4          9153,53,53   192.168.2.58,192.168.1.138   125m

NAME                                 MIN AVAILABLE   MAX UNAVAILABLE   ALLOWED DISRUPTIONS   AGE
poddisruptionbudget.policy/coredns   N/A             1                 1                     125m

NAME                                                         SECRETS   AGE
serviceaccount/attachdetach-controller                       0         128m
serviceaccount/aws-cloud-provider                            0         129m
serviceaccount/aws-node                                      0         127m
serviceaccount/certificate-controller                        0         128m
serviceaccount/clusterrole-aggregation-controller            0         128m
serviceaccount/coredns                                       0         125m
serviceaccount/cronjob-controller                            0         128m
serviceaccount/daemon-set-controller                         0         128m
serviceaccount/default                                       0         128m
serviceaccount/deployment-controller                         0         128m
serviceaccount/disruption-controller                         0         128m
serviceaccount/endpoint-controller                           0         128m
serviceaccount/endpointslice-controller                      0         128m
serviceaccount/endpointslicemirroring-controller             0         128m
serviceaccount/ephemeral-volume-controller                   0         128m
serviceaccount/expand-controller                             0         128m
serviceaccount/generic-garbage-collector                     0         128m
serviceaccount/horizontal-pod-autoscaler                     0         128m
serviceaccount/job-controller                                0         128m
serviceaccount/kube-proxy                                    0         125m
serviceaccount/legacy-service-account-token-cleaner          0         128m
serviceaccount/namespace-controller                          0         128m
serviceaccount/node-controller                               0         129m
serviceaccount/persistent-volume-binder                      0         128m
serviceaccount/pod-garbage-collector                         0         128m
serviceaccount/pv-protection-controller                      0         128m
serviceaccount/pvc-protection-controller                     0         128m
serviceaccount/replicaset-controller                         0         128m
serviceaccount/replication-controller                        0         128m
serviceaccount/resource-claim-controller                     0         128m
serviceaccount/resourcequota-controller                      0         128m
serviceaccount/root-ca-cert-publisher                        0         128m
serviceaccount/service-account-controller                    0         128m
serviceaccount/service-cidrs-controller                      0         128m
serviceaccount/service-controller                            0         129m
serviceaccount/statefulset-controller                        0         128m
serviceaccount/tagging-controller                            0         129m
serviceaccount/ttl-after-finished-controller                 0         128m
serviceaccount/ttl-controller                                0         128m
serviceaccount/validatingadmissionpolicy-status-controller   0         128m
serviceaccount/volumeattributesclass-protection-controller   0         128m

NAME                                                                            CREATED AT
role.rbac.authorization.k8s.io/eks-vpc-resource-controller-role                 2026-03-16T05:11:47Z
role.rbac.authorization.k8s.io/eks:addon-manager                                2026-03-16T05:11:44Z
role.rbac.authorization.k8s.io/eks:authenticator                                2026-03-16T05:11:40Z
role.rbac.authorization.k8s.io/eks:az-poller                                    2026-03-16T05:11:40Z
role.rbac.authorization.k8s.io/eks:coredns-autoscaler                           2026-03-16T05:11:40Z
role.rbac.authorization.k8s.io/eks:fargate-manager                              2026-03-16T05:11:44Z
role.rbac.authorization.k8s.io/eks:network-policy-controller                    2026-03-16T05:11:47Z
role.rbac.authorization.k8s.io/eks:node-manager                                 2026-03-16T05:11:44Z
role.rbac.authorization.k8s.io/eks:service-operations-configmaps                2026-03-16T05:11:40Z
role.rbac.authorization.k8s.io/extension-apiserver-authentication-reader        2026-03-16T05:11:38Z
role.rbac.authorization.k8s.io/system::leader-locking-kube-controller-manager   2026-03-16T05:11:38Z
role.rbac.authorization.k8s.io/system::leader-locking-kube-scheduler            2026-03-16T05:11:38Z
role.rbac.authorization.k8s.io/system:controller:bootstrap-signer               2026-03-16T05:11:38Z
role.rbac.authorization.k8s.io/system:controller:cloud-provider                 2026-03-16T05:11:38Z
role.rbac.authorization.k8s.io/system:controller:token-cleaner                  2026-03-16T05:11:38Z

NAME                                                                                      ROLE                                                  AGE
rolebinding.rbac.authorization.k8s.io/eks-vpc-resource-controller-rolebinding             Role/eks-vpc-resource-controller-role                 128m
rolebinding.rbac.authorization.k8s.io/eks:addon-manager                                   Role/eks:addon-manager                                129m
rolebinding.rbac.authorization.k8s.io/eks:authenticator                                   Role/eks:authenticator                                129m
rolebinding.rbac.authorization.k8s.io/eks:az-poller                                       Role/eks:az-poller                                    129m
rolebinding.rbac.authorization.k8s.io/eks:coredns-autoscaler                              Role/eks:coredns-autoscaler                           129m
rolebinding.rbac.authorization.k8s.io/eks:fargate-manager                                 Role/eks:fargate-manager                              129m
rolebinding.rbac.authorization.k8s.io/eks:network-policy-controller                       Role/eks:network-policy-controller                    128m
rolebinding.rbac.authorization.k8s.io/eks:node-manager                                    Role/eks:node-manager                                 129m
rolebinding.rbac.authorization.k8s.io/eks:service-operations                              Role/eks:service-operations-configmaps                129m
rolebinding.rbac.authorization.k8s.io/system::extension-apiserver-authentication-reader   Role/extension-apiserver-authentication-reader        129m
rolebinding.rbac.authorization.k8s.io/system::leader-locking-kube-controller-manager      Role/system::leader-locking-kube-controller-manager   129m
rolebinding.rbac.authorization.k8s.io/system::leader-locking-kube-scheduler               Role/system::leader-locking-kube-scheduler            129m
rolebinding.rbac.authorization.k8s.io/system:controller:bootstrap-signer                  Role/system:controller:bootstrap-signer               129m
rolebinding.rbac.authorization.k8s.io/system:controller:cloud-provider                    Role/system:controller:cloud-provider                 129m
rolebinding.rbac.authorization.k8s.io/system:controller:token-cleaner                     Role/system:controller:token-cleaner                  129m
그리고 이 파드의 컨테이너 정보도 함께 보시죠.
➜ kubectl get pods --all-namespaces -o jsonpath="{.items[*].spec.containers[*].image}" | tr -s '[[:space:]]' '\n' | sort | uniq -c
      2 602401143452.dkr.ecr.ap-northeast-2.amazonaws.com/amazon-k8s-cni:v1.21.1-eksbuild.3
      2 602401143452.dkr.ecr.ap-northeast-2.amazonaws.com/amazon/aws-network-policy-agent:v1.3.1-eksbuild.1
      2 602401143452.dkr.ecr.ap-northeast-2.amazonaws.com/eks/coredns:v1.13.2-eksbuild.3
      2 602401143452.dkr.ecr.ap-northeast-2.amazonaws.com/eks/kube-proxy:v1.34.3-eksbuild.5
그리고 kube-proxy, coredns, aws-node 의 정보도 살펴보시죠. 이 정보는 너무 방대해서 별도 내용으로 살펴보는 것이 좋겠습니다.
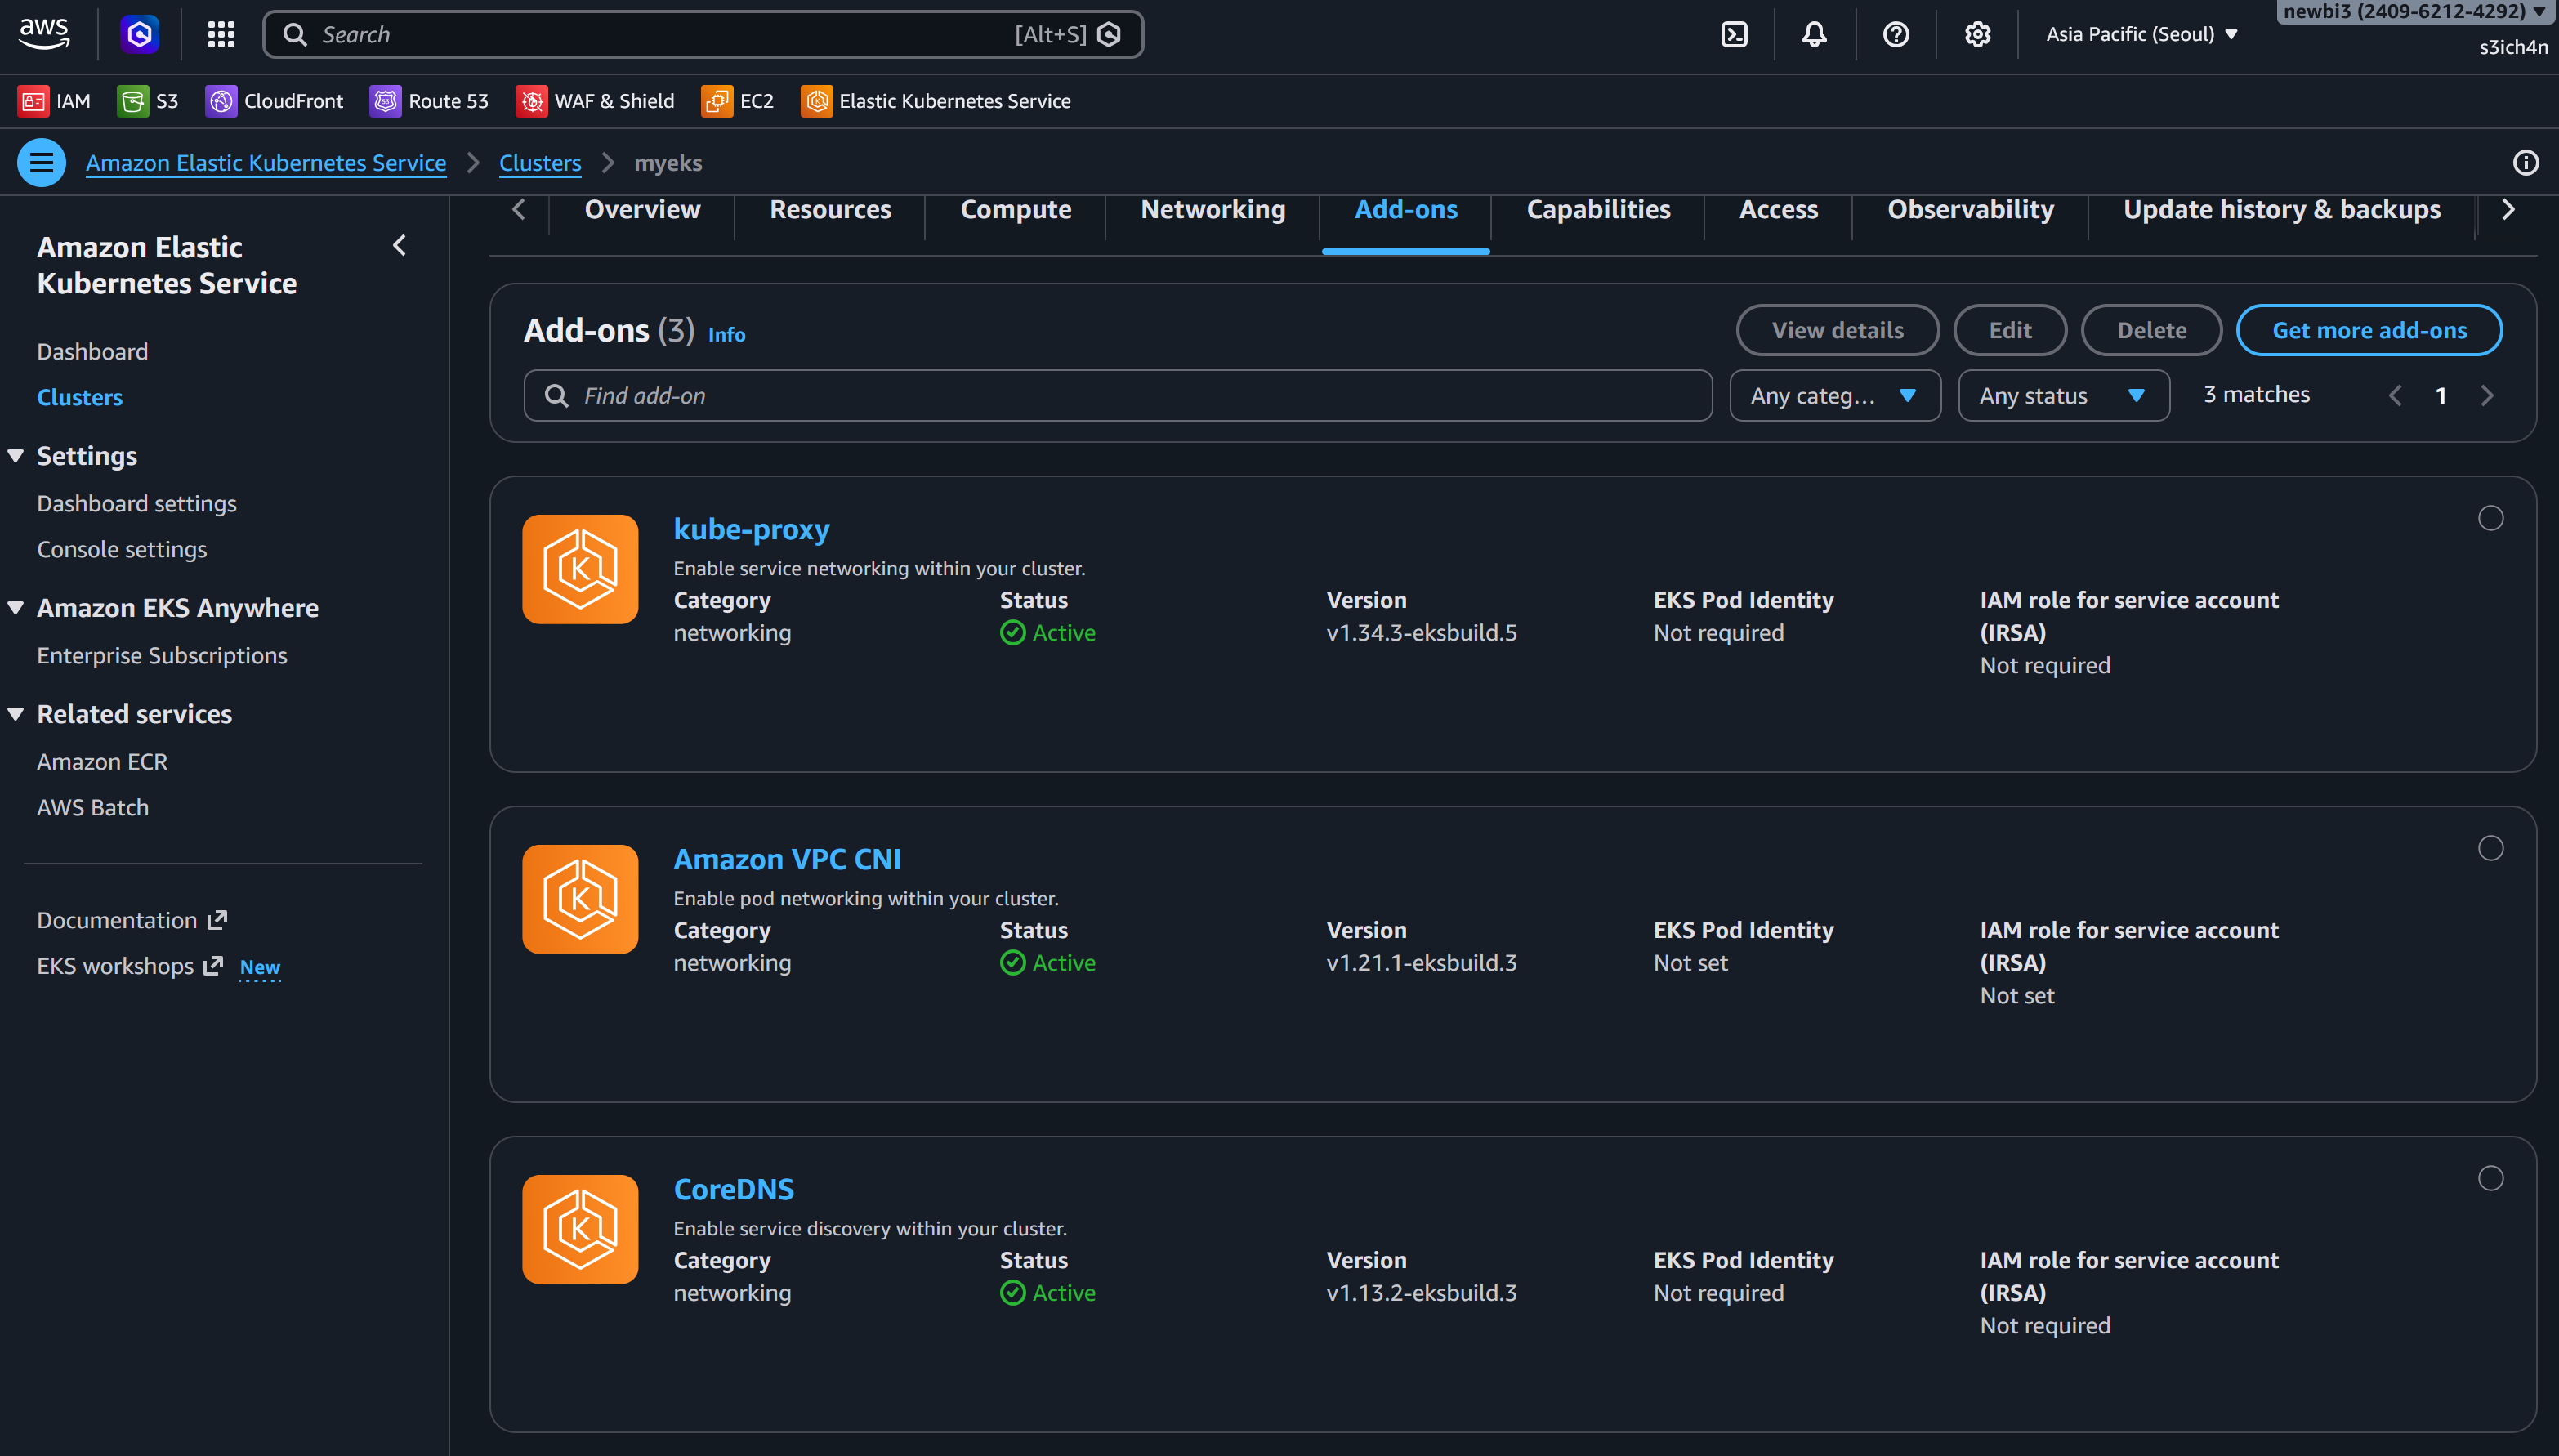
애드온 정보 살펴보기
설치된 애드온의 내용도 읽어보시죠.
➜ aws eks list-addons --cluster-name myeks | jq
{
  "addons": [
    "coredns",
    "kube-proxy",
    "vpc-cni"
  ]
}
이를 AWS 콘솔에서 살펴보면 아래와 같이 볼 수 있습니다:
EKS의 워커노드 살펴보기
그렇다면 컨트롤플레인을 살펴봤으니 워커노드를 살펴봅시다. 먼저 관리형 노드그룹부터 살펴보시죠.
EKS 노드그룹은 EC2 ASG(Auto Scaling Group) 으로 관리됩니다. 따라서 이는 노드가 스케일아웃될 때 어떤 설정으로 EC2 가 구동되는지를 살펴보는 것입니다.
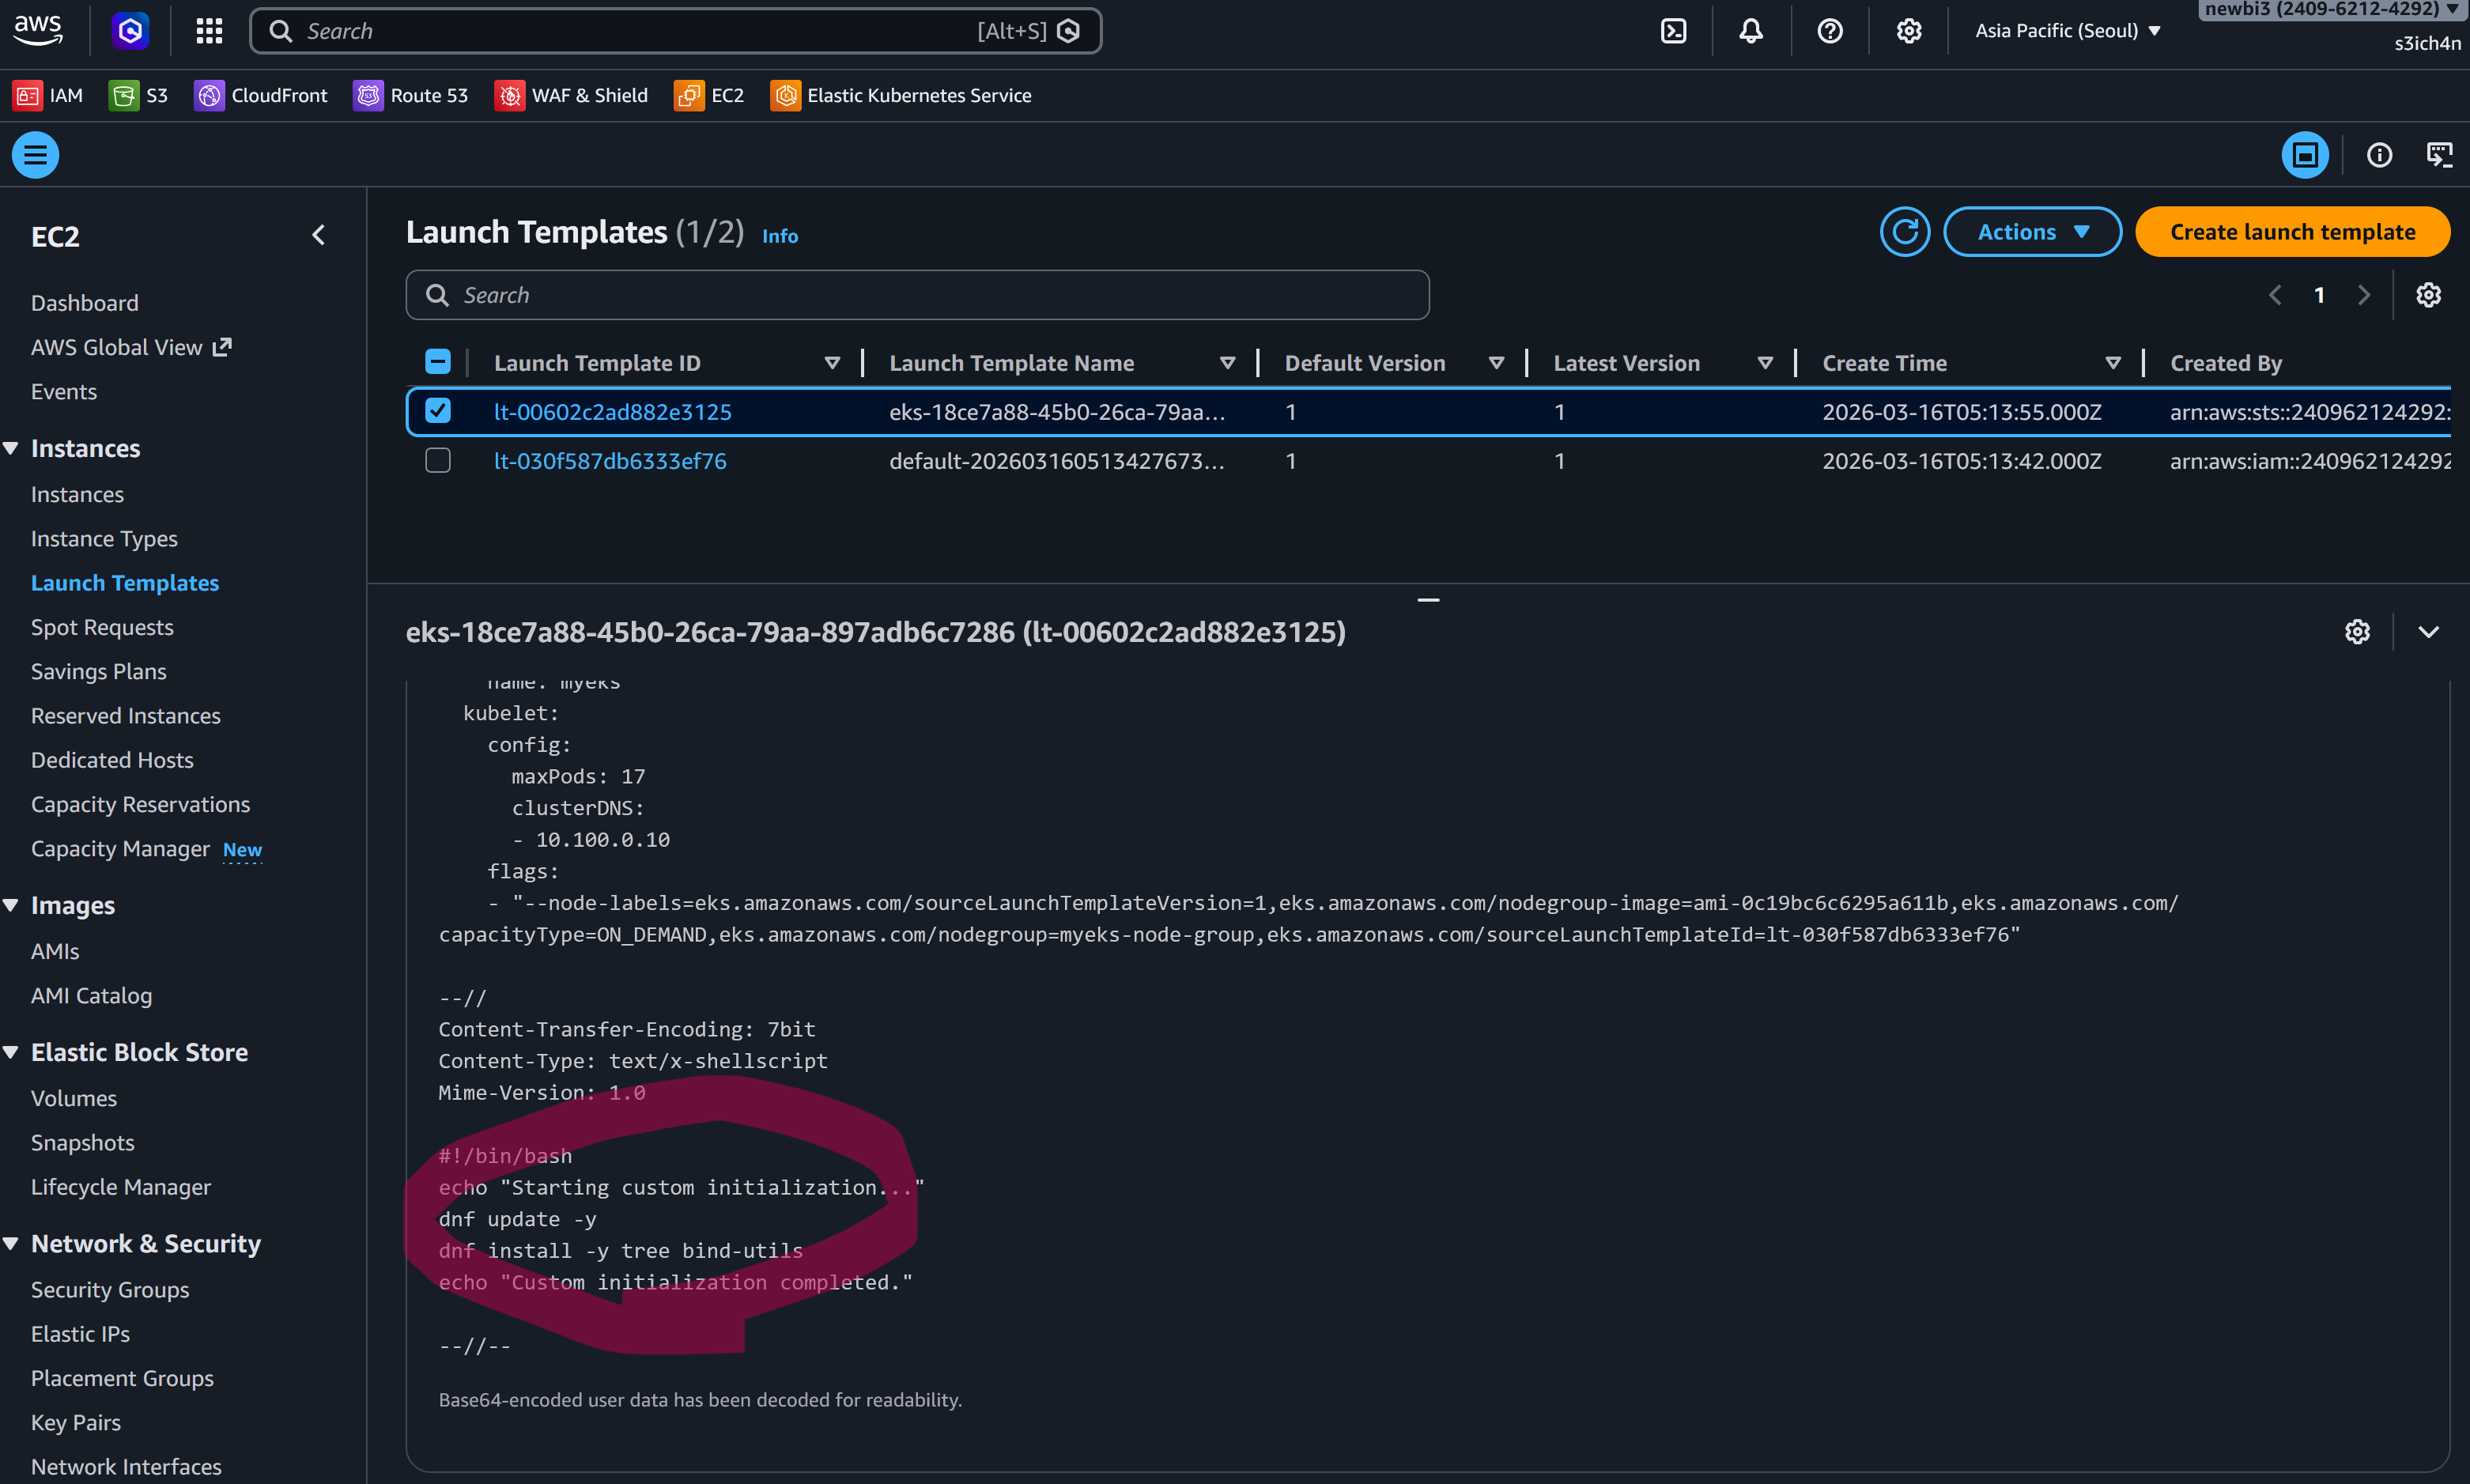
앞서 EKS 모듈생성 시 노드그룹을 생성할 때의 코드를 다시 보시죠. 일부를 살펴보겠습니다.
# EKS Managed Node Group(s)
eks_managed_node_groups = {
  default = {
    name             = "${var.ClusterBaseName}-node-group"
    use_name_prefix  = false
    instance_types   = ["${var.WorkerNodeInstanceType}"]
    desired_size     = var.WorkerNodeCount
    max_size         = var.WorkerNodeCount + 2
    min_size         = var.WorkerNodeCount - 1
    disk_size        = var.WorkerNodeVolumesize
    subnets          = module.vpc.public_subnets
    key_name         = "${var.KeyName}"
    vpc_security_group_ids = [aws_security_group.node_group_sg.id]

    # AL2023 전용 userdata 주입
    cloudinit_pre_nodeadm = [
      {
        content_type = "text/x-shellscript"
        content      = <<-EOT
          #!/bin/bash
          echo "Starting custom initialization..."
          dnf update -y
          dnf install -y tree bind-utils
          echo "Custom initialization completed."
        EOT
      }
    ]
  }
}
AL2023으로 구동되는 워커노드에, 앞서 코드로 살펴보았던 userdata가 nodeadm 구성 전 담고있는 컨텐츠가 담겨있는 것을 볼 수 있습니다.
노드를 SSH로 접속해보기
아래와같이 public ip를 확인하고 ping 을 쏴봅시다.
aews on main [!?] on ☁️ (ap-northeast-2)
➜ aws ec2 describe-instances --query "Reservations[*].Instances[*].{PublicIPAdd:PublicIpAddress,PrivateIPAdd:PrivateIpAddress,InstanceName:Tags[?Key=='Name']|[0].Value,Status:State.Name}" --filters Name=instance-state-name,Values=running --output table
--------------------------------------------------------------------
| DescribeInstances |
+------------------+-----------------+------------------+----------+
| InstanceName | PrivateIPAdd | PublicIPAdd | Status |
+------------------+-----------------+------------------+----------+
| myeks-node-group| 192.168.2.160 | 16.184.46.4 | running |
| myeks-node-group| 192.168.1.199 | 13.125.181.227 | running |
+------------------+-----------------+------------------+----------+
aews on main [!?] on ☁️ (ap-northeast-2)
➜ ping -c 1 $NODE1
PING 16.184.46.4 (16.184.46.4) 56(84) bytes of data.
64 bytes from 16.184.46.4: icmp_seq=1 ttl=119 time=5.07 ms
--- 16.184.46.4 ping statistics ---
1 packets transmitted, 1 received, 0% packet loss, time 0ms
rtt min/avg/max/mdev = 5.067/5.067/5.067/0.000 ms
aews on main [!?] on ☁️ (ap-northeast-2)
➜ ping -c 1 $NODE2
PING 13.125.181.227 (13.125.181.227) 56(84) bytes of data.
64 bytes from 13.125.181.227: icmp_seq=1 ttl=119 time=5.46 ms
--- 13.125.181.227 ping statistics ---
1 packets transmitted, 1 received, 0% packet loss, time 0ms
rtt min/avg/max/mdev = 5.456/5.456/5.456/0.000 ms
SSH가 붙을 수 있는지 보안그룹도 확인해보고,
➜ aws ec2 describe-security-groups --filters "Name=tag:Name,Values=myeks-node-group-sg" --query 'SecurityGroups[*].IpPermissions' --output text
-1
IPRANGES        <REDACTED>/32
IPRANGES        <REDACTED>/32
워커노드 SSH에 접속해봅시다.
# 설정을 마친 후
ssh -i ~/.ssh/id_rsa -o StrictHostKeyChecking=no ec2-user@$NODE1 hostname
ssh -i ~/.ssh/id_rsa -o StrictHostKeyChecking=no ec2-user@$NODE2 hostname
ssh -o StrictHostKeyChecking=no ec2-user@$NODE1 hostname
ssh -o StrictHostKeyChecking=no ec2-user@$NODE2 hostname

# 붙어봅시다
ssh ec2-user@$NODE1
exit

ssh ec2-user@$NODE2
exit
접속 후 아래 사항을 확인해봅시다 - 운영체제 수준의 설정
EKS 워커노드가 파드를 받고 실행하기 위해서는 운영체제 레벨에서 갖추어야 할 전제조건이 있습니다. 이를 위한 아래 요소들을 살펴볼 것입니다.
- swap이 비활성화되어 있는지(kubelet은 기본적으로 swap이 켜져 있으면 시작을 거부)
- overlay 및 br_netfilter 커널 모듈이 로드되어 있는지(컨테이너 파일시스템과 Pod 네트워킹의 기반)
- cgroup 버전이 v2인지(Kubernetes 1.31부터 v1은 maintenance mode)
- SELinux 상태가
Permissive인지 - containerd가 이미지 레이어를 snapshot으로 관리하는 구조가 되어있는지
호스트 정보 살펴보기
기본 커널정보와 하드웨어 모델을 살펴봅니다.
[root@ip-192-168-1-199 ~]# hostnamectl
Virtualization: amazon
Operating System: Amazon Linux 2023.10.20260302
    CPE OS Name: cpe:2.3:o:amazon:amazon_linux:2023
        Kernel: Linux 6.12.73-95.123.amzn2023.x86_64
    Architecture: x86-64
Hardware Vendor: Amazon EC2
Hardware Model: t3.medium
Firmware Version: 1.0
SELinux 설정 살펴보기
쿠버네티스는 Permissive 상태를 권장하기 때문에 살펴봅니다
[root@ip-192-168-1-199 ~]# getenforce
Permissive
[root@ip-192-168-1-199 ~]# sestatus
SELinux status:                 enabled
SELinuxfs mount:                /sys/fs/selinux
SELinux root directory:         /etc/selinux
Loaded policy name:             targeted
Current mode:                   permissive
Mode from config file:          permissive
Policy MLS status:              enabled
Policy deny_unknown status:     allowed
Memory protection checking:     actual (secure)
Max kernel policy version:      33
Swap 비활성화
kubelet의 권장사항. swap 영역을 안쓰길 원하기때문에, 노드에서 안쓰는지 살펴봅니다
[root@ip-192-168-1-199 ~]# free -h
            total        used        free      shared  buff/cache   available
Mem:           3.7Gi       338Mi       2.1Gi       1.0Mi       1.3Gi       3.2Gi
Swap:             0B          0B          0B
[root@ip-192-168-1-199 ~]# cat /etc/fstab
#
UUID=d306b125-f320-4f7c-8e41-c19d118b25e5     /           xfs    defaults,noatime  1   1
UUID=3D07-3F7F        /boot/efi       vfat    defaults,noatime,uid=0,gid=0,umask=0077,shortname=winnt,x-systemd.automount 0 2
cgroup v2 를 사용중인지 확인
v1.31 부터 cgroup v2로 넘어가도록 권장되었기 때문입니다. 참고링크
[root@ip-192-168-1-199 ~]# stat -fc %T /sys/fs/cgroup/
cgroup2fs
overlay 커널모듈 로드 확인
컨테이너의 파일 시스템 레이어 구성때문[2]입니다.
[root@ip-192-168-1-199 ~]# lsmod | grep overlay
overlay               217088  7
containerd 스냅샷 목록 보기[3]
# committed, active 를 구별해서 봅니다
ctr -n k8s.io snapshots ls

WARN[0000] DEPRECATION: The `bin_dir` property of `[plugins."io.containerd.cri.v1.runtime".cni`] is deprecated since containerd v2.1 and will be removed in containerd v2.3. Use `bin_dirs` in the same section instead.
KEY                                                                     PARENT                                                                  KIND
0e262d76e07ecd76963de327daec1e9d140865cfbd718de0ed31470f583d762d        sha256:1d29ddbe3fde80e61545aa67618e2c9f9c66c6c10514bf0b25c462e6c7ca95ea Active
1049323a8f33b8ea94ed51af317f5ca67d24ed7636c36009d29dee369c3756ff        sha256:d04a986803441bd3b5d521f093922b292e6adf38b1d473f320f3175b564ac95c Active
...
sha256:0bd8e49760ea4d211127dd0f42d909f2c066a4eaeeff687dd69d024ce4beeb71                                                                         Committed
sha256:1d29ddbe3fde80e61545aa67618e2c9f9c66c6c10514bf0b25c462e6c7ca95ea sha256:ef780f5b36fc0627e5662be1a6fb38fecf3b631c7ce925c4f62c65210d336dc4 Committed
...
sha256:49a7e69f58181559d964d51d3b5599480c9efad4d5b163095d0d163f6ef96882 sha256:cc074875b494aa2a3446b7977f22ea0c3b7e37bf850611614c3c82d6df96253b Committed
sha256:53a62a8cd216d79469b5fa82ff265302c5c00878bdeaad00042da40a049311b9                                                                         Committed
sha256:6978733d716fbedf6708fb8062a8aaf2236c77356ed8b5f583b54e758bf3cd2f sha256:8da4d76fd64eb2a33751853a1f60f672fcc204d5c5e6d84a8350890b1aad0eee Committed
sha256:7aadb4f9fcfff538563b51bad2fa2eb5e44e4fdf55b5712720b09260f755e084 sha256:53a62a8cd216d79469b5fa82ff265302c5c00878bdeaad00042da40a049311b9 Committed
...
sha256:f51db364c6b29a572234d37e29bac943ca56de484a471a241f098192bafba7c0 sha256:332cd5791f6431b7da15c3d7f47cc734d62aaeda09959775946713a4e20ee88c Committed

# 실제 노드 디스크 어디에서 용량을 차지하고있나 살펴볼 수 있습니다
ls -la /var/lib/containerd/io.containerd.snapshotter.v1.overlayfs/snapshots/

[root@ip-192-168-2-160 ~] ls -la /var/lib/containerd/io.containerd.snapshotter.v1.overlayfs/snapshots/
total 16
drwx------. 36 root root 16384 Mar 16 05:15 .
drwx------.  3 root root    42 Mar 11 20:30 ..
drwx------.  4 root root    28 Mar 11 20:33 10
...
drwx------.  4 root root    28 Mar 16 05:15 42
drwx------.  4 root root    28 Mar 16 05:15 43

# 어떻게 합쳐져서 컨테이너의 rootfs가 되는지 볼 수 있습니다.
tree /var/lib/containerd/io.containerd.snapshotter.v1.overlayfs/snapshots/ -L 3
/var/lib/containerd/io.containerd.snapshotter.v1.overlayfs/snapshots/
├── 12                          # 베이스 OS 레이어 (committed snapshot)
│   ├── fs
│   │   ├── bin -> usr/bin
│   │   ├── etc
│   │   ├── home
│   │   ├── lib -> usr/lib
│   │   ├── proc
│   │   ├── usr
│   │   └── var
│   └── work
├── 13                          # 그 위에 쌓인 이미지 레이어 (committed snapshot)
│   ├── fs
│   │   ├── etc
│   │   ├── usr
│   │   └── var
│   └── work
├── 10                          # pause 컨테이너 레이어
│   ├── fs
│   │   └── pause
│   └── work
├── 42                          # coredns 바이너리 레이어
│   ├── fs
│   │   └── coredns
│   └── work
├── 16                          # active snapshot (컨테이너 쓰기 레이어)
│   ├── fs
│   │   ├── etc
│   │   ├── host
│   │   └── run
│   └── work
│       └── work                # work 하위에 work가 있으면 overlayfs가
└── ...                         # 실제 마운트해서 사용 중이라는 뜻
containerd 의 경우, AI의 도움을 받아 레이어를 살펴보는 스크립트를 작성하여 구동해 보았습니다.
snapshot_tree.py 코드
#!/usr/bin/env python3
"""
containerd snapshot 부모-자식 관계를 트리로 시각화하고,
--verify 옵션 시 ctr로 실제 컨테이너/이미지와 매핑합니다.

사용법:
  ctr -n k8s.io snapshots ls | python3 snapshot_tree.py
  ctr -n k8s.io snapshots ls | python3 snapshot_tree.py --verify
"""

import sys
import json
import subprocess
from collections import defaultdict


def short(sha: str) -> str:
    if sha.startswith("sha256:"):
        return sha[7:19]
    return sha[:12] if len(sha) > 12 else sha


def short_image(image: str) -> str:
    """registry/repo/name:tag → name:tag"""
    name = image.rsplit("/", 1)[-1]
    if "@sha256:" in name:
        base, digest = name.split("@sha256:")
        name = f"{base}@{digest[:8]}"
    return name


# ─── snapshot 파싱 ───

def parse_snapshots(stream):
    snapshots = {}
    for line in stream:
        line = line.strip()
        if not line or line.startswith("KEY") or line.startswith("WARN"):
            continue
        parts = line.split()
        if len(parts) == 2:
            key, kind = parts[0], parts[1]
            parent = None
        elif len(parts) == 3:
            key, parent, kind = parts[0], parts[1], parts[2]
        else:
            continue
        snapshots[key] = {"parent": parent, "kind": kind}
    return snapshots


def build_tree(snapshots):
    children = defaultdict(list)
    roots = []
    for key, info in snapshots.items():
        if info["parent"] is None:
            roots.append(key)
        else:
            children[info["parent"]].append(key)
    return roots, children


# ─── ctr로 컨테이너 ↔ snapshot 매핑 ───

def run_cmd(cmd):
    try:
        result = subprocess.run(
            cmd, shell=True, capture_output=True, text=True, timeout=10
        )
        return result.stdout.strip() if result.returncode == 0 else None
    except Exception:
        return None


def get_container_snapshot_map():
    """
    ctr -n k8s.io containers ls → ctr containers info 로
    각 컨테이너의 SnapshotKey, Image, k8s labels를 추출
    반환: { snapshotKey: { container_id, name, image, pod_name, namespace } }
    """
    mapping = {}

    # 1) 컨테이너 ID 목록
    raw = run_cmd("ctr -n k8s.io containers ls -q")
    if not raw:
        return mapping

    container_ids = [cid.strip() for cid in raw.splitlines() if cid.strip()]

    # 2) 각 컨테이너 info (JSON)
    for cid in container_ids:
        info_raw = run_cmd(f"ctr -n k8s.io containers info {cid}")
        if not info_raw:
            continue

        try:
            info = json.loads(info_raw)
        except json.JSONDecodeError:
            continue

        snap_key = info.get("SnapshotKey", "")
        image = info.get("Image", "")
        labels = info.get("Labels", {}) or {}

        # k8s labels에서 메타데이터 추출
        container_name = labels.get("io.kubernetes.container.name", "")
        pod_name = labels.get("io.kubernetes.pod.name", "")
        namespace = labels.get("io.kubernetes.pod.namespace", "")

        if snap_key:
            mapping[snap_key] = {
                "container_id": cid[:12],
                "name": container_name or "?",
                "image": short_image(image),
                "pod_name": pod_name,
                "namespace": namespace,
            }

    return mapping


# ─── 출력 ───

def print_tree(key, snapshots, children, mapping, prefix="", is_last=True):
    info = snapshots[key]
    kind = info["kind"]

    marker = "🟢" if kind == "Active" else "📦"
    connector = "└── " if is_last else "├── "

    label = f"{short(key)}  [{kind}]"
    if key in mapping:
        m = mapping[key]
        ns = f"{m['namespace']}/" if m.get("namespace") else ""
        label += f"  ← {m['name']} ({m['image']}) {ns}{m.get('pod_name', '')}"

    print(f"{prefix}{connector}{marker} {label}")

    child_list = sorted(children.get(key, []), key=lambda k: snapshots[k]["kind"])
    new_prefix = prefix + ("    " if is_last else "│   ")
    for i, child in enumerate(child_list):
        print_tree(child, snapshots, children, mapping, new_prefix, i == len(child_list) - 1)


def main():
    verify = "--verify" in sys.argv

    snapshots = parse_snapshots(sys.stdin)
    roots, children = build_tree(snapshots)

    mapping = {}
    if verify:
        print("ctr로 컨테이너 ↔ snapshot 매핑 조회 중...\n")
        mapping = get_container_snapshot_map()
        if not mapping:
            print("⚠ ctr 조회 실패 또는 결과 없음. 트리만 출력합니다.\n")

    # 요약
    print(f"총 snapshot 수: {len(snapshots)}개")
    print(f"  - Committed: {sum(1 for s in snapshots.values() if s['kind'] == 'Committed')}개 (읽기전용 이미지 레이어)")
    print(f"  - Active:    {sum(1 for s in snapshots.values() if s['kind'] == 'Active')}개 (컨테이너 쓰기 레이어)")
    print(f"  - 루트 레이어(parent 없음): {len(roots)}개")
    if mapping:
        print(f"  - ctr 매핑 성공: {len(mapping)}개 컨테이너")
    print()

    # 트리
    print("=" * 80)
    print("부모 → 자식 트리")
    print("📦 = Committed (읽기전용)  🟢 = Active (컨테이너 쓰기 레이어)")
    print("=" * 80)

    roots_sorted = sorted(roots, key=lambda k: snapshots[k]["kind"])
    for i, root in enumerate(roots_sorted):
        print_tree(root, snapshots, children, mapping, "", i == len(roots_sorted) - 1)

    # Active 체인
    active_snapshots = [k for k, v in snapshots.items() if v["kind"] == "Active"]
    if active_snapshots:
        print("\n" + "=" * 80)
        print("Active snapshot별 전체 레이어 체인 (위 = 컨테이너, 아래 = 베이스)")
        print("=" * 80)

        for active_key in sorted(active_snapshots, key=short):
            header = f"🟢 {short(active_key)}"
            if active_key in mapping:
                m = mapping[active_key]
                ns = f"{m['namespace']}/" if m.get("namespace") else ""
                header += f"  →  {m['name']} ({m['image']}) {ns}{m.get('pod_name', '')}"
            print(f"\n{header}:")

            chain = []
            current = active_key
            while current:
                chain.append(current)
                current = snapshots[current]["parent"]

            for depth, key in enumerate(chain):
                indent = "  " * depth
                kind = snapshots[key]["kind"]
                if depth == 0:
                    print(f"  {indent}↳ {short(key)} [{kind}] ← 쓰기 레이어 (upperdir)")
                elif depth == len(chain) - 1:
                    print(f"  {indent}↳ {short(key)} [{kind}] ← 베이스 레이어")
                else:
                    print(f"  {indent}↳ {short(key)} [{kind}]")

    # 매핑 안 된 Active 경고
    if mapping:
        unmapped = [k for k in active_snapshots if k not in mapping]
        if unmapped:
            print(f"\n⚠ 매핑 안 된 Active snapshot {len(unmapped)}개:")
            for k in unmapped:
                print(f"  - {short(k)} (종료된 컨테이너이거나 sandbox snapshot일 수 있음)")


if __name__ == "__main__":
    main()
[root@ip-192-168-2-160 ~]# ctr -n k8s.io snapshots ls | python3 snapshot_tree.py --verify
WARN[0000] DEPRECATION: The `bin_dir` property of `[plugins."io.containerd.cri.v1.runtime".cni`] is deprecated since containerd v2.1 and will be removed in containerd v2.3. Use `bin_dirs` in the same section instead.
ctr로 컨테이너 ↔ snapshot 매핑 조회 중...

총 snapshot 수: 34개
  - Committed: 26개 (읽기전용 이미지 레이어)
  - Active:    8개 (컨테이너 쓰기 레이어)
  - 루트 레이어(parent 없음): 5개
  - ctr 매핑 성공: 8개 컨테이너

================================================================================
부모 → 자식 트리
📦 = Committed (읽기전용)  🟢 = Active (컨테이너 쓰기 레이어)
================================================================================
├── 📦 0bd8e49760ea  [Committed]
│   └── 📦 894cacb6054a  [Committed]
│       └── 📦 cc074875b494  [Committed]
│           └── 📦 49a7e69f5818  [Committed]
│               └── 🟢 8deb57d466c9  [Active]  ← kube-proxy (kube-proxy:v1.34.3-eksbuild.5) kube-system/kube-proxy-r5skf
├── 📦 53a62a8cd216  [Committed]
│   └── 📦 7aadb4f9fcff  [Committed]
│       └── 🟢 c7d55f0be56e  [Active]  ← coredns (coredns:v1.13.2-eksbuild.3) kube-system/coredns-d487b6fcb-7hk2d
├── 📦 abadb2b6510f  [Committed]
│   └── 📦 bee6c419bfe7  [Committed]
│       ├── 📦 b93e50da60e4  [Committed]
│       │   └── 📦 366c340df373  [Committed]
│       │       └── 📦 9087979c98ab  [Committed]
│       │           └── 📦 83674c681ba9  [Committed]
│       │               └── 🟢 3addfa4c8a0f  [Active]  ← aws-node (amazon-k8s-cni:v1.21.1-eksbuild.3) kube-system/aws-node-klqxp
│       └── 📦 cc10e294133f  [Committed]
│           └── 📦 810472959e4a  [Committed]
│               └── 🟢 ae01544676cd  [Active]  ← aws-vpc-cni-init (amazon-k8s-cni-init:v1.21.1-eksbuild.3) kube-system/aws-node-klqxp
├── 📦 d04a98680344  [Committed]
│   ├── 🟢 1049323a8f33  [Active]  ← ? (pause:3.10) kube-system/kube-proxy-r5skf
│   ├── 🟢 35edb8727e17  [Active]  ← ? (pause:3.10) kube-system/coredns-d487b6fcb-7hk2d
│   └── 🟢 94f56b06be18  [Active]  ← ? (pause:3.10) kube-system/aws-node-klqxp
└── 📦 d79971e8aedb  [Committed]
    └── 📦 ef48011b8000  [Committed]
        └── 📦 332cd5791f64  [Committed]
            └── 📦 f51db364c6b2  [Committed]
                └── 📦 941b379f2457  [Committed]
                    └── 📦 8da4d76fd64e  [Committed]
                        └── 📦 6978733d716f  [Committed]
                            └── 📦 dd7fa3fc215f  [Committed]
                                └── 📦 462f2eff945a  [Committed]
                                    └── 📦 ef780f5b36fc  [Committed]
                                        └── 📦 1d29ddbe3fde  [Committed]
                                            └── 🟢 0e262d76e07e  [Active]  ← aws-eks-nodeagent (aws-network-policy-agent:v1.3.1-eksbuild.1) kube-system/aws-node-klqxp

================================================================================
Active snapshot별 전체 레이어 체인 (위 = 컨테이너, 아래 = 베이스)
================================================================================

🟢 0e262d76e07e  →  aws-eks-nodeagent (aws-network-policy-agent:v1.3.1-eksbuild.1) kube-system/aws-node-klqxp:
  ↳ 0e262d76e07e [Active] ← 쓰기 레이어 (upperdir)
    ↳ 1d29ddbe3fde [Committed]
      ↳ ef780f5b36fc [Committed]
        ↳ 462f2eff945a [Committed]
          ↳ dd7fa3fc215f [Committed]
            ↳ 6978733d716f [Committed]
              ↳ 8da4d76fd64e [Committed]
                ↳ 941b379f2457 [Committed]
                  ↳ f51db364c6b2 [Committed]
                    ↳ 332cd5791f64 [Committed]
                      ↳ ef48011b8000 [Committed]
                        ↳ d79971e8aedb [Committed] ← 베이스 레이어

🟢 1049323a8f33  →  ? (pause:3.10) kube-system/kube-proxy-r5skf:
  ↳ 1049323a8f33 [Active] ← 쓰기 레이어 (upperdir)
    ↳ d04a98680344 [Committed] ← 베이스 레이어

🟢 35edb8727e17  →  ? (pause:3.10) kube-system/coredns-d487b6fcb-7hk2d:
  ↳ 35edb8727e17 [Active] ← 쓰기 레이어 (upperdir)
    ↳ d04a98680344 [Committed] ← 베이스 레이어

🟢 3addfa4c8a0f  →  aws-node (amazon-k8s-cni:v1.21.1-eksbuild.3) kube-system/aws-node-klqxp:
  ↳ 3addfa4c8a0f [Active] ← 쓰기 레이어 (upperdir)
    ↳ 83674c681ba9 [Committed]
      ↳ 9087979c98ab [Committed]
        ↳ 366c340df373 [Committed]
          ↳ b93e50da60e4 [Committed]
            ↳ bee6c419bfe7 [Committed]
              ↳ abadb2b6510f [Committed] ← 베이스 레이어

🟢 8deb57d466c9  →  kube-proxy (kube-proxy:v1.34.3-eksbuild.5) kube-system/kube-proxy-r5skf:
  ↳ 8deb57d466c9 [Active] ← 쓰기 레이어 (upperdir)
    ↳ 49a7e69f5818 [Committed]
      ↳ cc074875b494 [Committed]
        ↳ 894cacb6054a [Committed]
          ↳ 0bd8e49760ea [Committed] ← 베이스 레이어

🟢 94f56b06be18  →  ? (pause:3.10) kube-system/aws-node-klqxp:
  ↳ 94f56b06be18 [Active] ← 쓰기 레이어 (upperdir)
    ↳ d04a98680344 [Committed] ← 베이스 레이어

🟢 ae01544676cd  →  aws-vpc-cni-init (amazon-k8s-cni-init:v1.21.1-eksbuild.3) kube-system/aws-node-klqxp:
  ↳ ae01544676cd [Active] ← 쓰기 레이어 (upperdir)
    ↳ 810472959e4a [Committed]
      ↳ cc10e294133f [Committed]
        ↳ bee6c419bfe7 [Committed]
          ↳ abadb2b6510f [Committed] ← 베이스 레이어

🟢 c7d55f0be56e  →  coredns (coredns:v1.13.2-eksbuild.3) kube-system/coredns-d487b6fcb-7hk2d:
  ↳ c7d55f0be56e [Active] ← 쓰기 레이어 (upperdir)
    ↳ 7aadb4f9fcff [Committed]
      ↳ 53a62a8cd216 [Committed] ← 베이스 레이어
접속 후 아래 사항을 확인해봅시다 - 노드 서버 내 서비스 구동상태
위와같은 전제조건이 갖춰지면 각 컴포넌트가 정상작동 하고 있는지 살펴보면 되겠죠. 전제조건이 되어있다고 해서 클러스터가 정상일 보장은 없습니다. 설정이 어긋나거나 서비스가 죽어있다면 파드가 구동되지 않기 때문입니다. 그래서 아래 요소들을 살펴보기로 합니다.
- 시간 동기화(TLS 인증서 검증, 로그 타임스탬프, 분산 합의가 모두 시간에 의존)
- containerd 서비스 상태와 설정(config.toml의 SystemdCgroup, pause 이미지 경로 등)
- kubelet 서비스 상태와 설정(config.yaml의 cgroupDriver, clusterDNS, containerRuntimeEndpoint 등이 올바른지)
- nerdctl이나 ctr을 통해 해당 노드에서 실제로 돌고 있는 컨테이너 목록을 확인
time 동기화 확인
time sync 서비스의 주소값은 여기서 확인하실 수 있습니다. IPv4, IPv6 정보를 함께볼 수 있죠.
# 설정을 보고,
[root@ip-192-168-2-160 ~]# grep "^[^#]" /etc/chrony.conf
sourcedir /run/chrony.d
confdir /etc/chrony.d
sourcedir /etc/chrony.d
driftfile /var/lib/chrony/drift
makestep 1.0 3
rtcsync
keyfile /etc/chrony.keys
ntsdumpdir /var/lib/chrony
logdir /var/log/chrony
log measurements statistics tracking

# time 서버의 풀을 확인합니다.
[root@ip-192-168-2-160 ~]# tree /run/chrony.d/
/run/chrony.d/
├── amazon-pool.sources -> /usr/share/amazon-chrony-config/amazon-pool_aws.sources
└── link-local-ipv4.sources -> /usr/share/amazon-chrony-config/link-local-ipv4_unspecified.sources

0 directories, 2 files

# 어느 서버로부터 값을 가져오는지 확인합니다.
[root@ip-192-168-2-160 ~]# cat /usr/share/amazon-chrony-config/link-local-ipv4_unspecified.sources
# https://docs.aws.amazon.com/AWSEC2/latest/UserGuide/set-time.html
server 169.254.169.123 prefer iburst minpoll 4 maxpoll 4

[root@ip-192-168-2-160 ~]# cat /usr/share/amazon-chrony-config/amazon-pool_aws.sources
# Use Amazon Public NTP leap-second smearing time sources
# https://docs.aws.amazon.com/AWSEC2/latest/UserGuide/set-time.html#configure-time-sync
pool time.aws.com iburst

# aws 의 타임서버에 nsloopup을 해봅니다.
[root@ip-192-168-2-160 ~]# nslookup time.aws.com
Server:         192.168.0.2
Address:        192.168.0.2#53

Non-authoritative answer:
Name:   time.aws.com
Address: 54.90.191.9
Name:   time.aws.com
Address: 44.201.148.133
Name:   time.aws.com
Address: 3.87.127.143
Name:   time.aws.com
Address: 54.197.201.248
Name:   time.aws.com
Address: 54.81.127.33
Name:   time.aws.com
Address: 2600:1f18:4a3:6900:46e8:2cd4:84f2:c189
Name:   time.aws.com
Address: 2600:1f18:4a3:6901:e748:7e32:6d5e:3a44
Name:   time.aws.com
Address: 2600:1f18:4a3:6902:6a8a:b72:c16e:db31
Name:   time.aws.com
Address: 2600:1f18:4a3:6901:2f65:3de:4135:a6a4
Name:   time.aws.com
Address: 2600:1f18:4a3:6902:2a6f:3bec:e00b:8fb
실제 시간 동기화에 대한 내용을 살펴봅시다.
[root@ip-192-168-2-160 ~]# timedatectl status
               Local time: Tue 2026-03-17 06:48:11 UTC
           Universal time: Tue 2026-03-17 06:48:11 UTC
                 RTC time: Tue 2026-03-17 06:48:10
                Time zone: n/a (UTC, +0000)
System clock synchronized: yes
              NTP service: active
          RTC in local TZ: no
[root@ip-192-168-2-160 ~]# chronyc sources -v

  .-- Source mode  '^' = server, '=' = peer, '#' = local clock.
 / .- Source state '*' = current best, '+' = combined, '-' = not combined,
| /             'x' = may be in error, '~' = too variable, '?' = unusable.
||                                                 .- xxxx [ yyyy ] +/- zzzz
||      Reachability register (octal) -.           |  xxxx = adjusted offset,
||      Log2(Polling interval) --.      |          |  yyyy = measured offset,
||                                \     |          |  zzzz = estimated error.
||                                 |    |           \
MS Name/IP address         Stratum Poll Reach LastRx Last sample
===============================================================================
^* 169.254.169.123               3   4   377     7  -6614ns[  -11us] +/-  304us
^- ec2-52-207-222-50.comput>     4  10   377    58  -2568us[-2568us] +/-   91ms
^- ec2-54-210-225-137.compu>     4  10   377   720   +482us[ +492us] +/-   89ms
^- ec2-3-86-4-106.compute-1>     4  10   377   840  +1638us[+1671us] +/-   88ms
^- ec2-3-94-91-31.compute-1>     4  10   377   681   +730us[ +738us] +/-   92ms
containerd 작동 확인하기
그렇다면 이어서 containerd가 제대로 도는지 살펴보겠습니다.
[ec2-user@ip-192-168-2-160 ~]$ pstree -a
systemd --switched-root --system --deserialize=32
  ├─chronyd -F 2
  ├─containerd
  │   └─10*[{containerd}]
  ├─containerd-shim -namespace k8s.io -id 94f56b06be18... (aws-node Pod)
  │   ├─aws-vpc-cni
  │   │   ├─aws-k8s-agent
  │   │   │   └─8*[{aws-k8s-agent}]
  │   │   └─3*[{aws-vpc-cni}]
  │   ├─controller --enable-ipv6=false --enable-network-policy=false --enable-cloudwatch-logs=false ...
  │   │   └─7*[{controller}]
  │   ├─pause
  │   └─14*[{containerd-shim}]
  ├─containerd-shim -namespace k8s.io -id 1049323a8f33... (kube-proxy Pod)
  │   ├─kube-proxy --v=2 --config=/var/lib/kube-proxy-config/config ...
  │   │   └─5*[{kube-proxy}]
  │   ├─pause
  │   └─12*[{containerd-shim}]
  ├─containerd-shim -namespace k8s.io -id 35edb8727e17... (coredns Pod)
  │   ├─coredns -conf /etc/coredns/Corefile
  │   │   └─8*[{coredns}]
  │   ├─pause
  │   └─12*[{containerd-shim}]
  └─kubelet --node-ip=192.168.2.160 --cloud-provider=external --runtime-cgroups=/runtime.slice/containerd.service --config=/
      └─11*[{kubelet}]
[root@ip-192-168-2-160 ~]# systemctl status containerd --no-pager -l
● containerd.service - containerd container runtime
     Loaded: loaded (/usr/lib/systemd/system/containerd.service; disabled; preset: disabled)
    Drop-In: /etc/systemd/system/containerd.service.d
             └─00-runtime-slice.conf
     Active: active (running) since Mon 2026-03-16 05:15:04 UTC; 1 day 2h ago
       Docs: https://containerd.io
   Main PID: 2198 (containerd)
      Tasks: 52
     Memory: 744.7M
        CPU: 16min 54.304s
     CGroup: /runtime.slice/containerd.service
             ├─2198 /usr/bin/containerd
             ├─2295 /usr/bin/containerd-shim-runc-v2 -namespace k8s.io -id 94f56b06be18b892f09b876165c0091f184f22212c8f387fbd88425426113594 -address /run/containerd/containerd.sock
             ├─2702 /usr/bin/containerd-shim-runc-v2 -namespace k8s.io -id 1049323a8f33b8ea94ed51af317f5ca67d24ed7636c36009d29dee369c3756ff -address /run/containerd/containerd.sock
             └─2807 /usr/bin/containerd-shim-runc-v2 -namespace k8s.io -id 35edb8727e171ef5e6951166c8166c994dc5fa8fc1b6d3cd93667f64890dbb56 -address /run/containerd/containerd.sock
이어서 systemd 서비스 유닛 파일도 살펴봅시다. systemd는 PID 1 이고, 시스템의 모든 서비스를 관리하는 프로세스이니 containerd 라는 자식 프로세스를 관리하는 것이죠.
[root@ip-192-168-2-160 ~]# cat /usr/lib/systemd/system/containerd.service
# Copyright The containerd Authors.
#
# Licensed under the Apache License, Version 2.0 (the "License");
# you may not use this file except in compliance with the License.
# You may obtain a copy of the License at
#
#     http://www.apache.org/licenses/LICENSE-2.0
#
# Unless required by applicable law or agreed to in writing, software
# distributed under the License is distributed on an "AS IS" BASIS,
# WITHOUT WARRANTIES OR CONDITIONS OF ANY KIND, either express or implied.
# See the License for the specific language governing permissions and
# limitations under the License.

[Unit]
Description=containerd container runtime
Documentation=https://containerd.io
After=network.target dbus.service

[Service]
ExecStartPre=-/sbin/modprobe overlay
ExecStart=/usr/bin/containerd

Type=notify
Delegate=yes
KillMode=process
Restart=always
RestartSec=5

# Having non-zero Limit*s causes performance problems due to accounting overhead
# in the kernel. We recommend using cgroups to do container-local accounting.
LimitNPROC=infinity
LimitCORE=infinity
LimitNOFILE=infinity

# Comment TasksMax if your systemd version does not supports it.
# Only systemd 226 and above support this version.
TasksMax=infinity
OOMScoreAdjust=-999

[Install]
WantedBy=multi-user.target
containerd의 설정파일은 여기있습니다.
[root@ip-192-168-2-160 ~]# tree /etc/containerd/
/etc/containerd/
├── base-runtime-spec.json
└── config.toml

[root@ip-192-168-2-160 ~]# cat /etc/containerd/config.toml
version = 3
root = "/var/lib/containerd"
state = "/run/containerd"

[grpc]
address = "/run/containerd/containerd.sock"

[plugins.'io.containerd.cri.v1.images']
discard_unpacked_layers = true

[plugins.'io.containerd.cri.v1.images'.pinned_images]
sandbox = "localhost/kubernetes/pause"

[plugins."io.containerd.cri.v1.images".registry]
config_path = "/etc/containerd/certs.d:/etc/docker/certs.d"

[plugins.'io.containerd.cri.v1.runtime']
enable_cdi = true

[plugins.'io.containerd.cri.v1.runtime'.containerd]
default_runtime_name = "runc"

[plugins.'io.containerd.cri.v1.runtime'.containerd.runtimes.runc]
runtime_type = "io.containerd.runc.v2"
base_runtime_spec = "/etc/containerd/base-runtime-spec.json"

[plugins.'io.containerd.cri.v1.runtime'.containerd.runtimes.runc.options]
BinaryName = "/usr/sbin/runc"
SystemdCgroup = true

[plugins.'io.containerd.cri.v1.runtime'.cni]
bin_dir = "/opt/cni/bin"
conf_dir = "/etc/cni/net.d"
아래는 런타임 스펙에 대한 내용입니다.
- 네임스페이스에 대한 설명은 OCI Runtime Spec - Namespaces를,
- maskedPaths와 readonlyPaths에 대한 설명은 OCI Runtime Spec - Masked Paths를,
- 디바이스 접근 제어에 대한 설명은 OCI Runtime Spec - Device Allowlist를,
- 각 Linux Capability의 정의는 capabilities(7) man page를,
noNewPrivileges의 동작은 prctl(2) man page - PR_SET_NO_NEW_PRIVS를 참고하시기 바랍니다.
[root@ip-192-168-2-160 ~]# cat /etc/containerd/base-runtime-spec.json  | jq
{
  "linux": {
    "maskedPaths": [           # 컨테이너 안에서 접근 차단되는 경로 (읽으면 빈 파일로 보임)
      "/proc/acpi",            # 하드웨어 전원 관리 정보
      "/proc/asound",          # 사운드 카드 정보
      "/proc/kcore",           # 커널 메모리 덤프 — 노출 시 호스트 메모리 유출 위험
      "/proc/keys",            # 커널 키링 — 노출 시 암호화 키 유출 위험
      "/proc/latency_stats",   # 커널 레이턴시 통계
      "/proc/sched_debug",     # 스케줄러 디버그 정보 — 호스트의 전체 프로세스 목록 노출 위험
      "/proc/scsi",            # SCSI 디바이스 정보
      "/proc/timer_list",      # 커널 타이머 목록 — 호스트 커널 내부 상태 노출
      "/proc/timer_stats",     # 타이머 통계
      "/sys/firmware"          # 펌웨어(BIOS/UEFI) 정보 — 호스트 하드웨어 정보 노출 위험
    ],
    "namespaces": [            # 컨테이너를 호스트로부터 격리하는 리눅스 네임스페이스
      { "type": "ipc" },       # 프로세스 간 통신(공유메모리, 세마포어) 격리
      { "type": "mount" },     # 파일시스템 마운트 격리 — 컨테이너마다 독립된 마운트 테이블
      { "type": "network" },   # 네트워크 스택 격리 — Pod 단위로 IP, 포트, 라우팅 테이블 분리
      { "type": "pid" },       # PID 격리 — 컨테이너 안에서 호스트의 다른 프로세스가 안 보임
      { "type": "uts" }        # hostname 격리 — 컨테이너마다 독립된 hostname
                               # ※ user 네임스페이스 없음 → UID/GID 매핑 격리 안 함 (EKS 기본값)
    ],
    "readonlyPaths": [         # 컨테이너 안에서 읽기만 가능한 경로 (수정 불가)
      "/proc/bus",             # 버스(USB, PCI) 정보
      "/proc/fs",              # 파일시스템 통계
      "/proc/irq",             # 인터럽트 할당 정보 — 수정되면 호스트 안정성 위협
      "/proc/sys",             # 커널 파라미터(sysctl) — 수정되면 호스트 전체에 영향
      "/proc/sysrq-trigger"    # 커널 긴급 명령 트리거 — 수정되면 호스트 리부팅 등 가능
    ],
    "resources": {
      "devices": [
        { "access": "rwm", "allow": false }  # 기본적으로 모든 디바이스 접근 차단 (r:읽기, w:쓰기, m:생성)
      ]
    }
  },
  "process": {
    "capabilities": {
      "bounding": [                    # 컨테이너에 허용되는 리눅스 capability (전체 root 권한이 아닌 필요한 것만)
        "CAP_AUDIT_WRITE",             # audit 로그 쓰기
        "CAP_CHOWN",                   # 파일 소유자 변경
        "CAP_DAC_OVERRIDE",            # 파일 권한 검사 우회 (읽기/쓰기/실행)
        "CAP_FOWNER",                  # 파일 소유자 관련 권한 검사 우회
        "CAP_FSETID",                  # setuid/setgid 비트 유지
        "CAP_KILL",                    # 다른 프로세스에 시그널 전송
        "CAP_MKNOD",                   # 디바이스 파일 생성
        "CAP_NET_BIND_SERVICE",        # 1024 이하 포트 바인딩 허용
        "CAP_NET_RAW",                 # raw socket 사용 허용 (ping 등)
        "CAP_SETFCAP",                 # 파일 capability 설정
        "CAP_SETGID",                  # GID 변경
        "CAP_SETPCAP",                 # 다른 프로세스에 capability 전달
        "CAP_SETUID",                  # UID 변경
        "CAP_SYS_CHROOT"              # chroot 사용
                                       # ※ CAP_SYS_ADMIN 없음 → mount, namespace 조작 등 불가
                                       # ※ CAP_SYS_PTRACE 없음 → 다른 프로세스 디버깅 불가
      ]
    },
    "cwd": "/",                        # 컨테이너 프로세스의 기본 working directory
    "noNewPrivileges": true,           # 컨테이너 프로세스가 추가 privilege 획득 금지
                                       # setuid binary 실행해도 root 권한 상승 불가
    "rlimits": [
      {
        "type": "RLIMIT_NOFILE",       # 컨테이너 프로세스 파일 디스크립터 제한
        "soft": 65536,                 # 기본 사용 가능 → 65536
        "hard": 1048576                # 최대 상승 가능 → 1048576
      }
    ],
    "user": {
      "uid": 0,                        # 컨테이너 프로세스 기본 root 실행
      "gid": 0                         # 단, noNewPrivileges + capability 제한으로 호스트 root와 권한 다름
    }
  }
}
아래는 실제 containerd의 유닉스 도메인 소켓 통신상태를 살펴봅니다.
# kubelet이 CRI요청을 보내면, 이 소켓에 연결합니다.
[root@ip-192-168-2-160 ~]# containerd config dump | grep -n containerd.sock
11:  address = '/run/containerd/containerd.sock'

# 소켓파일에 대해 소유와 타입을 살펴봅니다.
[root@ip-192-168-2-160 ~]# ls -l /run/containerd/containerd.sock
srw-rw----. 1 root root 0 Mar 16 05:15 /run/containerd/containerd.sock

# ss -xl: LISTEN 상태인 유닉스 도메인 소켓을 확인합니다.
#   containerd.sock          → kubelet이 CRI 요청을 보내는 gRPC 소켓 (kubelet → containerd)
#   containerd.sock.ttrpc    → containerd가 listen, shim이 connect해서 상태를 보고하는 경량 소켓 (shim → containerd)
#   /run/containerd/s/<해시> → 각 containerd-shim이 listen하는 소켓, containerd가 여기로 명령을 보냄 (containerd → shim)
#
#   여기서 shim 소켓 3개는 pstree에서 확인한 Pod 3개(aws-node, kube-proxy, coredns)와 대응됩니다.
[root@ip-192-168-2-160 ~]# ss -xl | grep containerd
u_str LISTEN 0      4096   /run/containerd/s/56931e7f59f9fa33ed767462752e5b7eeda0942c640bdd877d286114a6b804d8 7075               * 0
u_str LISTEN 0      4096                                                /run/containerd/containerd.sock.ttrpc 4936               * 0
u_str LISTEN 0      4096                                                      /run/containerd/containerd.sock 5559               * 0
u_str LISTEN 0      4096   /run/containerd/s/5acdf4c83aea3c378be8fc8aa32a0c886ca0ab8de618ad4b167ef65f95d19591 6166               * 0
u_str LISTEN 0      4096   /run/containerd/s/4dbbec28e58840996f813b4d25ea7705bf25167c3f1766459744206766f64bed 7602               * 0

# ss -xnp: ESTAB 상태인 유닉스 도메인 소켓 연결을 확인합니다.
#   containerd(pid=2198)와 containerd-shim(pid=2295, 2702, 2807) 사이에
#   실제로 소켓 연결이 맺어져 있음을 확인할 수 있습니다.
#   위의 LISTEN 소켓이 실제로 사용되고 있다는 뜻입니다.
[root@ip-192-168-2-160 ~]# ss -xnp | grep containerd
u_str ESTAB 0      0                                                                                       * 7355               * 6759    users:(("containerd",pid=2198,fd=48))
u_str ESTAB 0      0      /run/containerd/s/56931e7f59f9fa33ed767462752e5b7eeda0942c640bdd877d286114a6b804d8 7081               * 7830    users:(("containerd-shim",pid=2807,fd=10))
u_str ESTAB 0      0                                                                                       * 5820               * 5821    users:(("containerd-shim",pid=2295,fd=3))
u_str ESTAB 0      0                                                                                       * 6170               * 6171    users:(("containerd",pid=2198,fd=18))
u_str ESTAB 0      0      /run/containerd/s/5acdf4c83aea3c378be8fc8aa32a0c886ca0ab8de618ad4b167ef65f95d19591 6453               * 6044    users:(("containerd-shim",pid=2295,fd=12))
u_str ESTAB 0      0                                                   /run/containerd/containerd.sock.ttrpc 6991               * 7681    users:(("containerd",pid=2198,fd=26))
u_str ESTAB 0      0      /run/containerd/s/4dbbec28e58840996f813b4d25ea7705bf25167c3f1766459744206766f64bed 6967               * 7605    users:(("containerd-shim",pid=2702,fd=10))
u_str ESTAB 0      0                                                                                       * 8039               * 8737    users:(("containerd",pid=2198,fd=72))
u_str ESTAB 0      0                                                   /run/containerd/containerd.sock.ttrpc 5821               * 5820    users:(("containerd",pid=2198,fd=19))
u_str ESTAB 0      0                                                                                       * 7830               * 7081    users:(("containerd",pid=2198,fd=58))
u_str ESTAB 0      0                                                                                       * 7605               * 6967    users:(("containerd",pid=2198,fd=23))
u_str ESTAB 0      0      /run/containerd/s/56931e7f59f9fa33ed767462752e5b7eeda0942c640bdd877d286114a6b804d8 8737               * 8039    users:(("containerd-shim",pid=2807,fd=12))
u_str ESTAB 0      0                                                                                       * 6044               * 6453    users:(("containerd",pid=2198,fd=35))
u_str ESTAB 0      0                                                                                       * 7681               * 6991    users:(("containerd-shim",pid=2702,fd=11))
u_str ESTAB 0      0      /run/containerd/s/5acdf4c83aea3c378be8fc8aa32a0c886ca0ab8de618ad4b167ef65f95d19591 6759               * 7355    users:(("containerd-shim",pid=2295,fd=21))
u_str ESTAB 0      0      /run/containerd/s/5acdf4c83aea3c378be8fc8aa32a0c886ca0ab8de618ad4b167ef65f95d19591 6171               * 6170    users:(("containerd-shim",pid=2295,fd=10))
u_str ESTAB 0      0                                                                                       * 7902               * 7903    users:(("containerd-shim",pid=2807,fd=11))
u_str ESTAB 0      0                                                                                       * 7948               * 7949    users:(("containerd",pid=2198,fd=66))
u_str ESTAB 0      0                                                         /run/containerd/containerd.sock 5582               * 5581    users:(("containerd",pid=2198,fd=14))
u_str ESTAB 0      0                                                   /run/containerd/containerd.sock.ttrpc 7903               * 7902    users:(("containerd",pid=2198,fd=53))
u_str ESTAB 0      0                                                         /run/containerd/containerd.sock 4953               * 5580    users:(("containerd",pid=2198,fd=13))
u_str ESTAB 0      0      /run/containerd/s/4dbbec28e58840996f813b4d25ea7705bf25167c3f1766459744206766f64bed 7949               * 7948    users:(("containerd-shim",pid=2702,fd=12))
u_str ESTAB 0      0                                                                                       * 5528               * 4895    users:(("containerd",pid=2198,fd=2),("containerd",pid=2198,fd=1))
kubelet 작동 확인하기
kubelet이 떠있나 살펴봅시다.
[root@ip-192-168-2-160 ~]# ps afxuwww | grep kubelet
root      533869  0.0  0.0 222336  2240 pts/1    S+   09:29   0:00                              \_ grep --color=auto kubelet
root        2235  0.9  2.1 2124144 83164 ?       Ssl  Mar16  16:25 /usr/bin/kubelet --node-ip=192.168.2.160 --cloud-provider=external --runtime-cgroups=/runtime.slice/containerd.service --config=/etc/kubernetes/kubelet/config.json --config-dir=/etc/kubernetes/kubelet/config.json.d --kubeconfig=/var/lib/kubelet/kubeconfig --image-credential-provider-config=/etc/eks/image-credential-provider/config.json --hostname-override=ip-192-168-2-160.ap-northeast-2.compute.internal --image-credential-provider-bin-dir=/etc/eks/image-credential-provider --node-labels=eks.amazonaws.com/sourceLaunchTemplateVersion=1,eks.amazonaws.com/nodegroup-image=ami-0c19bc6c6295a611b,eks.amazonaws.com/capacityType=ON_DEMAND,eks.amazonaws.com/nodegroup=myeks-node-group,eks.amazonaws.com/sourceLaunchTemplateId=lt-030f587db6333ef76
...

[root@ip-192-168-2-160 ~]# systemctl status kubelet --no-pager
● kubelet.service - Kubernetes Kubelet
     Loaded: loaded (/etc/systemd/system/kubelet.service; disabled; preset: disabled)
     Active: active (running) since Mon 2026-03-16 05:15:05 UTC; 1 day 4h ago
       Docs: https://github.com/kubernetes/kubernetes
   Main PID: 2235 (kubelet)
      Tasks: 12 (limit: 4516)
     Memory: 82.8M
        CPU: 18min 22.339s
     CGroup: /runtime.slice/kubelet.service
             └─2235 /usr/bin/kubelet --node-ip=192.168.2.160 --cloud-provider=external (이하생략)
그러면 쿠버네티스 구성에 필요한 root ca 구성도 살펴봅시다.
[root@ip-192-168-2-160 ~]# cat /etc/kubernetes/pki/ca.crt | openssl x509 -text -noout
Certificate:
    Data:
Issuer: CN=kubernetes
        Validity
            Not Before: Mar 16 05:05:48 2026 GMT
            Not After : Mar 13 05:10:48 2036 GMT
        Subject: CN=kubernetes
        Subject Public Key Info:
            Public Key Algorithm: rsaEncryption
                Public-Key: (2048 bit)
                Modulus:
                    (생략)
                Exponent: 65537 (0x10001)
        X509v3 extensions:
            X509v3 Key Usage: critical
                Digital Signature, Key Encipherment, Certificate Sign
            X509v3 Basic Constraints: critical
                CA:TRUE
            X509v3 Subject Key Identifier:
                <REDACTED>
            X509v3 Subject Alternative Name:
                DNS:kubernetes
    Signature Algorithm: sha256WithRSAEncryption

    ...
kubelet 설정과 EKS의 kubelet 추가설정도 살펴보겠습니다.
[root@ip-192-168-2-160 ~]# cat /etc/kubernetes/kubelet/config.json | jq
{
  "address": "0.0.0.0",
  "authentication": {
    "x509": {
      "clientCAFile": "/etc/kubernetes/pki/ca.crt"
    },
  ...
}

# 이 노드에는 17개의 파드만 구동될 수 있습니다.
#    VPC CNI는 파드마다 VPC IP를 할당하는데,
#    인스턴스 타입별로 maxPods가 정해집니다.
#    지금 구동중인 t3.medium 에서는 그 제한이 이정도입니다.
#    Pod가 진짜 VPC IP를 받아서 네트워크 성능과 호환성은 좋지만, 노드당 Pod 수에 하드 리밋이 생기지요.
[root@ip-192-168-2-160 ~]# cat /etc/kubernetes/kubelet/config.json.d/40-nodeadm.conf
{
    "apiVersion": "kubelet.config.k8s.io/v1beta1",
    "clusterDNS": [
        "10.100.0.10"
    ],
    "kind": "KubeletConfiguration",
    "maxPods": 17
}
kubelet 디렉터리는 이렇습니다.
[root@ip-192-168-2-160 ~]# tree /var/lib/kubelet -L 2
/var/lib/kubelet
├── actuated_pods_state
├── allocated_pods_state
├── checkpoints
├── cpu_manager_state
├── device-plugins
│   └── kubelet.sock
├── dra_manager_state
├── kubeconfig
├── memory_manager_state
├── pki
│   ├── kubelet-server-2026-03-16-05-15-24.pem
│   ├── kubelet-server-2026-03-16-05-15-40.pem
│   └── kubelet-server-current.pem -> /var/lib/kubelet/pki/kubelet-server-2026-03-16-05-15-40.pem
├── plugins
├── plugins_registry
├── pod-resources
│   └── kubelet.sock
└── pods
    ├── 9b98f2ea-407b-4936-b656-68ccb3cb30c3
    ├── 9d7b65ea-4d88-4a0a-8551-7f4a261b1422
    └── c96e3659-f1ce-4b84-a9a7-8b57e48c3dab
kubeconfig 값은 이렇습니다.
[root@ip-192-168-2-160 ~]# cat /var/lib/kubelet/kubeconfig
---
apiVersion: v1
kind: Config
clusters:
  - name: kubernetes
    cluster:
      certificate-authority: /etc/kubernetes/pki/ca.crt
      server: https://<REDACTED>.gr7.ap-northeast-2.eks.amazonaws.com
current-context: kubelet
contexts:
  - name: kubelet
    context:
      cluster: kubernetes
      user: kubelet
users:
  - name: kubelet
    user:
      exec:
        apiVersion: client.authentication.k8s.io/v1beta1
        command: aws
        args:
          - "eks"
          - "get-token"
          - "--cluster-name"
          - "myeks"
          - "--region"
          - "ap-northeast-2"
그리고 EKS API서버가 kubelet에 HTTPS로 요청을 보낼 때가 있습니다. 이때, SAN(Subject Alternative Name) 에 IP 주소도 같이 들어가있는데요. 이 부분도 함께 살펴보시죠.
[root@ip-192-168-2-160 ~]# curl ipinfo.io/ip ; echo
16.184.46.4

[root@ip-192-168-2-160 ~]# openssl x509 -in /var/lib/kubelet/pki/kubelet-server-current.pem -noout -text | grep -A 1 "Subject Alternative Name"
            X509v3 Subject Alternative Name:
                DNS:ec2-16-184-46-4.ap-northeast-2.compute.amazonaws.com, DNS:ip-192-168-2-160.ap-northeast-2.compute.internal, IP Address:16.184.46.4, IP Address:192.168.2.160
CNI, 네트워크, 스토리지, cgroup 정보 확인
CNI 확인은 아래와 같이 진행할 수 있습니다. 테라폼 코드에서 vpc-cni 를 애드온으로 두었는데, 이게 정상작동하는지 살펴본다고 할 수 있겠네요.
# CNI 관련 내용 확인
[root@ip-192-168-2-160 ~]# tree -pug /opt/cni/
/opt/cni/
└── [drwxr-xr-x root     root    ]  bin
    ├── [-rw-rw-r-- root     root    ]  LICENSE
    ├── [-rwxr-xr-x root     root    ]  aws-cni
    ├── [-rwxr-xr-x root     root    ]  aws-cni-support.sh
    ├── [-rw-r--r-- root     root    ]  bandwidth
    ├── [-rwxr-xr-x root     root    ]  bridge
    ├── [-rwxr-xr-x root     root    ]  dhcp
    ├── [-rwxr-xr-x root     root    ]  dummy
    ├── [-rwxr-xr-x root     root    ]  egress-cni
    ├── [-rwxr-xr-x root     root    ]  firewall
    ├── [-rwxr-xr-x root     root    ]  host-device
    ├── [-rwxr-xr-x root     root    ]  host-local
    ├── [-rwxr-xr-x root     root    ]  ipvlan
    ├── [-rwxr-xr-x root     root    ]  loopback
    ├── [-rwxr-xr-x root     root    ]  macvlan
    ├── [-rwxr-xr-x root     root    ]  portmap
    ├── [-rwxr-xr-x root     root    ]  ptp
    ├── [-rwxr-xr-x root     root    ]  sbr
    ├── [-rwxr-xr-x root     root    ]  static
    ├── [-rwxr-xr-x root     root    ]  tap
    ├── [-rwxr-xr-x root     root    ]  tuning
    ├── [-rwxr-xr-x root     root    ]  vlan
    └── [-rwxr-xr-x root     root    ]  vrf

1 directory, 22 files

# CNI 바이너리를 확인합니다.
[root@ip-192-168-2-160 ~]# /opt/cni/bin/aws-cni -h
AWS CNI
CNI protocol versions supported: 0.1.0, 0.2.0, 0.3.0, 0.3.1, 0.4.0, 1.0.0, 1.1.0

# VPC CNI 플러그인 설정은 여기서 확인할 수 있습니다.
[root@ip-192-168-2-160 ~]# tree /etc/cni
/etc/cni
└── net.d
    └── 10-aws.conflist

# 실제 내용은 아래와 같습니다.
[root@ip-192-168-2-160 ~]# cat /etc/cni/net.d/10-aws.conflist | jq
{
  "cniVersion": "0.4.0",
  "name": "aws-cni",
  "disableCheck": true,
  "plugins": [
    {
      "name": "aws-cni"

...
다음은 네트워크 구성을 확인해봅시다.
[root@ip-192-168-2-160 ~]# ip route
default via 192.168.2.1 dev ens5 proto dhcp src 192.168.2.160 metric 512
192.168.0.2 via 192.168.2.1 dev ens5 proto dhcp src 192.168.2.160 metric 512
192.168.2.0/24 dev ens5 proto kernel scope link src 192.168.2.160 metric 512
192.168.2.1 dev ens5 proto dhcp scope link src 192.168.2.160 metric 512
192.168.2.58 dev eni9f7e1aecc5e scope link
[root@ip-192-168-2-160 ~]# ip addr
1: lo: <LOOPBACK,UP,LOWER_UP> mtu 65536 qdisc noqueue state UNKNOWN group default qlen 1000
    link/loopback 00:00:00:00:00:00 brd 00:00:00:00:00:00
    inet 127.0.0.1/8 scope host lo
       valid_lft forever preferred_lft forever
    inet6 ::1/128 scope host noprefixroute
       valid_lft forever preferred_lft forever
2: ens5: <BROADCAST,MULTICAST,UP,LOWER_UP> mtu 9001 qdisc mq state UP group default qlen 1000
    link/ether 06:4d:03:18:6e:61 brd ff:ff:ff:ff:ff:ff
    altname enp0s5
    inet 192.168.2.160/24 metric 512 brd 192.168.2.255 scope global dynamic ens5
       valid_lft 3406sec preferred_lft 3406sec
    inet6 fe80::44d:3ff:fe18:6e61/64 scope link proto kernel_ll
       valid_lft forever preferred_lft forever
3: eni9f7e1aecc5e@if3: <BROADCAST,MULTICAST,UP,LOWER_UP> mtu 9001 qdisc noqueue state UP group default
    link/ether 5e:d5:54:bb:60:79 brd ff:ff:ff:ff:ff:ff link-netns cni-91e845b9-e928-ab06-6469-0c5dade6a8c8
    inet6 fe80::5cd5:54ff:febb:6079/64 scope link proto kernel_ll
       valid_lft forever preferred_lft forever
4: ens6: <BROADCAST,MULTICAST,UP,LOWER_UP> mtu 9001 qdisc mq state UP group default qlen 1000
    link/ether 06:e4:6f:a5:0a:c3 brd ff:ff:ff:ff:ff:ff
    altname enp0s6
    inet 192.168.2.186/24 brd 192.168.2.255 scope global ens6
       valid_lft forever preferred_lft forever
    inet6 fe80::4e4:6fff:fea5:ac3/64 scope link proto kernel_ll
       valid_lft forever preferred_lft forever
[root@ip-192-168-2-160 ~]# lsns -t net
        NS TYPE NPROCS   PID USER     NETNSID NSFS                                                COMMAND
4026531840 net     114     1 root  unassigned                                                     /usr/lib/systemd/systemd --switched-root --system --deseria
4026532210 net       2  2832 65535          0 /run/netns/cni-91e845b9-e928-ab06-6469-0c5dade6a8c8 /paus
iptables 규칙은 아래와 같이 확인하실 수 있습니다. CNI를 이용해 잘 생성된 것을 확인하실 수 있습니다.
# iptables 규칙 확인
iptables -t nat -S
iptables -t filter -S
iptables -t mangle -S
이어서 스토리지 정보 입니다. 디스크 하나만 잡아두었으니, 잘 잡혀있는지. 그리고 컨테이너 rootfs와 findmnt 결과를 살펴보겠습니다.
[root@ip-192-168-2-160 ~]# lsblk
NAME          MAJ:MIN RM SIZE RO TYPE MOUNTPOINTS
nvme0n1       259:0    0  20G  0 disk
├─nvme0n1p1   259:1    0  20G  0 part /
├─nvme0n1p127 259:2    0   1M  0 part
└─nvme0n1p128 259:3    0  10M  0 part /boot/efi

[root@ip-192-168-2-160 ~]# df -hT
# 호스트 루트 파일시스템: 20G 중 3.5G 사용 (18%)
/dev/nvme0n1p1   xfs        20G  3.5G   17G  18% /

# 컨테이너 rootfs: overlayfs로 마운트, 호스트 디스크를 공유
overlay          overlay    20G  3.5G   17G  18% /run/containerd/.../94f56b06be18.../rootfs  # aws-node sandbox
overlay          overlay    20G  3.5G   17G  18% /run/containerd/.../3addfa4c8a0f.../rootfs  # aws-node
overlay          overlay    20G  3.5G   17G  18% /run/containerd/.../0e262d76e07e.../rootfs  # aws-eks-nodeagent

# Pod별 서비스어카운트 토큰이 projected volume으로 마운트됨
tmpfs            tmpfs     3.3G   12K  3.3G   1% /var/lib/kubelet/pods/.../kube-api-access-s7p7s

# sandbox별 공유메모리 (64M)
shm              tmpfs      64M     0   64M   0% /run/containerd/.../sandboxes/94f56b06be18.../shm


[root@ip-192-168-2-160 ~]# findmnt
# cgroup v2 확인 (첫째 글에서 다룬 전제조건)
/sys/fs/cgroup    cgroup2    cgroup2    rw,nosuid,nodev,noexec,relatime,seclabel

# Pod 네트워크 네임스페이스가 파일로 마운트되어 있음
/run/netns/cni-91e845b9-...    nsfs    nsfs    rw
cgroup 버전은 아래와같이 확인하실 수 있습니다.
[root@ip-192-168-2-160 ~]# stat -fc %T /sys/fs/cgroup/
cgroup2fs
[root@ip-192-168-2-160 ~]# findmnt | grep -i cgroup
│ ├─/sys/fs/cgroup  cgroup2    cgroup2    rw,nosuid,nodev,noexec,relatime,seclabel
다양한 게시글들을 읽어보았습니다. 이해에 악분님의 게시글이 도움되었습니다. https://malwareanalysis.tistory.com/724 ↩︎
이해에 Interlude 님의 게시글이 도움되었습니다. 파일 시스템 레이어를 통해 읽기전용/읽기쓰기 영역으로 나누어 효율적으로 관리하기 위함이죠. https://interlude-3.tistory.com/47 ↩︎
컨테이너 이미지를 디스크에 풀어놓은 목록을 보는 것입니다. 컨테이너를 구동하면 containerd가 read only인 committed snapshot 위에, r/w인 active snapshot이 있는데, 이걸 보는 커맨드들입니다. ↩︎