[CloudNeta] EKS 워크샵 스터디 (4) - EKS Security Part 2 - EKS IAM 연동 (IRSA, Pod Identity)
이번 게시글에서는 EKS 워크샵 스터디 제 4주차 내용을 작성합니다.
이 글은 2부로 나누어집니다.
K8s 인증/인가 기초 실습
이번에는 실습을 위한 가상의 개발팀/인프라팀을 생각해보겠습니다. 사용자를 위한 서비스 어카운트(SA)를 각각 dev-k8s, infra-k8s 로 생성해봅시다.
그리고 실습환경을 구성하며 dev-team 네임스페이스와 infra-team 네임스페이스를 분리하여 각각의 SA, Role을 작성하고 각기 다른 권한을 가지는 상황을 가정해보겠습니다.
이를 통해 별도의 kubectl 파드를 생성하고, 해당 파드에 SA를 지정하여 권한에 대한 테스트를 진행할 예정입니다.
쿠버네티스의 .kube/config 파일에 대하여
~/.kube/config 파일은 kubectl이 어떤 쿠버네티스 API 서버에, 어떤 사용자 자격으로 접속할지 결정하는 설정 파일입니다. 보통 kubeconfig라고 부르며, 하나의 파일 안에 여러 클러스터와 여러 사용자 정보를 함께 넣어두고 필요할 때 컨텍스트를 바꿔가며 사용할 수 있습니다.
핵심 구성은 clusters, users, contexts 세 가지입니다.
| 항목 | 의미 |
|---|---|
clusters |
kubectl이 접속할 쿠버네티스 API 서버 목록입니다. 각 항목에는 API 서버 주소(server)와 서버 인증서를 검증하기 위한 CA 정보(certificate-authority-data)가 들어갑니다. 원격 쿠버네티스 API 서버의 주소를 추가하면 여러 클러스터를 같은 kubeconfig에서 관리할 수 있습니다. |
users |
쿠버네티스 API 서버에 접속할 때 사용할 사용자 인증 정보 목록입니다. 클라이언트 인증서와 키, ServiceAccount 토큰, exec 플러그인 설정 등이 여기에 들어갈 수 있습니다. EKS에서는 aws eks get-token을 실행하는 exec 방식이 자주 사용됩니다. |
contexts |
clusters와 users에 정의된 값을 조합해 실제로 사용할 접속 대상을 정의합니다. 필요하면 기본 네임스페이스도 함께 지정합니다. |
예를 들어 clusters에 클러스터 A, B가 있고 users에 사용자 a, b가 있다면 cluster A + user a를 묶어서 "cluster A에 user a로 인증해 접근한다"는 컨텍스트를 만들 수 있습니다. kubectl은 여러 컨텍스트 중 current-context로 지정된 하나를 기본값으로 사용합니다.
아래 예시는 kubernetes 클러스터에 kubernetes-admin 사용자로 접속하는 admin@k8s 컨텍스트를 정의한 kubeconfig입니다. 실제 certificate-authority-data, client-certificate-data, client-key-data 값은 긴 base64 문자열이며, 특히 client-key-data는 개인키이므로 외부에 노출하면 안 됩니다.
apiVersion: v1
kind: Config
preferences: {}

clusters:
- name: kubernetes
  cluster:
    server: https://192.168.100.10:6443
    certificate-authority-data: <BASE64_CA_CERT_DATA>

users:
- name: kubernetes-admin
  user:
    client-certificate-data: <BASE64_CLIENT_CERT_DATA>
    client-key-data: <BASE64_CLIENT_KEY_DATA>

contexts:
- name: admin@k8s
  context:
    cluster: kubernetes
    namespace: default
    user: kubernetes-admin

current-context: admin@k8s
이 설정을 기준으로 보면 kubectl은 current-context인 admin@k8s를 읽고, 그 안의 cluster: kubernetes와 user: kubernetes-admin을 따라갑니다. 그 결과 https://192.168.100.10:6443 API 서버에 kubernetes-admin 인증 정보로 요청을 보내며, 별도로 네임스페이스를 지정하지 않으면 default 네임스페이스를 사용합니다.
컨텍스트는 아래 명령으로 확인하거나 전환할 수 있습니다.
kubectl config get-contexts
kubectl config current-context
kubectl config use-context admin@k8s
네임스페이스와 SA 생성 후 확인하기
- Pod가 실행될 때는 ServiceAccount 한 개가 할당됩니다. 명시하지 않으면 해당 네임스페이스의
defaultServiceAccount가 사용됩니다. - ServiceAccount는 쿠버네티스 API에 접근할 때 사용할 수 있는 신원입니다. Kubernetes v1.24부터는 ServiceAccount용 Secret 토큰이 자동 생성되지 않으며, Pod에는 projected token이 마운트됩니다. 토큰을 직접 확인해야 할 때는
kubectl create token <service-account-name>을 사용합니다.
# 네임스페이스(Namespace, NS) 생성 및 확인
kubectl create namespace dev-team
kubectl create namespace infra-team

# 네임스페이스 확인
kubectl get ns

# 네임스페이스에 각각 서비스 어카운트 생성 : serviceaccounts 약자(=sa)
kubectl create sa dev-k8s -n dev-team
kubectl create sa infra-k8s -n infra-team

# 서비스 어카운트 정보 확인
kubectl get sa -n dev-team
kubectl get sa dev-k8s -n dev-team -o yaml

kubectl get sa -n infra-team
kubectl get sa infra-k8s -n infra-team -o yaml
실행 결과는 아래처럼 확인할 수 있습니다.
$ kubectl create namespace dev-team
namespace/dev-team created

$ kubectl create namespace infra-team
namespace/infra-team created

$ kubectl get ns
NAME              STATUS   AGE
cert-manager      Active   3h58m
default           Active   4h4m
dev-team          Active   8s
external-dns      Active   3h58m
infra-team        Active   7s
kube-node-lease   Active   4h4m
kube-public       Active   4h4m
kube-system       Active   4h4m

$ kubectl create sa dev-k8s -n dev-team
serviceaccount/dev-k8s created

$ kubectl create sa infra-k8s -n infra-team
serviceaccount/infra-k8s created

$ kubectl get sa -n dev-team
NAME      AGE
default   18s
dev-k8s   5s

$ kubectl get sa dev-k8s -n dev-team -o yaml
apiVersion: v1
kind: ServiceAccount
metadata:
  creationTimestamp: "2026-04-12T15:46:22Z"
  name: dev-k8s
  namespace: dev-team
  resourceVersion: "42967"
  uid: 1437f3ec-0a9b-4bfd-8cdc-7a3dd3a247d8

$ kubectl get sa -n infra-team
NAME        AGE
default     21s
infra-k8s   8s

$ kubectl get sa infra-k8s -n infra-team -o yaml
apiVersion: v1
kind: ServiceAccount
metadata:
  creationTimestamp: "2026-04-12T15:46:23Z"
  name: infra-k8s
  namespace: infra-team
  resourceVersion: "42968"
  uid: 43492c10-a684-4513-9faa-a5dc2fe6d1f0
두 네임스페이스에는 각각 default ServiceAccount가 기본으로 존재하고, 실습용 ServiceAccount인 dev-k8s, infra-k8s가 추가로 생성된 것을 볼 수 있습니다. YAML 출력에 secrets 필드가 없는 것도 Kubernetes v1.24 이후 ServiceAccount 토큰 Secret이 기본으로 자동 생성되지 않는 동작과 일치합니다.
서비스 어카운트를 지정하여 파드 생성 후 권한 테스트
이번에는 각 네임스페이스에 kubectl을 실행할 수 있는 테스트 Pod를 하나씩 생성합니다. 각 Pod에는 앞에서 만든 ServiceAccount를 명시적으로 연결합니다.
컨테이너 이미지는 bitnami/kubectl을 사용합니다. 로컬 Docker에서 실행한다면
docker run --rm --name kubectl -v /path/to/your/kube/config:/.kube/config bitnami/kubectl:latest처럼 kubeconfig를 마운트할 수 있지만, 여기서는 클러스터 안의 Pod에서 ServiceAccount 토큰을 사용해 kube-apiserver에 접근하는 흐름을 확인합니다.
# dev-team 네임스페이스에 dev-k8s ServiceAccount를 사용하는 kubectl Pod 생성
cat <<EOF | kubectl create -f -
apiVersion: v1
kind: Pod
metadata:
  name: dev-kubectl
  namespace: dev-team
spec:
  serviceAccountName: dev-k8s
  containers:
  - name: kubectl-pod
    image: bitnami/kubectl:latest
    command: ["tail"]
    args: ["-f", "/dev/null"]
  terminationGracePeriodSeconds: 0
EOF

# infra-team 네임스페이스에 infra-k8s ServiceAccount를 사용하는 kubectl Pod 생성
cat <<EOF | kubectl create -f -
apiVersion: v1
kind: Pod
metadata:
  name: infra-kubectl
  namespace: infra-team
spec:
  serviceAccountName: infra-k8s
  containers:
  - name: kubectl-pod
    image: bitnami/kubectl:latest
    command: ["tail"]
    args: ["-f", "/dev/null"]
  terminationGracePeriodSeconds: 0
EOF
Pod가 생성되고 serviceAccountName이 의도한 값으로 들어갔는지 확인합니다.
kubectl wait --for=condition=Ready pod/dev-kubectl -n dev-team --timeout=120s
kubectl wait --for=condition=Ready pod/infra-kubectl -n infra-team --timeout=120s

kubectl get pod -A

kubectl get pod dev-kubectl -n dev-team -o yaml | grep -E "serviceAccount|serviceAccountName"
kubectl get pod infra-kubectl -n infra-team -o yaml | grep -E "serviceAccount|serviceAccountName"
예상되는 핵심 출력은 아래와 같습니다.
$ kubectl get pod -A
NAMESPACE      NAME             READY   STATUS    RESTARTS   AGE
dev-team       dev-kubectl      1/1     Running   0          17s
infra-team     infra-kubectl    1/1     Running   0          12s
...

$ kubectl get pod dev-kubectl -n dev-team -o yaml | grep -E "serviceAccount|serviceAccountName"
serviceAccount: dev-k8s
serviceAccountName: dev-k8s

$ kubectl get pod infra-kubectl -n infra-team -o yaml | grep -E "serviceAccount|serviceAccountName"
serviceAccount: infra-k8s
serviceAccountName: infra-k8s
여기서 dev-kubectl Pod는 system:serviceaccount:dev-team:dev-k8s, infra-kubectl Pod는 system:serviceaccount:infra-team:infra-k8s 신원으로 kube-apiserver에 요청을 보내게 됩니다.
Pod 내부에는 ServiceAccount 토큰, 네임스페이스, CA 인증서가 기본 경로에 마운트됩니다. 토큰은 인증에 쓰이는 민감한 값이므로 원문을 블로그에 붙여 넣지 말고, 실습 중 존재 여부만 확인합니다.
kubectl exec -it dev-kubectl -n dev-team -- ls /run/secrets/kubernetes.io/serviceaccount
kubectl exec -it dev-kubectl -n dev-team -- cat /run/secrets/kubernetes.io/serviceaccount/namespace
kubectl exec -it dev-kubectl -n dev-team -- cat /run/secrets/kubernetes.io/serviceaccount/ca.crt

# 토큰 원문 확인이 꼭 필요할 때만 로컬 실습 환경에서 실행합니다. 문서나 저장소에는 남기지 않습니다.
kubectl exec -it dev-kubectl -n dev-team -- cat /run/secrets/kubernetes.io/serviceaccount/token
확인 결과는 아래처럼 ca.crt, namespace, token 파일이 보이면 충분합니다.
$ kubectl exec -it dev-kubectl -n dev-team -- ls /run/secrets/kubernetes.io/serviceaccount
ca.crt  namespace  token

$ kubectl exec -it dev-kubectl -n dev-team -- cat /run/secrets/kubernetes.io/serviceaccount/namespace
dev-team

$ kubectl exec -it dev-kubectl -n dev-team -- cat /run/secrets/kubernetes.io/serviceaccount/ca.crt
-----BEGIN CERTIFICATE-----
...
-----END CERTIFICATE-----
기본 경로의 token은 kube-apiserver 인증에 쓰이는 ServiceAccount JWT입니다. 디코딩해보면 sub에는 system:serviceaccount:dev-team:dev-k8s 같은 ServiceAccount 신원이 들어가고, kubernetes.io 클레임에는 Pod, 네임스페이스, 노드 정보가 포함됩니다. 이 토큰의 기본 audience는 Kubernetes API용이므로, 뒤에서 다룰 IRSA의 sts.amazonaws.com audience 토큰과는 구분해서 봐야 합니다.
반복 입력을 줄이기 위해 아래처럼 alias를 잡아두면, 각 Pod 내부에서 kubectl을 실행하는 것처럼 테스트할 수 있습니다.
alias k1='kubectl exec -it dev-kubectl -n dev-team -- kubectl'
alias k2='kubectl exec -it infra-kubectl -n infra-team -- kubectl'
아직 Role/RoleBinding을 만들지 않았기 때문에 아래 권한 테스트는 대부분 Forbidden으로 실패하는 것이 정상입니다. 즉, ServiceAccount가 존재한다는 사실과 해당 ServiceAccount에 권한이 있다는 사실은 별개입니다.
# dev-k8s ServiceAccount 권한 테스트
k1 get pods
k1 run nginx --image nginx:1.20-alpine
k1 get pods -n kube-system

# infra-k8s ServiceAccount 권한 테스트
k2 get pods
k2 run nginx --image nginx:1.20-alpine
k2 get pods -n kube-system

# kubectl auth can-i 로 현재 ServiceAccount가 특정 권한을 가졌는지 확인
k1 auth can-i get pods
# no
k2 auth can-i get pods
# no
실제 출력은 아래처럼 Forbidden이 나옵니다.
$ k1 get pods
Error from server (Forbidden): pods is forbidden: User "system:serviceaccount:dev-team:dev-k8s" cannot list resource "pods" in API group "" in the namespace "dev-team"
command terminated with exit code 1

$ k1 run nginx --image nginx:1.20-alpine
Error from server (Forbidden): pods is forbidden: User "system:serviceaccount:dev-team:dev-k8s" cannot create resource "pods" in API group "" in the namespace "dev-team"
command terminated with exit code 1

$ k1 get pods -n kube-system
Error from server (Forbidden): pods is forbidden: User "system:serviceaccount:dev-team:dev-k8s" cannot list resource "pods" in API group "" in the namespace "kube-system"
command terminated with exit code 1

$ k2 get pods
Error from server (Forbidden): pods is forbidden: User "system:serviceaccount:infra-team:infra-k8s" cannot list resource "pods" in API group "" in the namespace "infra-team"
command terminated with exit code 1

$ k2 run nginx --image nginx:1.20-alpine
Error from server (Forbidden): pods is forbidden: User "system:serviceaccount:infra-team:infra-k8s" cannot create resource "pods" in API group "" in the namespace "infra-team"
command terminated with exit code 1

$ k2 get pods -n kube-system
Error from server (Forbidden): pods is forbidden: User "system:serviceaccount:infra-team:infra-k8s" cannot list resource "pods" in API group "" in the namespace "kube-system"
command terminated with exit code 1

$ k1 auth can-i get pods
no
command terminated with exit code 1

$ k2 auth can-i get pods
no
command terminated with exit code 1
command terminated with exit code 1은 테스트 Pod가 죽었다는 뜻이 아니라, Pod 안에서 실행한 kubectl 명령이 권한 없음 결과로 종료되었다는 뜻입니다. 아직 dev-k8s, infra-k8s ServiceAccount에 어떤 Role도 연결하지 않았기 때문에 같은 네임스페이스의 Pod 목록 조회도 허용되지 않습니다.
각각 네임스페이스에 Role 생성 후 ServiceAccount에 바인딩하기
앞에서 확인한 것처럼 ServiceAccount만 만든 상태에서는 아무 권한도 없습니다. 이제 각 네임스페이스에 Role을 만들고, RoleBinding으로 ServiceAccount에 연결합니다.
Role을 작성하기 전에 kubectl api-resources로 쿠버네티스 API 리소스의 apiGroup, resource, namespaced, kind, verbs 정보를 확인할 수 있습니다.
kubectl api-resources
kubectl api-resources -o wide

kubectl api-resources --api-group=""
kubectl api-resources --api-group="apps"
kubectl api-resources --api-group=metrics.k8s.io
kubectl api-resources --api-group=admissionregistration.k8s.io
kubectl api-resources --api-group=rbac.authorization.k8s.io
kubectl api-resources --api-group=apiextensions.k8s.io
주요 출력은 아래처럼 볼 수 있습니다.
$ kubectl api-resources -o wide
NAME         SHORTNAMES   APIVERSION   NAMESPACED   KIND       VERBS
configmaps   cm           v1           true         ConfigMap  create,delete,deletecollection,get,list,patch,update,watch
pods         po           v1           true         Pod        create,delete,deletecollection,get,list,patch,update,watch
...

$ kubectl api-resources --api-group=""
NAME             SHORTNAMES   APIVERSION   NAMESPACED   KIND
namespaces       ns           v1           false        Namespace
nodes            no           v1           false        Node
pods             po           v1           true         Pod
serviceaccounts  sa           v1           true         ServiceAccount
services         svc          v1           true         Service

$ kubectl api-resources --api-group="apps"
NAME          SHORTNAMES   APIVERSION   NAMESPACED   KIND
deployments   deploy       apps/v1      true         Deployment
replicasets   rs           apps/v1      true         ReplicaSet
statefulsets  sts          apps/v1      true         StatefulSet

$ kubectl api-resources --api-group=rbac.authorization.k8s.io
NAME                 SHORTNAMES   APIVERSION                     NAMESPACED   KIND
clusterrolebindings                rbac.authorization.k8s.io/v1   false        ClusterRoleBinding
clusterroles                       rbac.authorization.k8s.io/v1   false        ClusterRole
rolebindings                       rbac.authorization.k8s.io/v1   true         RoleBinding
roles                              rbac.authorization.k8s.io/v1   true         Role
RBAC의 Role은 apiGroups, resources, verbs 조합으로 권한을 정의합니다. apiGroups: [""]는 core API group을 의미하고, apiGroups: ["apps"]는 Deployment 같은 apps/v1 리소스를 의미합니다. 이번 실습에서는 차이를 명확히 보기 위해 각 네임스페이스 안의 모든 API group, 모든 resource, 모든 verb를 허용합니다.
운영 환경에서는
["*"]를 넓게 주는 방식은 피하고, 필요한apiGroups,resources,verbs만 좁혀서 부여해야 합니다.
cat <<EOF | kubectl create -f -
apiVersion: rbac.authorization.k8s.io/v1
kind: Role
metadata:
  name: role-dev-team
  namespace: dev-team
rules:
- apiGroups: ["*"]
  resources: ["*"]
  verbs: ["*"]
EOF

cat <<EOF | kubectl create -f -
apiVersion: rbac.authorization.k8s.io/v1
kind: Role
metadata:
  name: role-infra-team
  namespace: infra-team
rules:
- apiGroups: ["*"]
  resources: ["*"]
  verbs: ["*"]
EOF
Role 생성 결과를 확인합니다.
kubectl get roles -n dev-team
kubectl get roles -n infra-team
kubectl get roles -n dev-team -o yaml
kubectl describe roles role-dev-team -n dev-team
실행 결과는 아래와 같습니다.
$ kubectl get roles -n dev-team
NAME            CREATED AT
role-dev-team   2026-04-12T15:57:19Z

$ kubectl get roles -n infra-team
NAME              CREATED AT
role-infra-team   2026-04-12T15:57:24Z

$ kubectl describe roles role-dev-team -n dev-team
Name:         role-dev-team
Labels:       <none>
Annotations:  <none>
PolicyRule:
  Resources  Non-Resource URLs  Resource Names  Verbs
  ---------  -----------------  --------------  -----
  *.*        []                 []              [*]
*.*는 모든 API group의 모든 resource를 의미하고, [*]는 모든 verb를 의미합니다. 단, 여기서 만든 것은 ClusterRole이 아니라 네임스페이스 범위의 Role입니다. 따라서 role-dev-team은 dev-team 네임스페이스 안에서만 적용되고, role-infra-team은 infra-team 네임스페이스 안에서만 적용됩니다.
이제 RoleBinding으로 Role과 ServiceAccount를 연결합니다.
cat <<EOF | kubectl create -f -
apiVersion: rbac.authorization.k8s.io/v1
kind: RoleBinding
metadata:
  name: roleB-dev-team
  namespace: dev-team
roleRef:
  apiGroup: rbac.authorization.k8s.io
  kind: Role
  name: role-dev-team
subjects:
- kind: ServiceAccount
  name: dev-k8s
  namespace: dev-team
EOF

cat <<EOF | kubectl create -f -
apiVersion: rbac.authorization.k8s.io/v1
kind: RoleBinding
metadata:
  name: roleB-infra-team
  namespace: infra-team
roleRef:
  apiGroup: rbac.authorization.k8s.io
  kind: Role
  name: role-infra-team
subjects:
- kind: ServiceAccount
  name: infra-k8s
  namespace: infra-team
EOF
RoleBinding 생성 결과도 확인합니다.
kubectl get rolebindings -n dev-team
kubectl get rolebindings -n infra-team
kubectl get rolebindings -n dev-team -o yaml
kubectl describe rolebindings roleB-dev-team -n dev-team
실행 결과는 아래와 같습니다.
$ kubectl get rolebindings -n dev-team
NAME             ROLE                 AGE
roleB-dev-team   Role/role-dev-team   8s

$ kubectl get rolebindings -n infra-team
NAME               ROLE                   AGE
roleB-infra-team   Role/role-infra-team   6s

$ kubectl describe rolebindings roleB-dev-team -n dev-team
Name:         roleB-dev-team
Labels:       <none>
Annotations:  <none>
Role:
  Kind:  Role
  Name:  role-dev-team
Subjects:
  Kind            Name     Namespace
  ----            ----     ---------
  ServiceAccount  dev-k8s  dev-team
RoleBinding은 "누구에게(subjects) 어떤 Role을(roleRef) 적용할지"를 묶어주는 리소스입니다. 이 설정으로 dev-k8s는 dev-team 네임스페이스에서 role-dev-team 권한을 갖고, infra-k8s는 infra-team 네임스페이스에서 role-infra-team 권한을 갖습니다.
서비스 어카운트를 지정하여 생성한 파드에서 다시 권한 테스트
RoleBinding까지 생성했으므로 같은 명령을 다시 실행해봅니다. 이번에는 각 ServiceAccount가 자신의 네임스페이스 안에서는 Pod를 조회, 생성, 삭제할 수 있어야 합니다. 다만 Role은 네임스페이스 범위 리소스이므로 다른 네임스페이스인 kube-system이나 cluster-scoped 리소스인 nodes 조회는 여전히 실패해야 합니다.
# dev-k8s ServiceAccount 권한 테스트
k1 run nginx --image nginx:1.20-alpine
k1 get pods
k1 delete pods nginx
k1 get pods -n kube-system
k1 get pods -n kube-system -v=6
k1 get nodes
k1 get nodes -v=6

# infra-k8s ServiceAccount 권한 테스트
k2 get pods
k2 run nginx --image nginx:1.20-alpine
k2 get pods
k2 delete pods nginx
k2 get pods -n kube-system
k2 get nodes

# 현재 ServiceAccount 권한 확인
k1 auth can-i get pods
k2 auth can-i get pods
dev-k8s ServiceAccount로 실행한 결과입니다.
$ k1 run nginx --image nginx:1.20-alpine
pod/nginx created

$ k1 get pods
NAME          READY   STATUS              RESTARTS   AGE
dev-kubectl   1/1     Running             0          9m50s
nginx         0/1     ContainerCreating   0          1s

$ k1 delete pods nginx
pod "nginx" deleted from dev-team namespace

$ k1 get pods -n kube-system
Error from server (Forbidden): pods is forbidden: User "system:serviceaccount:dev-team:dev-k8s" cannot list resource "pods" in API group "" in the namespace "kube-system"
command terminated with exit code 1

$ k1 get nodes
Error from server (Forbidden): nodes is forbidden: User "system:serviceaccount:dev-team:dev-k8s" cannot list resource "nodes" in API group "" at the cluster scope
command terminated with exit code 1

$ k1 auth can-i get pods
yes
infra-k8s ServiceAccount도 자기 네임스페이스인 infra-team 안에서는 Pod 조작이 가능해졌습니다.
$ k2 get pods
NAME            READY   STATUS    RESTARTS   AGE
infra-kubectl   1/1     Running   0          9m56s

$ k2 run nginx --image nginx:1.20-alpine
pod/nginx created

$ k2 get pods
NAME            READY   STATUS              RESTARTS   AGE
infra-kubectl   1/1     Running             0          9m58s
nginx           0/1     ContainerCreating   0          1s

$ k2 delete pods nginx
pod "nginx" deleted from infra-team namespace

$ k2 get pods -n kube-system
Error from server (Forbidden): pods is forbidden: User "system:serviceaccount:infra-team:infra-k8s" cannot list resource "pods" in API group "" in the namespace "kube-system"
command terminated with exit code 1

$ k2 get nodes
Error from server (Forbidden): nodes is forbidden: User "system:serviceaccount:infra-team:infra-k8s" cannot list resource "nodes" in API group "" at the cluster scope
command terminated with exit code 1

$ k2 auth can-i get pods
yes
-v=6 옵션을 붙이면 kubectl이 어떤 설정으로 어떤 API 경로에 요청하는지 조금 더 자세히 볼 수 있습니다.
$ k1 get pods -n kube-system -v=6
I0412 16:01:16.309620     128 merged_client_builder.go:121] Using in-cluster configuration
I0412 16:01:16.328292     128 round_trippers.go:632] "Response" verb="GET" url="https://10.100.0.1:443/api/v1/namespaces/kube-system/pods?limit=500" status="403 Forbidden" milliseconds=10
Error from server (Forbidden): pods is forbidden: User "system:serviceaccount:dev-team:dev-k8s" cannot list resource "pods" in API group "" in the namespace "kube-system"
command terminated with exit code 1

$ k1 get nodes -v=6
I0412 16:01:18.247808     150 merged_client_builder.go:121] Using in-cluster configuration
I0412 16:01:18.274862     150 round_trippers.go:632] "Response" verb="GET" url="https://10.100.0.1:443/api/v1/nodes?limit=500" status="403 Forbidden" milliseconds=14
Error from server (Forbidden): nodes is forbidden: User "system:serviceaccount:dev-team:dev-k8s" cannot list resource "nodes" in API group "" at the cluster scope
command terminated with exit code 1
여기서 Using in-cluster configuration은 Pod 안의 kubectl이 kubeconfig 파일이 아니라 Pod에 마운트된 ServiceAccount 토큰과 CA 인증서를 사용하고 있다는 뜻입니다. 요청 URL도 각각 다릅니다. kube-system Pod 조회는 /api/v1/namespaces/kube-system/pods로 가고, Node 조회는 /api/v1/nodes처럼 네임스페이스가 없는 cluster-scoped 경로로 갑니다. 앞에서 만든 Role은 각자의 네임스페이스에만 적용되므로 두 요청 모두 403 Forbidden이 됩니다.
정리하면 지금 RBAC 상태는 아래와 같습니다.
| ServiceAccount | 허용되는 동작 | 거부되는 동작 |
|---|---|---|
dev-team/dev-k8s |
dev-team 네임스페이스 안의 리소스 조작 |
kube-system Pod 조회, nodes 같은 cluster-scoped 리소스 조회 |
infra-team/infra-k8s |
infra-team 네임스페이스 안의 리소스 조작 |
kube-system Pod 조회, nodes 같은 cluster-scoped 리소스 조회 |
EKS에서 ServiceAccount로 AWS IAM Role 사용하기
앞에서는 ServiceAccount가 쿠버네티스 API에 대해 어떤 권한을 갖는지 RBAC으로 확인했습니다. 이제는 ServiceAccount를 AWS IAM Role과 연결해, Pod가 S3 같은 AWS 리소스에 접근하는 방식을 살펴보겠습니다.
여기서의 목표는 명확합니다. 컨테이너 이미지나 환경변수에 장기 Access Key를 넣지 않고, Pod가 실행되는 시점에 필요한 임시 자격증명을 자동으로 얻도록 만드는 것입니다. 권한 범위도 노드 단위가 아니라 ServiceAccount, 즉 Pod 워크로드 단위로 좁힙니다.
왜 필요한가
Part 1에서 살펴본 IMDS 방식은 노드(EC2)에 붙은 IAM Role을 Pod가 사용할 수 있는 구조였습니다. 이 방식은 단순하지만, 노드 위의 여러 Pod가 같은 노드 IAM Role 권한에 접근할 수 있어 최소 권한 원칙을 지키기 어렵습니다.
그래서 EKS에서는 Pod가 사용하는 ServiceAccount와 AWS IAM Role을 연결하는 방식을 사용합니다. 대표적인 방식은 IRSA(IAM Roles for Service Accounts)와 EKS Pod Identity입니다.
IRSA란?
IRSA는 쿠버네티스 ServiceAccount 토큰을 AWS STS의 AssumeRoleWithWebIdentity 호출에 사용해 IAM Role의 임시 자격증명을 받는 방식입니다.
핵심은 EKS 클러스터의 OIDC issuer를 AWS IAM OIDC Provider로 등록하는 것입니다. 그러면 AWS는 "이 EKS 클러스터가 발급한 ServiceAccount 토큰을 검증할 수 있다"고 인식합니다. 이후 STS는 Pod가 전달한 JWT의 서명과 클레임을 검증하고, IAM Role의 Trust Policy 조건과 맞으면 임시 자격증명을 발급합니다.
- 최소 권한 원칙
ServiceAccount별로 IAM Role을 다르게 연결할 수 있어, 노드 IAM Role에 과도한 권한을 부여하지 않아도 됩니다. - 자격 증명 격리
Pod는 자신이 사용하는 ServiceAccount와 연결된 IAM Role의 임시 자격증명만 얻습니다. - 감사 가능성
STS AssumeRole 이벤트와 AWS API 호출은 CloudTrail에서 추적할 수 있습니다.
IRSA 동작 과정
IRSA는 JWT와 JWKS 기반의 OIDC 검증 흐름을 사용합니다. EKS 클러스터는 ServiceAccount 토큰을 발급하고, AWS STS는 IAM OIDC Provider 설정과 JWKS 공개키를 통해 이 토큰이 신뢰할 수 있는지 확인합니다.

흐름을 단순화하면 아래와 같습니다.
K8S 세계              다리              AWS 세계
SA + JWT  ──→  OIDC(서명 검증)  ──→  AssumeRole(Trust Policy + IAM Policy 확인)
"나는 이 SA다"    "서명 유효하다"      "이 SA는 이 Role 쓸 수 있고, S3 권한 있다"
실제 요청 과정은 조금 더 세분화됩니다.
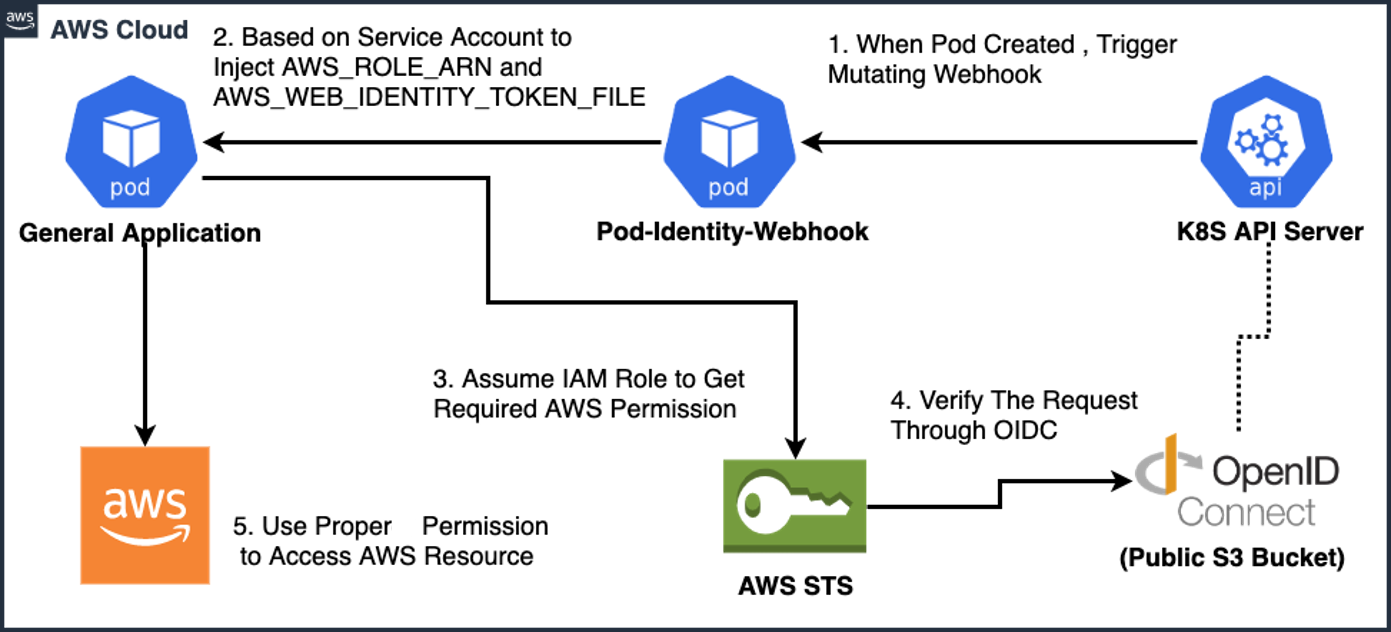
- IAM Role의 Trust Policy에 EKS OIDC Provider와 허용할 ServiceAccount 조건을 설정합니다.
- ServiceAccount에
eks.amazonaws.com/role-arnannotation으로 IAM Role ARN을 연결합니다. - 해당 ServiceAccount를 사용하는 Pod가 생성되면 EKS의 webhook이 Pod에
AWS_ROLE_ARN,AWS_WEB_IDENTITY_TOKEN_FILE환경변수와 web identity token volume을 주입합니다. - 애플리케이션의 AWS SDK는 이 환경변수를 보고 STS에
AssumeRoleWithWebIdentity를 호출합니다. - STS는 JWT의 서명과
iss,sub,aud,exp같은 클레임을 검증하고, IAM Role의 Trust Policy 조건과 비교합니다. - 검증이 통과하면 STS가 IAM Role의 임시 자격증명을 반환합니다.
- 애플리케이션은 이 임시 자격증명으로 S3 같은 AWS API를 호출합니다.
여기서 주의할 점은 앞에서 확인한 기본 ServiceAccount 토큰과 IRSA용 토큰의 audience가 다르다는 것입니다. /run/secrets/kubernetes.io/serviceaccount/token 경로의 기본 토큰은 주로 kube-apiserver 인증에 쓰이고, IRSA에서 STS에 전달되는 web identity token은 aud가 sts.amazonaws.com이 되도록 발급됩니다.
ServiceAccount 토큰의 핵심 클레임
ServiceAccount 토큰은 kube-apiserver가 서명한 JWT입니다. 개발자가 애플리케이션 로그인 용도로 발급하는 JWT와는 별개이며, 쿠버네티스가 Pod와 ServiceAccount의 신원을 표현하기 위해 사용합니다.
| IRSA에서 사용하는 ServiceAccount JWT | 앱에서 만드는 JWT | |
|---|---|---|
| 발급자 | kube-apiserver | 개발자의 앱 서버 |
| 서명키 | kube-apiserver의 비밀키 | 앱의 시크릿/비밀키 |
| 용도 | AWS STS에 "나는 이 ServiceAccount다" 증명 | 유저 로그인 세션 등 앱 비즈니스 로직 |
| 수명 | 자동 갱신 (기본 24시간, 만료 전 kubelet이 교체) | 앱이 결정 |
IRSA에서 STS로 전달되는 토큰은 보통 아래와 같은 클레임을 확인합니다.
{
  "iss": "https://oidc.eks.ap-northeast-2.amazonaws.com/id/ABCDEF1234567890",
  "sub": "system:serviceaccount:default:my-sa",
  "aud": ["sts.amazonaws.com"],
  "exp": 1712345678
}
| 클레임 | 의미 |
|---|---|
iss |
EKS 클러스터의 OIDC Issuer URL — "누가 이 토큰을 발급했는가" |
sub |
system:serviceaccount:<namespace>:<sa-name> — "이 토큰의 주체가 누구인가" |
aud |
sts.amazonaws.com — "이 토큰이 누구를 위한 것인가" |
AssumeRoleWithWebIdentity = AWS 세계의 권한 획득
서명이 유효해도 한 번 더 확인합니다. IAM Role의 Trust Policy에서 어떤 OIDC Provider의, 어떤 ServiceAccount만 이 Role을 Assume할 수 있는지 제한합니다:
{
  "Effect": "Allow",
  "Principal": {
    "Federated": "arn:aws:iam::123456789012:oidc-provider/oidc.eks.ap-northeast-2.amazonaws.com/id/ABCDEF..."
  },
  "Action": "sts:AssumeRoleWithWebIdentity",
  "Condition": {
    "StringEquals": {
      "oidc.eks....:sub": "system:serviceaccount:default:my-sa",
      "oidc.eks....:aud": "sts.amazonaws.com"
    }
  }
}
통과하면 그 Role에 붙은 IAM Policy(S3 접근 등)에 따라 임시 자격증명이 발급됩니다.
실제로 Pod에서 S3에 접근한다면
IRSA 사전 설정이 끝난 뒤 애플리케이션 Pod 입장에서 보면, 별도의 장기 Access Key를 들고 있을 필요가 없습니다. AWS SDK가 web identity token을 읽고 STS에서 임시 자격증명을 받아 AWS API 호출에 사용합니다.
sequenceDiagram
    participant Pod as Pod (AWS SDK)
    participant Webhook as EKS Webhook
    participant Kubelet as kubelet
    participant STS as AWS STS
    participant OIDC as EKS OIDC Provider
    participant S3 as Amazon S3

    Webhook->>Pod: AWS_ROLE_ARN, AWS_WEB_IDENTITY_TOKEN_FILE 환경변수와 volume 설정 주입
    Kubelet->>Pod: projected ServiceAccount token volume 마운트
    Pod->>STS: AssumeRoleWithWebIdentity(JWT + Role ARN)
    STS->>OIDC: JWKS 공개키 요청
    OIDC-->>STS: 공개키 반환
    STS->>STS: JWT 서명 검증 +
Trust Policy 확인
    STS-->>Pod: 임시 자격증명 발급
    Pod->>S3: PutObject (임시 자격증명 사용)
    S3-->>Pod: 성공
Pod 안에서는 aws s3 cp file.txt s3://my-bucket/ 같은 명령이나 SDK 호출을 실행할 뿐이고, AWS SDK가 내부적으로 JWT → STS → 임시 자격증명 흐름을 처리합니다.
IMDS 방식과의 근본적 차이
| IMDS (Instance Profile) | IRSA | |
|---|---|---|
| 자격증명 소스 | EC2 메타데이터 (노드 단위) | STS AssumeRoleWithWebIdentity (SA 단위) |
| 권한 범위 | 노드 위의 모든 Pod가 동일 권한 | ServiceAccount별로 다른 IAM Role |
| AWS 자격증명 저장 | 없음 (IMDS에서 실시간 조회) | 없음 (JWT로 임시 발급) |
| 신뢰 체인 | EC2 → IMDS → IAM Role | kube-apiserver(JWT 서명) → OIDC → STS → IAM Role |
실습 - 별도 권한 부여하기
SA 없이 생성해보기 (비추천)
- 보안상의 이유로, 파드의 워크로드가 Kubernetes API 서버를 호출하지 않는 경우 파드에 토큰을 포함하지 않는 것이 좋습니다.
automountServiceAccountToken: false를 설정하면 Pod에 기본 ServiceAccount 토큰이 자동 마운트되지 않습니다.
다만 이 설정은 쿠버네티스 API용 ServiceAccount 토큰 자동 마운트만 끄는 것입니다. AWS 자격증명 획득 경로까지 막는 설정은 아닙니다. IRSA나 Pod Identity를 설정하지 않은 Pod에서 AWS CLI를 실행하면, AWS SDK/CLI의 기본 credential provider chain에 따라 다른 경로를 찾습니다. EKS 워커 노드에서 IMDS 접근이 가능하면 노드 IAM Role의 임시 자격증명을 사용하려고 시도할 수 있습니다.
이를 확인하기 위해 default 네임스페이스에 별도 ServiceAccount 지정 없이 AWS CLI Pod를 실행합니다.
cat <<EOF | kubectl apply -f -
apiVersion: v1
kind: Pod
metadata:
  name: eks-iam-test1
spec:
  containers:
    - name: my-aws-cli
      image: amazon/aws-cli:latest
      args: ["s3", "ls"]
  restartPolicy: Never
  automountServiceAccountToken: false
  terminationGracePeriodSeconds: 0
EOF

kubectl get pod
kubectl describe pod eks-iam-test1
kubectl logs eks-iam-test1
kubectl delete pod eks-iam-test1
Pod 상세를 보면 ServiceAccount는 default로 표시되지만, automountServiceAccountToken: false 때문에 컨테이너에 쿠버네티스 ServiceAccount 토큰이 마운트되지 않습니다.
$ kubectl describe pod eks-iam-test1
Name:             eks-iam-test1
Namespace:        default
Service Account:  default
Status:           Running
Containers:
  my-aws-cli:
    Image:         amazon/aws-cli:latest
    Args:
      s3
      ls
    Environment:    <none>
    Mounts:         <none>
Volumes:                      <none>
로그를 확인하면 S3 버킷 목록 조회가 실패합니다.
$ kubectl logs eks-iam-test1
aws: [ERROR]: An error occurred (AccessDenied) when calling the ListBuckets operation: User: arn:aws:sts::<ACCOUNT_ID>:assumed-role/myeks-ng-1/<INSTANCE_ID> is not authorized to perform: s3:ListAllMyBuckets because no identity-based policy allows the s3:ListAllMyBuckets action
여기서 중요한 점은 에러가 Unable to locate credentials가 아니라 AccessDenied라는 것입니다. 즉, AWS CLI가 아예 자격증명을 못 찾은 것이 아니라, 노드 IAM Role인 myeks-ng-1의 임시 자격증명을 사용해 S3 ListBuckets를 호출했고 해당 Role에 s3:ListAllMyBuckets 권한이 없어서 거부된 것입니다.
정리하면 이 실습 결과는 정상입니다.
| 확인 항목 | 결과 |
|---|---|
| 쿠버네티스 ServiceAccount 토큰 마운트 | automountServiceAccountToken: false로 비활성화 |
| IRSA/Pod Identity 연결 | 없음 |
| AWS CLI가 사용한 자격증명 | 노드 IAM Role의 임시 자격증명으로 추정 |
S3 ListBuckets 결과 |
노드 IAM Role에 권한이 없어 AccessDenied |
CloudTrail에서는 ListBuckets 이벤트의 principal이 애플리케이션용 ServiceAccount가 아니라 노드 IAM Role 세션으로 남는지 확인하면 됩니다. 이번 로그 기준으로는 arn:aws:sts::<ACCOUNT_ID>:assumed-role/myeks-ng-1/<INSTANCE_ID> 형태가 핵심 단서입니다. 이 방식은 Pod 단위 권한 분리가 되지 않으므로, 이후 실습에서는 IRSA 또는 Pod Identity로 ServiceAccount 단위의 IAM Role을 연결해 비교합니다.
userIdentity.arn과 sessionIssuer.arn을 보면 애플리케이션 Pod 전용 IAM Role이 아니라, 워커 노드 IAM Role인 myeks-ng-1 세션으로 호출된 것을 확인할 수 있습니다. errorCode는 AccessDenied이며, 권한이 없는 동작은 s3:ListAllMyBuckets입니다.
{
  "userIdentity": {
    "type": "AssumedRole",
    "arn": "arn:aws:sts::<ACCOUNT_ID>:assumed-role/myeks-ng-1/<INSTANCE_ID>",
    "sessionContext": {
      "sessionIssuer": {
        "type": "Role",
        "arn": "arn:aws:iam::<ACCOUNT_ID>:role/myeks-ng-1",
        "userName": "myeks-ng-1"
      },
      "ec2RoleDelivery": "2.0"
    }
  },
  "eventTime": "2026-04-12T16:38:19Z",
  "eventSource": "s3.amazonaws.com",
  "eventName": "ListBuckets",
  "errorCode": "AccessDenied",
  "errorMessage": "User: arn:aws:sts::<ACCOUNT_ID>:assumed-role/myeks-ng-1/<INSTANCE_ID> is not authorized to perform: s3:ListAllMyBuckets because no identity-based policy allows the s3:ListAllMyBuckets action",
  "additionalEventData": {
    "SignatureVersion": "SigV4",
    "AuthenticationMethod": "AuthHeader"
  }
}
기본 Kubernetes API 접근용 ServiceAccount 토큰 확인
aud : https://kubernetes.default.svc
- Kubernetes 1.12에서 ProjectedServiceAccountToken 이란 새로운 기능이 도입되었습니다.
- 이 기능을 통해 Kubernetes의 TokenRequest API에서 발급된 OIDC JWT 토큰을 Pod에 프로젝션 볼륨으로 마운트할 수 있습니다.
- 관련 서비스 계정 토큰 볼륨 프로젝션 플래그는 EKS 클러스터에서 기본적으로 활성화되어 있습니다.
- 따라서 과거처럼 Secret 기반 ServiceAccount 토큰이 자동 생성되어 붙는 방식이 아니라, Pod에는 OIDC JWT ServiceAccount 토큰이 projected volume으로 마운트됩니다.
이번에는 automountServiceAccountToken을 끄지 않고 Pod를 생성해서 기본 ServiceAccount 토큰이 어떻게 붙는지 확인합니다.
cat <<EOF | kubectl apply -f -
apiVersion: v1
kind: Pod
metadata:
  name: eks-iam-test2
spec:
  containers:
    - name: my-aws-cli
      image: amazon/aws-cli:latest
      command: ["sleep", "36000"]
  restartPolicy: Never
  terminationGracePeriodSeconds: 0
EOF

kubectl get pod
kubectl describe pod eks-iam-test2
kubectl get pod eks-iam-test2 -o yaml
kubectl get pod eks-iam-test2 -o yaml | grep serviceAccount
automountServiceAccountToken을 별도로 false로 지정하지 않았으므로, Pod에는 default ServiceAccount와 projected volume이 자동으로 연결됩니다.
$ kubectl describe pod eks-iam-test2
Name:             eks-iam-test2
Namespace:        default
Service Account:  default
Status:           Running
Containers:
  my-aws-cli:
    Image:         amazon/aws-cli:latest
    Command:
      sleep
      36000
    Environment:    <none>
    Mounts:
      /var/run/secrets/kubernetes.io/serviceaccount from kube-api-access-qfxp5 (ro)
Volumes:
  kube-api-access-qfxp5:
    Type:                    Projected (a volume that contains injected data from multiple sources)
    TokenExpirationSeconds:  3607
    ConfigMapName:           kube-root-ca.crt
    DownwardAPI:             true
YAML로 보면 serviceAccountName: default와 serviceAccountToken projected volume이 함께 보입니다.
$ kubectl get pod eks-iam-test2 -o yaml | grep serviceAccount
  serviceAccount: default
  serviceAccountName: default
      - serviceAccountToken:
토큰이 마운트된 경로도 확인합니다. 토큰 원문은 민감한 값이므로 문서에는 남기지 않습니다.
kubectl get sa default
kubectl exec -it eks-iam-test2 -- ls -al /var/run/secrets/kubernetes.io/serviceaccount
kubectl exec -it eks-iam-test2 -- ls -al /var/run/secrets/kubernetes.io/serviceaccount/..data

# 토큰 원문은 로컬 실습에서만 확인하고 문서에는 남기지 않습니다.
kubectl exec -it eks-iam-test2 -- cat /var/run/secrets/kubernetes.io/serviceaccount/token
$ kubectl get sa default
NAME      AGE
default   5h12m

$ kubectl exec -it eks-iam-test2 -- ls -al /var/run/secrets/kubernetes.io/serviceaccount
total 0
drwxrwxrwt. 3 root root 140 Apr 12 16:52 .
drwxr-xr-x. 3 root root  28 Apr 12 16:52 ..
drwxr-xr-x. 2 root root 100 Apr 12 16:52 ..2026_04_12_16_52_42.2061614946
lrwxrwxrwx. 1 root root  32 Apr 12 16:52 ..data -> ..2026_04_12_16_52_42.2061614946
lrwxrwxrwx. 1 root root  13 Apr 12 16:52 ca.crt -> ..data/ca.crt
lrwxrwxrwx. 1 root root  16 Apr 12 16:52 namespace -> ..data/namespace
lrwxrwxrwx. 1 root root  12 Apr 12 16:52 token -> ..data/token
토큰을 디코딩해보면 aud가 https://kubernetes.default.svc이고, sub는 system:serviceaccount:default:default입니다. 즉, 이 토큰은 AWS STS용이 아니라 kube-apiserver 인증용 ServiceAccount 토큰입니다.
이 상태에서 AWS CLI로 S3 버킷 목록을 조회해도 결과는 앞의 실습과 같습니다.
kubectl exec -it eks-iam-test2 -- aws s3 ls
$ kubectl exec -it eks-iam-test2 -- aws s3 ls
aws: [ERROR]: An error occurred (AccessDenied) when calling the ListBuckets operation: User: arn:aws:sts::<ACCOUNT_ID>:assumed-role/myeks-ng-1/<INSTANCE_ID> is not authorized to perform: s3:ListAllMyBuckets because no identity-based policy allows the s3:ListAllMyBuckets action
command terminated with exit code 254
Pod 안에 Kubernetes API용 ServiceAccount 토큰이 마운트되어 있어도, 그것만으로 AWS IAM Role이 연결되지는 않습니다. IRSA라면 aud: sts.amazonaws.com인 web identity token과 ServiceAccount annotation이 필요하고, Pod Identity라면 Pod Identity Association과 Pod Identity Agent 경로가 필요합니다. 여기서는 둘 다 없으므로 AWS CLI는 여전히 노드 IAM Role 자격증명을 사용하려고 시도하고, 노드 Role에 S3 권한이 없어 AccessDenied가 발생합니다.
IRSA에서 사용하는 토큰은 앞에서 본 기본 ServiceAccount 토큰과 별도로 발급됩니다. 쿠버네티스의 TokenRequest API는 audience를 지정한 OIDC JWT 토큰을 만들 수 있고, IRSA에서는 aud: sts.amazonaws.com인 토큰을 AWS STS AssumeRoleWithWebIdentity 호출에 사용합니다.
하지만 이 두 번째 토큰을 Pod에 넣으려면 Pod 생성 시점에 Pod spec을 변경하는 추가 구성 요소가 필요합니다. EKS에서는 amazon-eks-pod-identity-webhook이 이 역할을 하며, Amazon EKS 클러스터에는 사전 설치되어 있습니다. 이름에 pod-identity가 들어가지만, 여기서 말하는 웹훅은 앞에서 비교한 신규 EKS Pod Identity Agent와는 별개로 IRSA에서 사용되는 admission webhook입니다.
이 웹훅은 Pod 생성 API 요청을 가로채 ServiceAccount의 eks.amazonaws.com/role-arn annotation을 확인하고, 조건이 맞으면 Pod에 AWS SDK가 읽을 수 있는 환경변수와 web identity token volume을 주입합니다.
기본 ServiceAccount 토큰:
aud = https://kubernetes.default.svc
용도 = kube-apiserver 인증

IRSA용 web identity token:
aud = sts.amazonaws.com
용도 = STS AssumeRoleWithWebIdentity 호출
주입 = amazon-eks-pod-identity-webhook
실습 - IRSA 설정 및 SA 토큰 확인
aud : sts.amazonaws.com
IRSA 설정하기
IRSA를 사용하려면 먼저 EKS 클러스터의 OIDC issuer가 AWS IAM OIDC Provider로 등록되어 있어야 합니다. eksctl로 클러스터를 만들 때 옵션을 주었거나, 별도로 eksctl utils associate-iam-oidc-provider를 실행했다면 이미 등록되어 있을 수 있습니다.
먼저 클러스터의 OIDC provider ID를 확인합니다.
oidc_id=$(aws eks describe-cluster \
  --name myeks \
  --query "cluster.identity.oidc.issuer" \
  --output text | cut -d "/" -f 5)

echo $oidc_id
예시 출력입니다.
79980C89B3BA24DBE37EBD7C95B5D021
이 OIDC provider ID가 IAM에 이미 등록되어 있는지도 확인합니다.
aws iam list-open-id-connect-providers | grep $oidc_id | cut -d "/" -f4
위 명령은 AWS CLI 기본 JSON 출력에 grep/cut을 적용하기 때문에 결과 끝에 "가 붙을 수 있습니다. 깔끔하게 보려면 ARN 목록만 text로 뽑아 확인합니다.
aws iam list-open-id-connect-providers \
  --query "OpenIDConnectProviderList[].Arn" \
  --output text | tr "\t" "\n" | grep "$oidc_id" | awk -F/ '{print $NF}'
예시 출력입니다.
79980C89B3BA24DBE37EBD7C95B5D021
현재처럼 79980C89B3BA24DBE37EBD7C95B5D021가 출력되면 IAM에 아래 OIDC Provider가 이미 등록된 상태입니다.
arn:aws:iam::<ACCOUNT_ID>:oidc-provider/oidc.eks.ap-northeast-2.amazonaws.com/id/79980C89B3BA24DBE37EBD7C95B5D021
반대로 출력이 없다면 해당 EKS 클러스터의 OIDC provider가 IAM에 아직 등록되지 않은 상태입니다. 이 경우 IRSA를 사용하기 전에 OIDC provider association을 먼저 구성해야 합니다.
OIDC issuer URL 자체도 변수에 저장해두면 이후 확인이 편합니다.
IDP=$(aws eks describe-cluster \
  --name myeks \
  --query "cluster.identity.oidc.issuer" \
  --output text)

echo $IDP
OIDC discovery endpoint는 issuer URL 뒤에 /.well-known/openid-configuration을 붙여 호출합니다.
curl -s $IDP/.well-known/openid-configuration | jq .
예시 출력입니다.
{
  "issuer": "https://oidc.eks.ap-northeast-2.amazonaws.com/id/79980C89B3BA24DBE37EBD7C95B5D021",
  "jwks_uri": "https://oidc.eks.ap-northeast-2.amazonaws.com/id/79980C89B3BA24DBE37EBD7C95B5D021/keys",
  "authorization_endpoint": "urn:kubernetes:programmatic_authorization",
  "response_types_supported": [
    "id_token"
  ],
  "subject_types_supported": [
    "public"
  ],
  "claims_supported": [
    "sub",
    "iss"
  ],
  "id_token_signing_alg_values_supported": [
    "RS256"
  ]
}
jwks_uri는 JWT 서명 검증에 사용할 공개키 목록입니다. 일반적으로 issuer URL 뒤의 /keys 경로입니다.
curl -s $IDP/keys | jq .
예시 출력입니다.
{
  "keys": [
    {
      "kty": "RSA",
      "kid": "4eb2f05f5c2b18c3b1a14705d72defde74669b29",
      "use": "sig",
      "alg": "RS256",
      "n": "<PUBLIC_KEY_MODULUS>",
      "e": "AQAB"
    }
  ]
}
만약 현재 클러스터의 OIDC issuer ID가 아닌 다른 ID로 discovery endpoint나 JWKS endpoint를 호출하면 아래처럼 실패합니다.
curl -s https://oidc.eks.ap-northeast-2.amazonaws.com/id/D101CFA79EB3A774D39A52E2425B034F/.well-known/openid-configuration | jq .
curl -s https://oidc.eks.ap-northeast-2.amazonaws.com/id/032357E88E266F4AE7C2E8CF6F5EFEB0/.well-known/openid-configuration | jq .
curl -s https://oidc.eks.ap-northeast-2.amazonaws.com/id/032357E88E266F4AE7C2E8CF6F5EFEB0/keys | jq .
{
  "id": "032357E88E266F4AE7C2E8CF6F5EFEB0",
  "message": "ID is not found"
}
이 출력은 IAM 등록 여부 문제가 아니라, 호출한 OIDC issuer ID가 현재 EKS 클러스터의 issuer ID가 아니라는 뜻입니다. 현재 클러스터에서 확인된 issuer ID는 79980C89B3BA24DBE37EBD7C95B5D021이므로, discovery endpoint와 /keys도 같은 ID로 호출해야 합니다. 클러스터를 새로 만들었거나 예전 실습 클러스터를 삭제한 경우 이전 OIDC ID로는 ID is not found가 나올 수 있습니다.
이 과정을 보는 이유는 IRSA의 검증 원리와 연결됩니다.
- Pod의 AWS SDK가
aud: sts.amazonaws.com인 web identity token을 STS로 전달합니다. - STS는 토큰의
iss를 보고 어떤 OIDC issuer가 발급한 토큰인지 확인합니다. - AWS IAM에 등록된 OIDC provider와 issuer가 일치하는지 확인합니다.
jwks_uri의 공개키로 JWT 서명을 검증합니다.sub,aud,exp같은 클레임을 IAM Role Trust Policy 조건과 비교합니다.- 조건이 맞으면 STS가
AssumeRoleWithWebIdentity로 임시 자격증명을 발급합니다.
즉, 위의 discovery endpoint와 JWKS는 "EKS가 발급한 ServiceAccount 토큰을 AWS가 어떻게 검증할 수 있는가"를 보여주는 지점입니다. 이후 단계에서는 IAM Role과 Trust Policy를 만들고, ServiceAccount annotation을 통해 이 Role을 Pod에 연결합니다.
쿠버네티스 SA가 IAM 역할을 통해 사용할 IAM Policy 생성하기
이번 실습에서는 AWS Load Balancer Controller가 사용할 IAM Policy를 예시로 만듭니다. 이 Policy는 나중에 IAM Role에 붙고, 그 IAM Role을 Kubernetes ServiceAccount와 연결하게 됩니다.
먼저 AWS Load Balancer Controller 저장소에서 IAM Policy 문서를 내려받습니다.
curl -o aws_lb_controller_policy.json \
  https://raw.githubusercontent.com/kubernetes-sigs/aws-load-balancer-controller/refs/heads/main/docs/install/iam_policy.json

cat aws_lb_controller_policy.json | jq
정책 파일에는 AWS Load Balancer Controller가 ELB, Target Group, Listener, Security Group 등을 조회하고 생성/수정/삭제하기 위한 권한이 들어 있습니다. 예를 들면 아래 범주의 권한이 포함됩니다.
iam:CreateServiceLinkedRole

ec2:Describe*
ec2:CreateSecurityGroup
ec2:AuthorizeSecurityGroupIngress
ec2:RevokeSecurityGroupIngress
ec2:CreateTags
ec2:DeleteTags
ec2:DeleteSecurityGroup

elasticloadbalancing:Describe*
elasticloadbalancing:CreateLoadBalancer
elasticloadbalancing:CreateTargetGroup
elasticloadbalancing:CreateListener
elasticloadbalancing:CreateRule
elasticloadbalancing:Modify*
elasticloadbalancing:Delete*
elasticloadbalancing:RegisterTargets
elasticloadbalancing:DeregisterTargets

acm:ListCertificates
acm:DescribeCertificate
iam:ListServerCertificates
iam:GetServerCertificate
wafv2:*
shield:*
위 정책은 실습 편의를 위해 main 브랜치의 정책 파일을 내려받는 방식입니다. 실제 운영 환경에서는 설치하려는 AWS Load Balancer Controller 버전에 맞는 문서나 릴리스의 IAM Policy를 사용하는 편이 좋습니다.
이제 내려받은 JSON 파일로 IAM Policy를 생성합니다.
aws iam create-policy \
  --policy-name AWSLoadBalancerControllerIAMPolicy \
  --policy-document file://aws_lb_controller_policy.json
예시 출력입니다.
{
  "Policy": {
    "PolicyName": "AWSLoadBalancerControllerIAMPolicy",
    "PolicyId": "<POLICY_ID>",
    "Arn": "arn:aws:iam::<ACCOUNT_ID>:policy/AWSLoadBalancerControllerIAMPolicy",
    "Path": "/",
    "DefaultVersionId": "v1",
    "AttachmentCount": 0,
    "PermissionsBoundaryUsageCount": 0,
    "IsAttachable": true,
    "CreateDate": "2026-04-12T17:11:14+00:00",
    "UpdateDate": "2026-04-12T17:11:14+00:00"
  }
}
생성된 Policy는 ARN으로 다시 조회해 확인합니다.
ACCOUNT_ID=$(aws sts get-caller-identity --query "Account" --output text)

aws iam get-policy \
  --policy-arn arn:aws:iam::$ACCOUNT_ID:policy/AWSLoadBalancerControllerIAMPolicy | jq
예시 출력입니다.
{
  "Policy": {
    "PolicyName": "AWSLoadBalancerControllerIAMPolicy",
    "PolicyId": "<POLICY_ID>",
    "Arn": "arn:aws:iam::<ACCOUNT_ID>:policy/AWSLoadBalancerControllerIAMPolicy",
    "Path": "/",
    "DefaultVersionId": "v1",
    "AttachmentCount": 0,
    "PermissionsBoundaryUsageCount": 0,
    "IsAttachable": true,
    "CreateDate": "2026-04-12T17:11:14+00:00",
    "UpdateDate": "2026-04-12T17:11:14+00:00",
    "Tags": []
  }
}
여기까지는 IAM Policy만 만든 상태입니다. 아직 어떤 Pod나 ServiceAccount도 이 권한을 사용할 수 없습니다. 다음 단계에서 IAM Role의 Trust Policy를 구성하고, 이 Policy를 Role에 붙인 뒤, Kubernetes ServiceAccount와 연결해야 IRSA로 권한이 전달됩니다.
ServiceAccount에 IAM Role 연결하기
AWS Load Balancer Controller가 사용할 ServiceAccount에 IAM Role을 연결합니다. eksctl create iamserviceaccount는 IAM Role, Trust Policy, Kubernetes ServiceAccount annotation을 한 번에 구성할 때 자주 사용합니다. eksctl 문서에서도 iamserviceaccount는 IAM Role과 Kubernetes ServiceAccount의 쌍을 의미하며, ServiceAccount에는 eks.amazonaws.com/role-arn annotation이 들어가야 한다고 설명합니다.
먼저 클러스터 이름을 변수로 지정하고, eksctl create iamserviceaccount로 ServiceAccount와 IAM Role을 생성합니다.
CLUSTER_NAME=myeks

eksctl create iamserviceaccount \
  --cluster=$CLUSTER_NAME \
  --namespace=kube-system \
  --name=aws-load-balancer-controller \
  --attach-policy-arn=arn:aws:iam::$ACCOUNT_ID:policy/AWSLoadBalancerControllerIAMPolicy \
  --approve
실행 결과입니다.
2026-04-13 02:19:15 [ℹ]  1 iamserviceaccount (kube-system/aws-load-balancer-controller) was included (based on the include/exclude rules)
2026-04-13 02:19:15 [!]  serviceaccounts that exist in Kubernetes will be excluded, use --override-existing-serviceaccounts to override
2026-04-13 02:19:15 [ℹ]  1 task: {
    2 sequential sub-tasks: {
        create IAM role for serviceaccount "kube-system/aws-load-balancer-controller",
        create serviceaccount "kube-system/aws-load-balancer-controller",
    } }
2026-04-13 02:19:15 [ℹ]  building iamserviceaccount stack "eksctl-myeks-addon-iamserviceaccount-kube-system-aws-load-balancer-controller"
2026-04-13 02:19:15 [ℹ]  deploying stack "eksctl-myeks-addon-iamserviceaccount-kube-system-aws-load-balancer-controller"
2026-04-13 02:19:15 [ℹ]  waiting for CloudFormation stack "eksctl-myeks-addon-iamserviceaccount-kube-system-aws-load-balancer-controller"
2026-04-13 02:19:46 [ℹ]  created serviceaccount "kube-system/aws-load-balancer-controller"
생성 후 eksctl 기준과 Kubernetes 기준에서 각각 확인합니다.
eksctl get iamserviceaccount --cluster $CLUSTER_NAME
kubectl get serviceaccounts -n kube-system aws-load-balancer-controller -o yaml
$ eksctl get iamserviceaccount --cluster $CLUSTER_NAME
NAMESPACE       NAME                            ROLE ARN
kube-system     aws-load-balancer-controller    arn:aws:iam::<ACCOUNT_ID>:role/eksctl-myeks-addon-iamserviceaccount-kube-sys-Role1-<SUFFIX>
apiVersion: v1
kind: ServiceAccount
metadata:
  annotations:
    eks.amazonaws.com/role-arn: arn:aws:iam::<ACCOUNT_ID>:role/eksctl-myeks-addon-iamserviceaccount-kube-sys-Role1-<SUFFIX>
  labels:
    app.kubernetes.io/managed-by: eksctl
  name: aws-load-balancer-controller
  namespace: kube-system
핵심은 ServiceAccount annotation입니다. aws-load-balancer-controller Pod가 이 ServiceAccount를 사용하면 IRSA webhook이 이 annotation을 보고 aud: sts.amazonaws.com 토큰과 AWS SDK용 환경변수를 Pod에 주입할 수 있습니다.
eksctl get iamserviceaccount에는 있는데 Kubernetes ServiceAccount가 없을 때
아래처럼 eksctl에는 iamserviceaccount가 보이지만, 실제 Kubernetes ServiceAccount가 없을 수 있습니다.
$ eksctl get iamserviceaccount --cluster $CLUSTER_NAME
NAMESPACE       NAME                            ROLE ARN
kube-system     aws-load-balancer-controller    arn:aws:iam::<ACCOUNT_ID>:role/eksctl-myeks-addon-iamserviceaccount-kube-sys-Role1-<OLD_SUFFIX>

$ kubectl get serviceaccounts -n kube-system aws-load-balancer-controller
Error from server (NotFound): serviceaccounts "aws-load-balancer-controller" not found
이 상태에서 --override-existing-serviceaccounts를 붙여 다시 실행하면 아래처럼 no tasks가 나올 수 있습니다.
2026-04-13 02:15:04 [ℹ]  1 existing iamserviceaccount(s) (kube-system/aws-load-balancer-controller) will be excluded
2026-04-13 02:15:04 [ℹ]  1 iamserviceaccount (kube-system/aws-load-balancer-controller) was excluded (based on the include/exclude rules)
2026-04-13 02:15:04 [!]  metadata of serviceaccounts that exist in Kubernetes will be updated, as --override-existing-serviceaccounts was set
2026-04-13 02:15:04 [ℹ]  no tasks
--override-existing-serviceaccounts는 Kubernetes에 이미 존재하는 ServiceAccount의 metadata를 업데이트할 때 쓰는 옵션입니다. eksctl/CloudFormation 쪽에는 iamserviceaccount 정보가 남아 있는데 Kubernetes ServiceAccount 오브젝트가 없는 상태라면 새 작업이 만들어지지 않을 수 있습니다.
이럴 때는 eksctl이 만든 iamserviceaccount/CloudFormation stack을 정리한 뒤 다시 생성하는 편이 가장 일관적입니다.
eksctl delete iamserviceaccount \
  --cluster=$CLUSTER_NAME \
  --namespace=kube-system \
  --name=aws-load-balancer-controller \
  --wait

eksctl create iamserviceaccount \
  --cluster=$CLUSTER_NAME \
  --namespace=kube-system \
  --name=aws-load-balancer-controller \
  --attach-policy-arn=arn:aws:iam::$ACCOUNT_ID:policy/AWSLoadBalancerControllerIAMPolicy \
  --approve
AWS LBC 설치하기
Node IAM Role 에 ELB 권한이 없는 상태입니다.
이제 AWS Load Balancer Controller를 Helm으로 설치합니다. 앞에서 IRSA용 ServiceAccount를 이미 만들었으므로, Helm chart가 ServiceAccount를 새로 만들지 않도록 serviceAccount.create=false를 지정합니다.
helm repo add eks https://aws.github.io/eks-charts
helm repo update

helm install aws-load-balancer-controller eks/aws-load-balancer-controller \
  -n kube-system \
  --version 3.1.0 \
  --set clusterName=$CLUSTER_NAME \
  --set serviceAccount.name=aws-load-balancer-controller \
  --set serviceAccount.create=false \
  --set enableCertManager=true
실행 결과입니다.
$ helm repo add eks https://aws.github.io/eks-charts
"eks" already exists with the same configuration, skipping

$ helm repo update
Hang tight while we grab the latest from your chart repositories...
...Successfully got an update from the "eks" chart repository
Update Complete. ⎈Happy Helming!⎈

$ helm install aws-load-balancer-controller eks/aws-load-balancer-controller -n kube-system --version 3.1.0 ...
NAME: aws-load-balancer-controller
LAST DEPLOYED: Mon Apr 13 02:23:06 2026
NAMESPACE: kube-system
STATUS: deployed
REVISION: 1
DESCRIPTION: Install complete
TEST SUITE: None
NOTES:
AWS Load Balancer controller installed!
Helm release와 Controller Pod를 확인합니다.
helm list -n kube-system
kubectl get pod -n kube-system -l app.kubernetes.io/name=aws-load-balancer-controller
kubectl logs -n kube-system deployment/aws-load-balancer-controller -f
$ helm list -n kube-system
NAME                            NAMESPACE     REVISION  STATUS    CHART                               APP VERSION
aws-load-balancer-controller    kube-system   1         deployed  aws-load-balancer-controller-3.1.0  v3.1.0

$ kubectl get pod -n kube-system -l app.kubernetes.io/name=aws-load-balancer-controller
NAME                                            READY   STATUS    RESTARTS   AGE
aws-load-balancer-controller-7c5488d4c6-lbgsj   0/1     Running   0          10s
aws-load-balancer-controller-7c5488d4c6-szfjb   0/1     Running   0          10s
초기에는 READY가 0/1로 보일 수 있습니다. 로그를 보면 webhook 등록과 인증서 로드가 진행되는 것을 확인할 수 있습니다.
$ kubectl logs -n kube-system deployment/aws-load-balancer-controller -f
Found 2 pods, using pod/aws-load-balancer-controller-7c5488d4c6-lbgsj
{"level":"info","msg":"version","GitVersion":"v3.1.0"}
{"level":"info","logger":"setup","msg":"adding health check for controller"}
{"level":"info","logger":"setup","msg":"adding readiness check for webhook"}
{"level":"info","logger":"controller-runtime.webhook","msg":"Registering webhook","path":"/mutate-v1-pod"}
{"level":"info","logger":"controller-runtime.webhook","msg":"Registering webhook","path":"/mutate-v1-service"}
{"level":"info","logger":"controller-runtime.webhook","msg":"Registering webhook","path":"/validate-networking-v1-ingress"}
{"level":"info","logger":"controller-runtime.metrics","msg":"Starting metrics server"}
{"level":"info","logger":"controller-runtime.webhook","msg":"Starting webhook server"}
{"level":"info","logger":"controller-runtime.certwatcher","msg":"Updated current TLS certificate"}
{"level":"info","logger":"controller-runtime.webhook","msg":"Serving webhook server","port":9443}
{"level":"info","msg":"attempting to acquire leader lease kube-system/aws-load-balancer-controller-leader..."}
AWS LBC Webhook 인증서 확인
AWS Load Balancer Controller는 ALB/NLB를 만들기만 하는 컨트롤러가 아닙니다. 사용자가 작성한 Ingress, Service, TargetGroupBinding 같은 리소스를 검증하거나 일부 설정을 보정하기 위해 admission webhook도 제공합니다.
kube-apiserver는 이 webhook으로 HTTPS 요청을 보내므로, controller webhook 서버에는 TLS 인증서가 필요합니다. 이번 설치에서는 enableCertManager=true를 지정했기 때문에 cert-manager가 인증서를 발급하고 갱신합니다.
kubectl get certificaterequests,issuers,certificates -n kube-system
kubectl get secret -n kube-system
kubectl get secret aws-load-balancer-tls -n kube-system -o yaml
$ kubectl get certificaterequests,issuers,certificates -n kube-system
NAME                                                                  APPROVED   DENIED   READY   ISSUER                                REQUESTER                                         AGE
certificaterequest.cert-manager.io/aws-load-balancer-root-cert-1      True                True    aws-load-balancer-selfsigned-issuer   system:serviceaccount:cert-manager:cert-manager   25s
certificaterequest.cert-manager.io/aws-load-balancer-serving-cert-1   True                True    aws-load-balancer-root-issuer         system:serviceaccount:cert-manager:cert-manager   25s

NAME                                                         READY   AGE
issuer.cert-manager.io/aws-load-balancer-root-issuer         True    25s
issuer.cert-manager.io/aws-load-balancer-selfsigned-issuer   True    25s

NAME                                                         READY   SECRET                        AGE
certificate.cert-manager.io/aws-load-balancer-root-cert      True    aws-load-balancer-root-cert   25s
certificate.cert-manager.io/aws-load-balancer-serving-cert   True    aws-load-balancer-tls         25s

$ kubectl get secret -n kube-system
NAME                                                 TYPE                 DATA   AGE
aws-load-balancer-root-cert                          kubernetes.io/tls    3      28s
aws-load-balancer-tls                                kubernetes.io/tls    3      27s
sh.helm.release.v1.aws-load-balancer-controller.v1   helm.sh/release.v1   1      28s
aws-load-balancer-tls Secret에는 ca.crt, tls.crt, tls.key가 들어 있습니다. 특히 tls.key는 개인키이므로 문서에는 원문을 남기지 않습니다. 확인이 필요할 때는 metadata와 key 이름 정도만 봅니다.
$ kubectl get secret aws-load-balancer-tls -n kube-system -o yaml
apiVersion: v1
data:
  ca.crt: <BASE64_CA_CERT>
  tls.crt: <BASE64_TLS_CERT>
  tls.key: <BASE64_TLS_PRIVATE_KEY>
kind: Secret
metadata:
  annotations:
    cert-manager.io/certificate-name: aws-load-balancer-serving-cert
    cert-manager.io/issuer-name: aws-load-balancer-root-issuer
  name: aws-load-balancer-tls
  namespace: kube-system
type: kubernetes.io/tls
cert-manager를 사용하지 않고 webhook 인증서를 직접 관리하면 인증서 만료 시점에 kube-apiserver의 webhook 호출이 실패할 수 있습니다. 이 경우 Ingress나 Service 관련 kubectl apply가 Internal error: failed calling webhook... 형태로 실패할 수 있으므로, 인증서 갱신 경로를 반드시 관리해야 합니다.
AWS LBC ServiceAccount와 RBAC 확인
마지막으로 Controller Deployment가 앞에서 만든 IRSA ServiceAccount를 사용하는지 확인합니다.
kubectl get serviceaccounts -n kube-system aws-load-balancer-controller -o yaml
kubectl rolesum -n kube-system aws-load-balancer-controller
kubectl get deployment -n kube-system aws-load-balancer-controller
kubectl describe deploy -n kube-system aws-load-balancer-controller
kubectl describe deploy -n kube-system aws-load-balancer-controller | grep 'Service Account'
ServiceAccount에는 IRSA Role ARN annotation이 있어야 합니다.
apiVersion: v1
kind: ServiceAccount
metadata:
  annotations:
    eks.amazonaws.com/role-arn: arn:aws:iam::<ACCOUNT_ID>:role/eksctl-myeks-addon-iamserviceaccount-kube-sys-Role1-<SUFFIX>
  labels:
    app.kubernetes.io/managed-by: eksctl
  name: aws-load-balancer-controller
  namespace: kube-system
rolesum 결과를 보면 두 종류의 Kubernetes RBAC 바인딩이 보입니다.
ServiceAccount: kube-system/aws-load-balancer-controller

Policies:
• [RB] kube-system/aws-load-balancer-controller-leader-election-rolebinding
  ⟶ [R] kube-system/aws-load-balancer-controller-leader-election-role

• [CRB] */aws-load-balancer-controller-rolebinding
  ⟶ [CR] */aws-load-balancer-controller-role
첫 번째 RoleBinding은 leader election에 필요한 configmaps, leases.coordination.k8s.io 권한이고, 두 번째 ClusterRoleBinding은 Ingress, Service, TargetGroupBinding, Gateway API, Node, Pod 등을 감시하고 조정하기 위한 클러스터 범위 권한입니다.
Deployment도 정상적으로 2개 replica가 준비되어 있고, Pod template이 aws-load-balancer-controller ServiceAccount를 사용합니다.
$ kubectl get deployment -n kube-system aws-load-balancer-controller
NAME                           READY   UP-TO-DATE   AVAILABLE   AGE
aws-load-balancer-controller   2/2     2            2           46s

$ kubectl describe deploy -n kube-system aws-load-balancer-controller | grep 'Service Account'
  Service Account:  aws-load-balancer-controller
kubectl describe deploy의 주요 내용은 아래와 같습니다.
Replicas:               2 desired | 2 updated | 2 total | 2 available | 0 unavailable
Service Account:        aws-load-balancer-controller
Image:                  public.ecr.aws/eks/aws-load-balancer-controller:v3.1.0
Ports:                  9443/TCP (webhook-server), 8080/TCP (metrics-server)
Args:
  --cluster-name=myeks
  --ingress-class=alb
Mounts:
  /tmp/k8s-webhook-server/serving-certs from cert (ro)
Volumes:
  cert:
    Type:        Secret
    SecretName:  aws-load-balancer-tls
IRSA Webhook이 주입한 환경 변수와 토큰 볼륨 확인
그런데 실제 Pod를 확인하면 Deployment template에는 없던 AWS 관련 환경 변수와 두 번째 토큰 볼륨이 추가되어 있습니다.
먼저 Deployment YAML을 확인해보면 aws-load-balancer-controller는 cert 볼륨만 가지고 있습니다. 이 시점에는 AWS_ROLE_ARN, AWS_WEB_IDENTITY_TOKEN_FILE, aws-iam-token 볼륨이 보이지 않습니다.
kubectl get deploy -n kube-system aws-load-balancer-controller -o yaml
spec:
  template:
    spec:
      serviceAccountName: aws-load-balancer-controller
      containers:
      - args:
        - --cluster-name=myeks
        - --ingress-class=alb
        image: public.ecr.aws/eks/aws-load-balancer-controller:v3.1.0
        name: aws-load-balancer-controller
        volumeMounts:
        - mountPath: /tmp/k8s-webhook-server/serving-certs
          name: cert
          readOnly: true
      volumes:
      - name: cert
        secret:
          secretName: aws-load-balancer-tls
하지만 실제 생성된 Pod를 describe로 확인하면 아래처럼 IRSA에 필요한 환경 변수와 토큰 볼륨이 들어가 있습니다.
kubectl describe pod -n kube-system -l app.kubernetes.io/name=aws-load-balancer-controller
Service Account:      aws-load-balancer-controller

Environment:
  AWS_STS_REGIONAL_ENDPOINTS:   regional
  AWS_DEFAULT_REGION:           ap-northeast-2
  AWS_REGION:                   ap-northeast-2
  AWS_ROLE_ARN:                 arn:aws:iam::<ACCOUNT_ID>:role/eksctl-myeks-addon-iamserviceaccount-kube-sys-Role1-<SUFFIX>
  AWS_WEB_IDENTITY_TOKEN_FILE:  /var/run/secrets/eks.amazonaws.com/serviceaccount/token
Mounts:
  /tmp/k8s-webhook-server/serving-certs from cert (ro)
  /var/run/secrets/eks.amazonaws.com/serviceaccount from aws-iam-token (ro)
  /var/run/secrets/kubernetes.io/serviceaccount from kube-api-access-<SUFFIX> (ro)

Volumes:
  aws-iam-token:
    Type:                    Projected
    TokenExpirationSeconds:  86400
  cert:
    Type:        Secret
    SecretName:  aws-load-balancer-tls
  kube-api-access-<SUFFIX>:
    Type:                    Projected
    TokenExpirationSeconds:  3607
    ConfigMapName:           kube-root-ca.crt
    DownwardAPI:             true
Pod YAML로 보면 더 명확합니다.
kubectl get pod -n kube-system -l app.kubernetes.io/name=aws-load-balancer-controller -o yaml
env:
- name: AWS_STS_REGIONAL_ENDPOINTS
  value: regional
- name: AWS_DEFAULT_REGION
  value: ap-northeast-2
- name: AWS_REGION
  value: ap-northeast-2
- name: AWS_ROLE_ARN
  value: arn:aws:iam::<ACCOUNT_ID>:role/eksctl-myeks-addon-iamserviceaccount-kube-sys-Role1-<SUFFIX>
- name: AWS_WEB_IDENTITY_TOKEN_FILE
  value: /var/run/secrets/eks.amazonaws.com/serviceaccount/token
volumeMounts:
- mountPath: /tmp/k8s-webhook-server/serving-certs
  name: cert
  readOnly: true
- mountPath: /var/run/secrets/kubernetes.io/serviceaccount
  name: kube-api-access-<SUFFIX>
  readOnly: true
- mountPath: /var/run/secrets/eks.amazonaws.com/serviceaccount
  name: aws-iam-token
  readOnly: true
volumes:
- name: aws-iam-token
  projected:
    sources:
    - serviceAccountToken:
        audience: sts.amazonaws.com
        expirationSeconds: 86400
        path: token
- name: cert
  secret:
    secretName: aws-load-balancer-tls
- name: kube-api-access-<SUFFIX>
  projected:
    sources:
    - serviceAccountToken:
        expirationSeconds: 3607
        path: token
핵심은 aws-iam-token 볼륨의 audience가 sts.amazonaws.com이라는 점입니다. 이 토큰은 Kubernetes API 서버에 요청하기 위한 기본 ServiceAccount 토큰이 아니라, AWS STS의 AssumeRoleWithWebIdentity 요청에 사용할 Web Identity Token입니다.
반대로 kube-api-access-<SUFFIX> 볼륨은 Kubernetes API 접근에 사용하는 기본 ServiceAccount 토큰입니다. 두 토큰은 모두 ServiceAccount를 기반으로 하지만 사용 목적과 audience가 다릅니다.
이 값은 Helm Chart가 Deployment에 직접 넣은 값이 아니라, Pod 생성 시 EKS의 pod-identity-webhook Mutating Webhook이 주입한 값입니다.
kubectl get MutatingWebhookConfiguration
NAME                            WEBHOOKS   AGE
aws-load-balancer-webhook       6          3m50s
cert-manager-webhook            1          5h39m
pod-identity-webhook            1          5h45m
vpc-resource-mutating-webhook   1          5h45m
pod-identity-webhook을 확인해보면 iam-for-pods.amazonaws.com이라는 webhook이 Pod 생성 요청에 대해 동작합니다.
kubectl describe MutatingWebhookConfiguration pod-identity-webhook
kubectl get MutatingWebhookConfiguration pod-identity-webhook -o yaml
Name:            iam-for-pods.amazonaws.com
Failure Policy:  Ignore
Rules:
  Operations:
    CREATE
  Resources:
    pods
Object Selector:
  Match Expressions:
    Key:       eks.amazonaws.com/skip-pod-identity-webhook
    Operator:  DoesNotExist
정리하면 아래 순서로 동작합니다.
aws-load-balancer-controllerServiceAccount에eks.amazonaws.com/role-arnannotation이 설정됩니다.- 이 ServiceAccount를 사용하는 Pod가 생성됩니다.
- EKS의
pod-identity-webhook이 Pod 생성 요청을 가로채서 확인합니다. - ServiceAccount annotation을 기준으로
AWS_ROLE_ARN,AWS_WEB_IDENTITY_TOKEN_FILE환경 변수를 주입합니다. audience: sts.amazonaws.com인 projected ServiceAccount token 볼륨을/var/run/secrets/eks.amazonaws.com/serviceaccount/token경로에 마운트합니다.- 컨테이너 안의 AWS SDK/CLI는 이 토큰을 사용해 AWS STS에
AssumeRoleWithWebIdentity를 요청하고, 임시 자격 증명을 받아 AWS API를 호출합니다.
여기서 이름이 헷갈릴 수 있는데, 이 pod-identity-webhook은 IRSA를 위한 EKS admission webhook입니다. 최근 EKS Pod Identity에서 사용하는 eks-pod-identity-agent와는 다른 구성 요소입니다.
또한 aws-load-balancer-webhook은 AWS Load Balancer Controller가 Ingress, Service, TargetGroupBinding 같은 리소스를 검증하거나 변경하기 위해 등록한 webhook입니다. IRSA 토큰을 주입하는 역할은 aws-load-balancer-webhook이 아니라 pod-identity-webhook이 담당합니다.
여기까지 확인되면 AWS Load Balancer Controller Pod는 Kubernetes RBAC 권한과 AWS IAM 권한을 모두 사용할 준비가 된 상태입니다. Kubernetes 리소스 감시와 조정은 ClusterRole/RoleBinding으로 처리하고, AWS API 호출은 ServiceAccount annotation으로 연결된 IAM Role을 통해 처리합니다.
AWS LBC 동작 확인하기
kube-ops-view 배포 후 ALB Ingress 구성으로 배포가 제대로 되는지 확인해봅시다.
이 때는 NodePort, LoadBalancer Type 없이 할 수 있습니다.
와일드카드 인증서 발급은 (필독) 3주차 스터디에 사용될 인증서 발급하기에서 진행한 내용을 사용합니다.
kube-ops-view는 클러스터 내부에서는 ClusterIP Service로만 노출하고, 외부 접속은 AWS Load Balancer Controller가 생성하는 ALB Ingress를 통해 처리합니다.
# kube-ops-view : NodePort나 LoadBalancer Type이 필요 없습니다.
helm repo add geek-cookbook https://geek-cookbook.github.io/charts/
helm install kube-ops-view geek-cookbook/kube-ops-view \
  --version 1.2.2 \
  --set service.main.type=ClusterIP \
  --set env.TZ="Asia/Seoul" \
  --namespace kube-system

# 확인
kubectl get deploy,pod,svc,ep -n kube-system -l app.kubernetes.io/instance=kube-ops-view
Ingress에는 HTTPS Listener에 연결할 ACM 인증서 ARN과 접속할 도메인이 필요합니다. 아래의 MyDomain에는 본인의 Route53 공인 도메인을 넣습니다.
# 자신의 공인 도메인 변수 지정
MyDomain=<자신의 공인 도메인>
echo $MyDomain

# 예시
MyDomain=s3ich4n.me
echo $MyDomain

# 사용 리전의 인증서 ARN 변수 지정 : ISSUED 상태의 와일드카드 인증서 ARN을 사용합니다.
CERT_ARN=$(aws acm list-certificates --region ap-northeast-2 --query 'CertificateSummaryList[].CertificateArn' --output text)
echo $CERT_ARN

# 인증서 상태 확인 : PENDING_VALIDATION이면 DNS 검증 완료까지 기다립니다.
aws acm describe-certificate --certificate-arn $CERT_ARN --region ap-northeast-2 --query 'Certificate.Status' --output text
ACM 인증서가 여러 개라면 CERT_ARN에 여러 ARN이 한 번에 들어갈 수 있습니다.
이 경우 kubeopsview.$MyDomain에 사용할 와일드카드 인증서 ARN 하나만 직접 지정합니다.
CERT_ARN=arn:aws:acm:ap-northeast-2:<ACCOUNT_ID>:certificate/<CERTIFICATE_ID>
echo $CERT_ARN
실행 결과에서는 인증서가 처음에는 DNS 검증 대기 상태였다가 이후 ISSUED로 변경되었습니다.
$ aws acm describe-certificate --certificate-arn $CERT_ARN --region ap-northeast-2 --query 'Certificate.Status' --output text
PENDING_VALIDATION

$ aws acm describe-certificate --certificate-arn $CERT_ARN --region ap-northeast-2 --query 'Certificate.Status' --output text
ISSUED

$ echo $MyDomain
s3ich4n.me
이제 kube-ops-view용 Ingress를 생성합니다. alb.ingress.kubernetes.io/group.name: study를 사용하므로 이후 같은 그룹을 지정한 Ingress와 하나의 ALB를 공유할 수 있습니다.
# kube-ops-view용 Ingress 설정 : group 설정으로 1대의 ALB를 여러 Ingress에서 공용 사용
cat <<EOF | kubectl apply -f -
apiVersion: networking.k8s.io/v1
kind: Ingress
metadata:
  annotations:
    alb.ingress.kubernetes.io/certificate-arn: $CERT_ARN
    alb.ingress.kubernetes.io/group.name: study
    alb.ingress.kubernetes.io/listen-ports: '[{"HTTPS":443}, {"HTTP":80}]'
    alb.ingress.kubernetes.io/load-balancer-name: myeks-ingress-alb
    alb.ingress.kubernetes.io/scheme: internet-facing
    alb.ingress.kubernetes.io/ssl-redirect: "443"
    alb.ingress.kubernetes.io/success-codes: 200-399
    alb.ingress.kubernetes.io/target-type: ip
  labels:
    app.kubernetes.io/name: kubeopsview
  name: kubeopsview
  namespace: kube-system
spec:
  ingressClassName: alb
  rules:
  - host: kubeopsview.$MyDomain
    http:
      paths:
      - backend:
          service:
            name: kube-ops-view
            port:
              number: 8080
        path: /
        pathType: Prefix
EOF
ingress.networking.k8s.io/kubeopsview created
Ingress 생성 후 Service, Endpoint, Ingress 상태를 확인합니다.
kubectl get ingress,svc,ep -n kube-system

# Kube Ops View 접속 정보 확인
echo -e "Kube Ops View URL = https://kubeopsview.$MyDomain/#scale=1.5"

# macOS에서 브라우저로 열기
open "https://kubeopsview.$MyDomain/#scale=1.5"
실행 직후에는 아래처럼 Ingress의 ADDRESS가 비어 있을 수 있습니다.
$ kubectl get ingress,svc,ep -n kube-system
Warning: v1 Endpoints is deprecated in v1.33+; use discovery.k8s.io/v1 EndpointSlice

NAME                                    CLASS   HOSTS                    ADDRESS   PORTS   AGE
ingress.networking.k8s.io/kubeopsview   alb     kubeopsview.s3ich4n.me             80      4s

NAME                                        TYPE        CLUSTER-IP       EXTERNAL-IP   PORT(S)                  AGE
service/aws-load-balancer-webhook-service   ClusterIP   10.100.80.65     <none>        443/TCP                  28m
service/eks-extension-metrics-api           ClusterIP   10.100.251.200   <none>        443/TCP                  6h10m
service/kube-dns                            ClusterIP   10.100.0.10      <none>        53/UDP,53/TCP,9153/TCP   6h4m
service/kube-ops-view                       ClusterIP   10.100.72.133    <none>        8080/TCP                 12m
service/metrics-server                      ClusterIP   10.100.141.83    <none>        443/TCP                  6h4m

NAME                                          ENDPOINTS                                                               AGE
endpoints/aws-load-balancer-webhook-service   192.168.14.250:9443,192.168.18.90:9443                                  28m
endpoints/eks-extension-metrics-api           172.0.32.0:10443                                                        6h10m
endpoints/kube-dns                            192.168.14.170:9153,192.168.16.226:9153,192.168.14.170:53 + 3 more...   6h4m
endpoints/kube-ops-view                       192.168.18.18:8080                                                      12m
endpoints/metrics-server                      192.168.15.214:10251,192.168.16.213:10251                               6h4m

$ echo -e "Kube Ops View URL = https://kubeopsview.$MyDomain/#scale=1.5"
Kube Ops View URL = https://kubeopsview.s3ich4n.me/#scale=1.5
이 단계에서 AWS Load Balancer Controller가 Ingress를 감지하고 ALB, Listener, TargetGroup을 생성합니다. 동시에 target-type: ip를 사용하므로 ALB TargetGroup에는 노드가 아니라 Pod IP가 대상으로 등록됩니다.
위 출력처럼 Ingress의 ADDRESS가 비어 있으면 아직 ALB 프로비저닝이 끝나지 않은 상태입니다.
이 상태에서 https://kubeopsview.$MyDomain으로 접속하면 실패하는 것이 정상입니다.
# ADDRESS에 ALB DNS 이름이 들어오는지 대기
kubectl get ingress kubeopsview -n kube-system -w

# Ingress 이벤트 확인
kubectl describe ingress kubeopsview -n kube-system

# AWS Load Balancer Controller 로그 확인
kubectl logs -n kube-system deployment/aws-load-balancer-controller --since=10m
ADDRESS가 생겼는데도 접속이 안 되면 다음 순서로 확인합니다.
# DNS가 ALB 주소로 해석되는지 확인
dig +short kubeopsview.$MyDomain

# external-dns를 사용한다면 DNS 레코드 생성 로그 확인
kubectl logs -n external-dns deployment/external-dns --since=10m

# TargetGroupBinding 생성 여부 확인
kubectl get targetgroupbindings -A
kubectl describe targetgroupbinding -n kube-system
ADDRESS는 있는데 DNS가 비어 있으면 Route53 레코드가 아직 없거나 external-dns가 해당 Ingress를 처리하지 못한 것입니다.
DNS까지 정상인데 접속이 안 되면 TargetGroup health, ALB 보안 그룹, 인증서 ARN, Ingress 이벤트를 이어서 확인합니다.
이번 실습에서는 잠시 기다린 뒤 DNS가 ALB 주소로 정상 해석되고, HTTPS 접속도 HTTP/2 200으로 응답했습니다. Ingress 생성 직후에는 ALB 프로비저닝, TargetGroup health check, DNS 레코드 반영까지 시간이 걸릴 수 있으므로 수 분 정도 기다린 뒤 다시 확인하는 것이 좋습니다.
$ curl -Iv https://kubeopsview.$MyDomain
* Host kubeopsview.s3ich4n.me:443 was resolved.
* IPv4: 3.35.99.201, 43.201.199.38, 15.164.201.129
* Connected to kubeopsview.s3ich4n.me port 443
* SSL certificate verify ok.
* subjectAltName: host "kubeopsview.s3ich4n.me" matched cert's "*.s3ich4n.me"
< HTTP/2 200
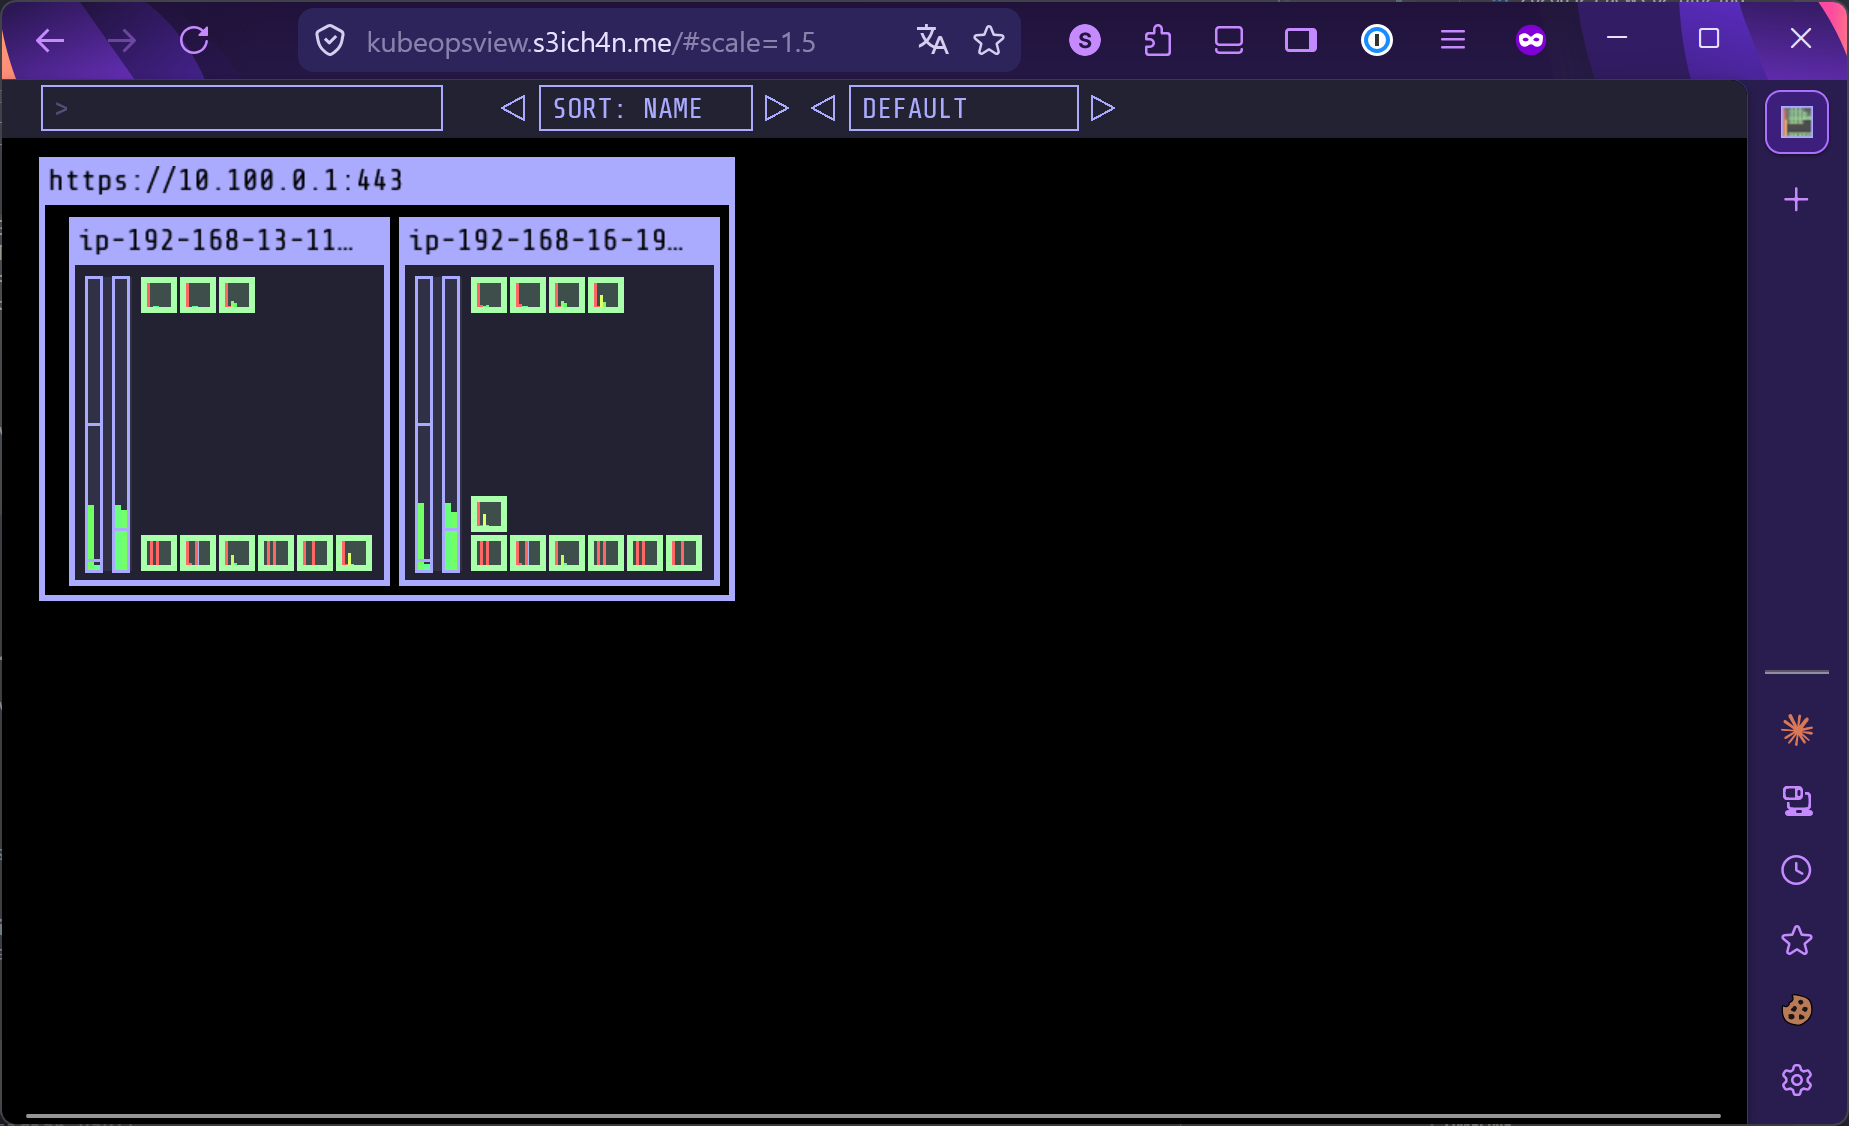
브라우저에서도 https://kubeopsview.s3ich4n.me/#scale=1.5로 정상 접속되는 것을 확인했습니다.
AWS S3 읽기 전용 권한이 필요한 파드에 IRSA 설정
앞에서는 AWS Load Balancer Controller가 IRSA를 사용하는 모습을 확인했습니다. 이번에는 직접 S3 읽기 전용 IAM Role을 Kubernetes ServiceAccount에 연결하고, 해당 ServiceAccount를 사용하는 Pod에서 AWS CLI가 어떤 권한으로 동작하는지 확인합니다.
S3 ReadOnly IAM Role과 ServiceAccount 생성
eksctl create iamserviceaccount는 IAM Role, IAM Policy 연결, IAM Role trust policy, Kubernetes ServiceAccount annotation을 한 번에 구성해줍니다.
# Create an iamserviceaccount - AWS IAM role bound to a Kubernetes service account
eksctl create iamserviceaccount \
  --name my-sa \
  --namespace default \
  --cluster $CLUSTER_NAME \
  --approve \
  --role-name eksctl-myeks-pod-irsa-s3-readonly-role \
  --attach-policy-arn $(aws iam list-policies --query 'Policies[?PolicyName==`AmazonS3ReadOnlyAccess`].Arn' --output text)
실행 결과 default/my-sa ServiceAccount가 생성되고, eksctl이 CloudFormation Stack을 통해 IAM Role을 함께 생성했습니다.
2026-04-13 03:02:55 [ℹ]  1 existing iamserviceaccount(s) (kube-system/aws-load-balancer-controller) will be excluded
2026-04-13 03:02:55 [ℹ]  1 iamserviceaccount (default/my-sa) was included (based on the include/exclude rules)
2026-04-13 03:02:55 [!]  serviceaccounts that exist in Kubernetes will be excluded, use --override-existing-serviceaccounts to override
2026-04-13 03:02:55 [ℹ]  1 task: {
    2 sequential sub-tasks: {
        create IAM role for serviceaccount "default/my-sa",
        create serviceaccount "default/my-sa",
    } }
2026-04-13 03:02:55 [ℹ]  building iamserviceaccount stack "eksctl-myeks-addon-iamserviceaccount-default-my-sa"
2026-04-13 03:02:55 [ℹ]  deploying stack "eksctl-myeks-addon-iamserviceaccount-default-my-sa"
2026-04-13 03:03:26 [ℹ]  created serviceaccount "default/my-sa"
AmazonS3ReadOnlyAccess는 AWS 관리형 정책입니다. 위처럼 조회해서 붙여도 되고, 아래처럼 ARN을 직접 써도 됩니다.
--attach-policy-arn arn:aws:iam::aws:policy/AmazonS3ReadOnlyAccess
생성 후에는 CloudFormation Stack과 IAM Role이 만들어졌는지 AWS 콘솔에서도 확인할 수 있습니다. CLI에서는 아래처럼 ServiceAccount와 annotation을 확인합니다.
eksctl get iamserviceaccount --cluster $CLUSTER_NAME
kubectl get sa
kubectl describe sa my-sa
핵심은 my-sa ServiceAccount에 eks.amazonaws.com/role-arn annotation이 들어가는 것입니다.
$ eksctl get iamserviceaccount --cluster $CLUSTER_NAME
NAMESPACE       NAME                            ROLE ARN
default         my-sa                           arn:aws:iam::<ACCOUNT_ID>:role/eksctl-myeks-pod-irsa-s3-readonly-role
kube-system     aws-load-balancer-controller    arn:aws:iam::<ACCOUNT_ID>:role/eksctl-myeks-addon-iamserviceaccount-kube-sys-Role1-<SUFFIX>

$ kubectl get sa
NAME      AGE
default   6h33m
my-sa     11m

$ kubectl describe sa my-sa
Name:                my-sa
Namespace:           default
Labels:              app.kubernetes.io/managed-by=eksctl
Annotations:         eks.amazonaws.com/role-arn: arn:aws:iam::<ACCOUNT_ID>:role/eksctl-myeks-pod-irsa-s3-readonly-role
Image pull secrets:  <none>
Mountable secrets:   <none>
Tokens:              <none>
Events:              <none>
이 annotation을 보고 EKS의 IRSA webhook이 Pod 생성 시 AWS SDK가 사용할 환경 변수와 STS용 토큰 볼륨을 주입합니다.
my-sa를 사용하는 테스트 Pod 생성
이제 my-sa ServiceAccount를 사용하는 테스트 Pod를 생성합니다.
# 파드 3번 생성
cat <<EOF | kubectl apply -f -
apiVersion: v1
kind: Pod
metadata:
  name: eks-iam-test3
spec:
  serviceAccountName: my-sa
  containers:
    - name: my-aws-cli
      image: amazon/aws-cli:latest
      command: ['sleep', '36000']
  restartPolicy: Never
  terminationGracePeriodSeconds: 0
EOF
pod/eks-iam-test3 created
같은 manifest를 다시 적용하면 이미 생성된 Pod와 spec이 같으므로 unchanged가 출력됩니다.
pod/eks-iam-test3 unchanged
Pod 생성 후 상태와 YAML을 확인합니다.
kubectl get pod eks-iam-test3
kubectl get pod eks-iam-test3 -o yaml
Pod는 정상 실행 중입니다.
$ kubectl get pod eks-iam-test3
NAME            READY   STATUS    RESTARTS   AGE
eks-iam-test3   1/1     Running   0          12s
Pod YAML에는 직접 작성하지 않은 IRSA 관련 환경 변수와 볼륨이 추가됩니다. 이것이 pod-identity-webhook mutating webhook이 주입한 값입니다.
env:
- name: AWS_STS_REGIONAL_ENDPOINTS
  value: regional
- name: AWS_DEFAULT_REGION
  value: ap-northeast-2
- name: AWS_REGION
  value: ap-northeast-2
- name: AWS_ROLE_ARN
  value: arn:aws:iam::<ACCOUNT_ID>:role/eksctl-myeks-pod-irsa-s3-readonly-role
- name: AWS_WEB_IDENTITY_TOKEN_FILE
  value: /var/run/secrets/eks.amazonaws.com/serviceaccount/token
volumeMounts:
- mountPath: /var/run/secrets/eks.amazonaws.com/serviceaccount
  name: aws-iam-token
  readOnly: true
- mountPath: /var/run/secrets/kubernetes.io/serviceaccount
  name: kube-api-access-<SUFFIX>
  readOnly: true
volumes:
- name: aws-iam-token
  projected:
    sources:
    - serviceAccountToken:
        audience: sts.amazonaws.com
        expirationSeconds: 86400
        path: token
- name: kube-api-access-<SUFFIX>
  projected:
    sources:
    - serviceAccountToken:
        expirationSeconds: 3607
        path: token
    - configMap:
        name: kube-root-ca.crt
    - downwardAPI: {}
앞에서 확인한 기본 Kubernetes API용 토큰은 /var/run/secrets/kubernetes.io/serviceaccount/token에 있고, IRSA용 토큰은 /var/run/secrets/eks.amazonaws.com/serviceaccount/token에 있습니다. 여기서는 두 번째 경로의 토큰이 중요합니다.
kubectl exec -it eks-iam-test3 -- ls /var/run/secrets/eks.amazonaws.com/serviceaccount
kubectl exec -it eks-iam-test3 -- cat /var/run/secrets/eks.amazonaws.com/serviceaccount/token ; echo
$ kubectl exec -it eks-iam-test3 -- ls /var/run/secrets/eks.amazonaws.com/serviceaccount
token

$ kubectl exec -it eks-iam-test3 -- cat /var/run/secrets/eks.amazonaws.com/serviceaccount/token ; echo
<IRSA_WEB_IDENTITY_TOKEN>
문서에 토큰 원문을 남기지는 않습니다. 디코딩이 필요하면 변수에 저장한 뒤 로컬에서 확인합니다. 변수 저장 시에는 불필요한 TTY 문자가 들어가지 않도록 -it를 빼는 편이 좋습니다.
# 서비스 어카운트 두 번째 토큰 확인
SA_TOKEN=$(kubectl exec eks-iam-test3 -- cat /var/run/secrets/eks.amazonaws.com/serviceaccount/token)
echo $SA_TOKEN

# jwt CLI 혹은 https://jwt.io/ 에서 확인
jwt decode $SA_TOKEN --json --iso8601
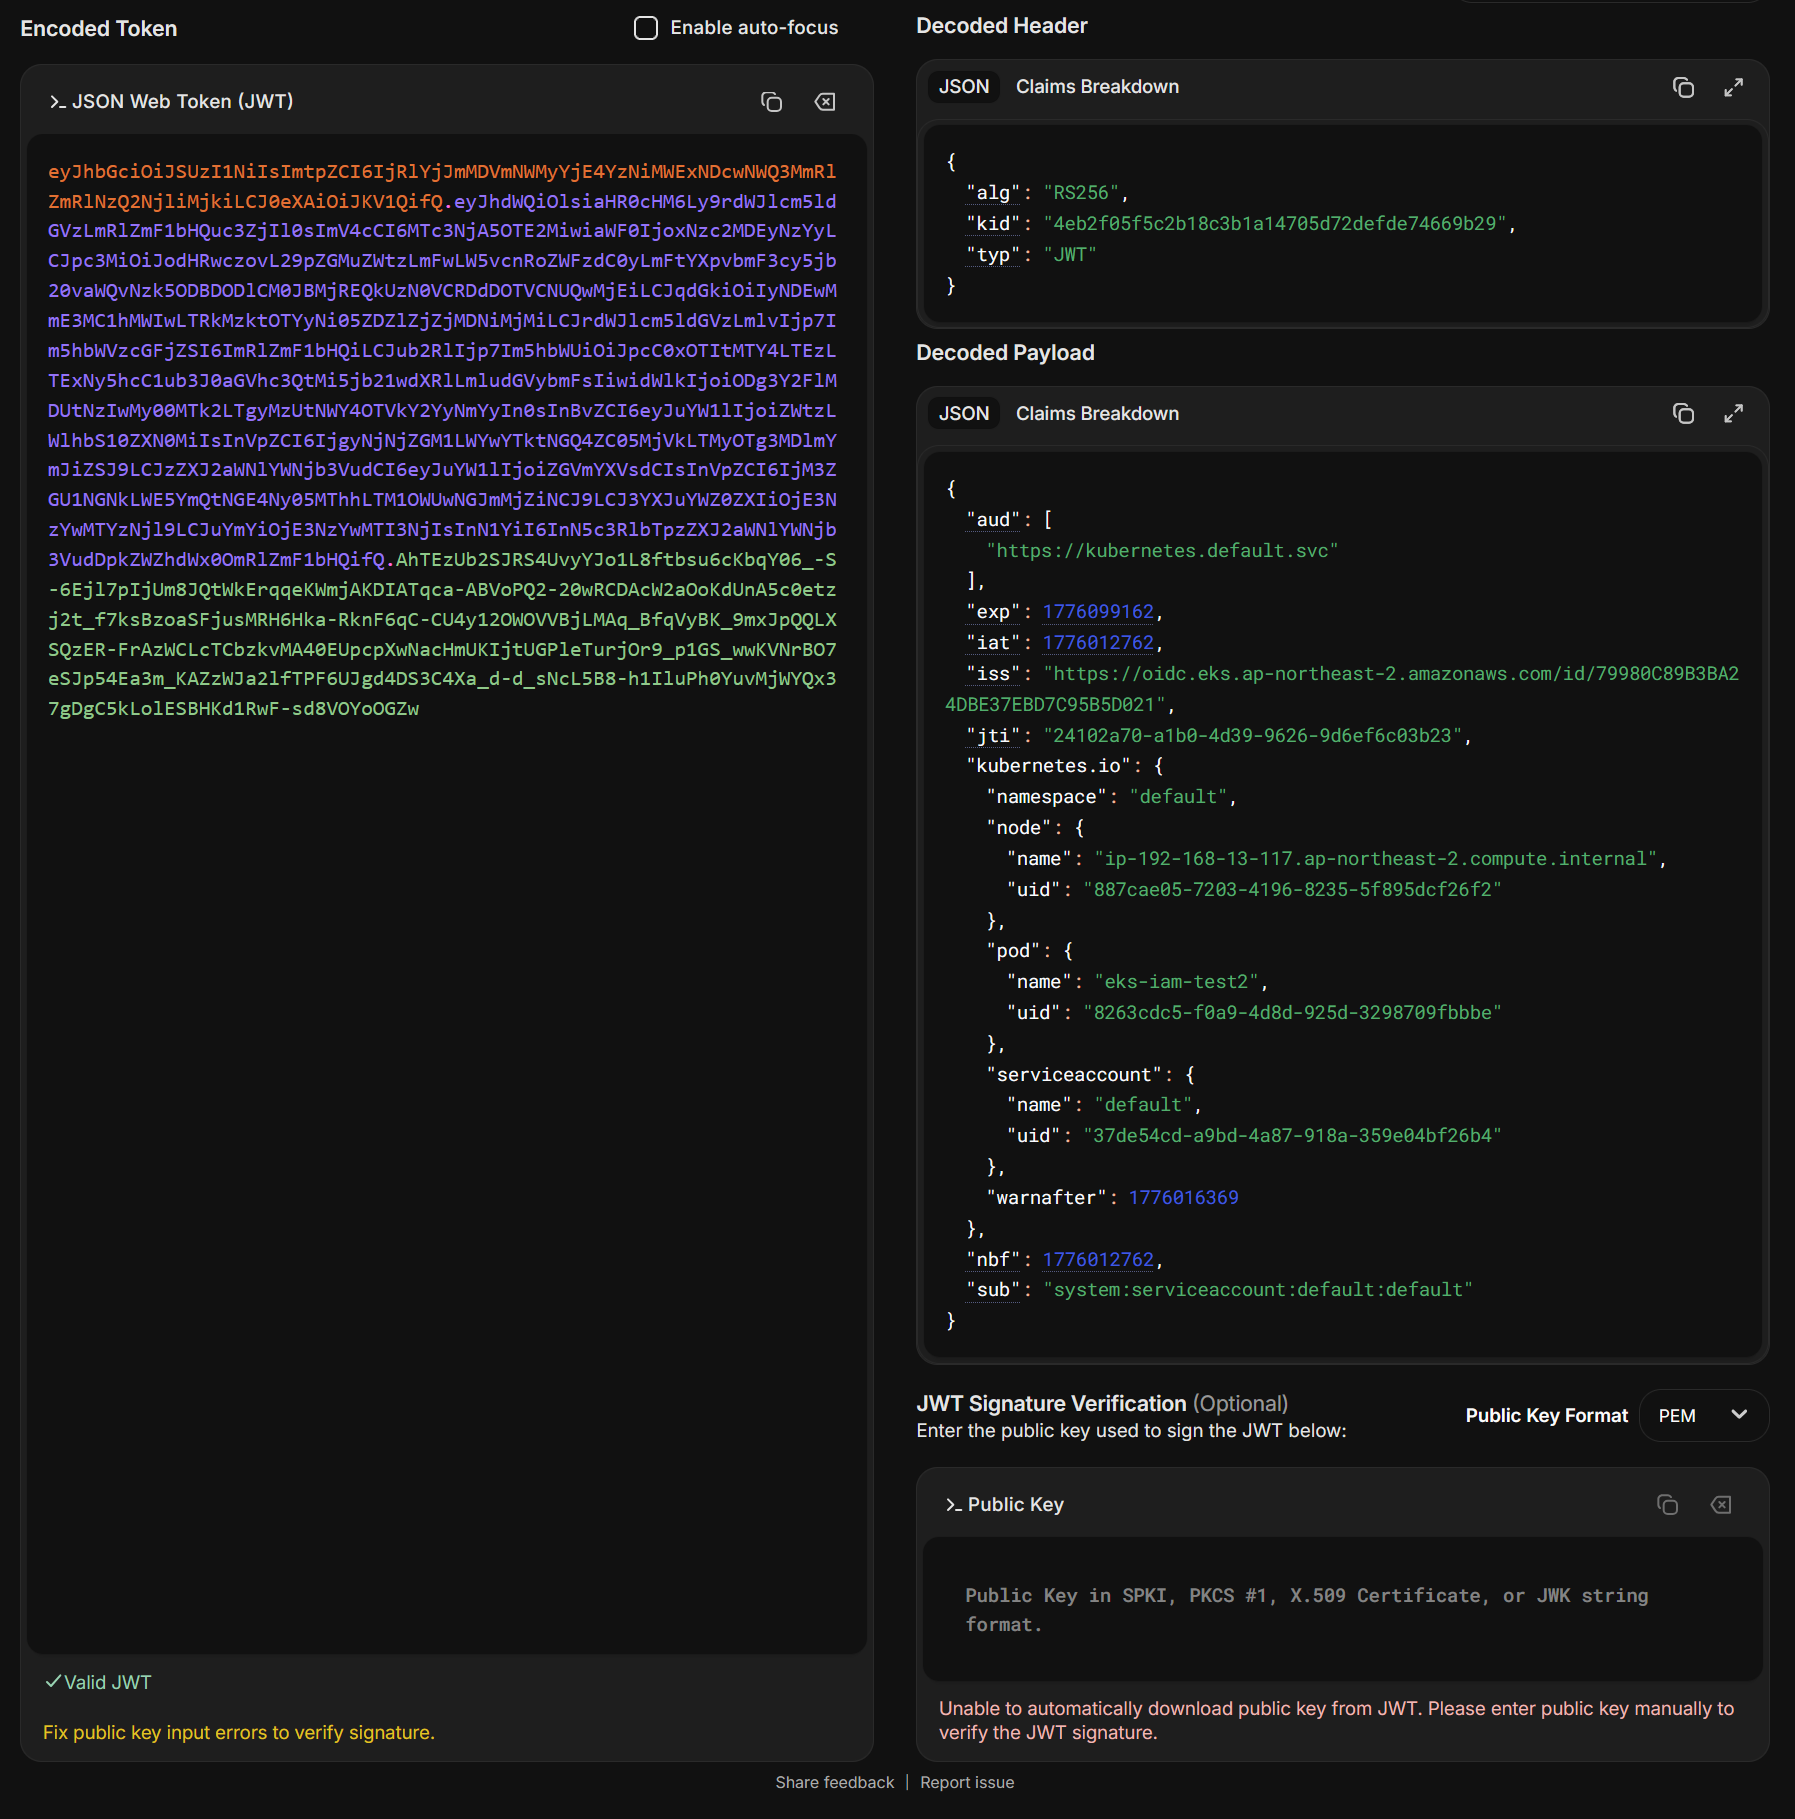
디코딩한 토큰의 핵심은 aud, iss, sub입니다.
{
  "alg": "RS256",
  "kid": "4eb2f05f5c2b18c3b1a14705d72defde74669b29",
  "typ": "JWT"
}
{
  "aud": [
    "sts.amazonaws.com"
  ],
  "exp": 1776104117,
  "iat": 1776017717,
  "iss": "https://oidc.eks.ap-northeast-2.amazonaws.com/id/79980C89B3BA24DBE37EBD7C95B5D021",
  "jti": "c99116ab-3079-40bb-beea-b10351001628",
  "kubernetes.io": {
    "namespace": "default",
    "node": {
      "name": "ip-192-168-13-117.ap-northeast-2.compute.internal",
      "uid": "887cae05-7203-4196-8235-5f895dcf26f2"
    },
    "pod": {
      "name": "eks-iam-test3",
      "uid": "a8845d55-257a-463c-9dd9-a1fd6ab61341"
    },
    "serviceaccount": {
      "name": "my-sa",
      "uid": "d0120741-226f-4278-9168-1095552d3bb7"
    }
  },
  "nbf": 1776017717,
  "sub": "system:serviceaccount:default:my-sa"
}
시간값을 UTC 기준으로 풀어보면 iat와 nbf는 2026-04-12T18:15:17Z, exp는 2026-04-13T18:15:17Z입니다. 즉, 이 IRSA용 projected token은 약 24시간짜리 토큰으로 발급되었습니다.
이 토큰은 Kubernetes API용 기본 토큰이 아니라, EKS Pod가 AWS IAM Role을 Assume하기 위한 IRSA 전용 JWT입니다. aud가 sts.amazonaws.com이므로 AWS STS가 검증 대상으로 사용하고, sub가 system:serviceaccount:default:my-sa이므로 IAM Role trust policy에서 이 ServiceAccount만 Role을 Assume하도록 제한할 수 있습니다.
Pod에서 AWS CLI 권한 확인
이제 Pod 안에서 AWS CLI가 어떤 IAM Role로 동작하는지 확인합니다.
kubectl exec -it eks-iam-test3 -- aws sts get-caller-identity --query Arn
정상이라면 노드 IAM Role이 아니라 my-sa에 연결한 IAM Role의 assumed-role ARN이 출력됩니다.
"arn:aws:sts::<ACCOUNT_ID>:assumed-role/eksctl-myeks-pod-irsa-s3-readonly-role/<SESSION_NAME>"
실행 결과에서도 노드 Role이 아니라 my-sa에 연결한 S3 ReadOnly Role로 전환된 것을 확인할 수 있습니다.
$ kubectl exec -it eks-iam-test3 -- aws sts get-caller-identity --query Arn
"arn:aws:sts::<ACCOUNT_ID>:assumed-role/eksctl-myeks-pod-irsa-s3-readonly-role/botocore-session-<SESSION_ID>"
CloudTrail에서도 AssumeRoleWithWebIdentity 이벤트를 확인할 수 있습니다. 여기서 중요한 필드는 userIdentity.type, userName, eventName, roleArn, subjectFromWebIdentityToken, audience, assumedRoleUser.arn입니다.
{
  "userIdentity": {
    "type": "WebIdentityUser",
    "principalId": "arn:aws:iam::<ACCOUNT_ID>:oidc-provider/oidc.eks.ap-northeast-2.amazonaws.com/id/79980C89B3BA24DBE37EBD7C95B5D021:sts.amazonaws.com:system:serviceaccount:default:my-sa",
    "userName": "system:serviceaccount:default:my-sa",
    "identityProvider": "arn:aws:iam::<ACCOUNT_ID>:oidc-provider/oidc.eks.ap-northeast-2.amazonaws.com/id/79980C89B3BA24DBE37EBD7C95B5D021"
  },
  "eventTime": "2026-04-12T18:16:10Z",
  "eventSource": "sts.amazonaws.com",
  "eventName": "AssumeRoleWithWebIdentity",
  "awsRegion": "ap-northeast-2",
  "sourceIPAddress": "<SOURCE_PUBLIC_IP>",
  "userAgent": "aws-cli/2.34.29 ... md/command#sts.get-caller-identity",
  "requestParameters": {
    "roleArn": "arn:aws:iam::<ACCOUNT_ID>:role/eksctl-myeks-pod-irsa-s3-readonly-role",
    "roleSessionName": "botocore-session-<SESSION_ID>"
  },
  "responseElements": {
    "credentials": "<REDACTED>",
    "subjectFromWebIdentityToken": "system:serviceaccount:default:my-sa",
    "assumedRoleUser": {
      "assumedRoleId": "<ASSUMED_ROLE_ID>:botocore-session-<SESSION_ID>",
      "arn": "arn:aws:sts::<ACCOUNT_ID>:assumed-role/eksctl-myeks-pod-irsa-s3-readonly-role/botocore-session-<SESSION_ID>"
    },
    "provider": "arn:aws:iam::<ACCOUNT_ID>:oidc-provider/oidc.eks.ap-northeast-2.amazonaws.com/id/79980C89B3BA24DBE37EBD7C95B5D021",
    "audience": "sts.amazonaws.com"
  },
  "additionalEventData": {
    "identityProviderConnectionVerificationMethod": "IAMTrustStore",
    "RequestDetails": {
      "endpointType": "regional",
      "awsServingRegion": "ap-northeast-2"
    }
  },
  "resources": [
    {
      "accountId": "<ACCOUNT_ID>",
      "type": "AWS::IAM::Role",
      "ARN": "arn:aws:iam::<ACCOUNT_ID>:role/eksctl-myeks-pod-irsa-s3-readonly-role"
    }
  ],
  "eventType": "AwsApiCall",
  "managementEvent": true,
  "eventCategory": "Management",
  "tlsDetails": {
    "tlsVersion": "TLSv1.3",
    "cipherSuite": "TLS_AES_128_GCM_SHA256",
    "clientProvidedHostHeader": "sts.ap-northeast-2.amazonaws.com"
  }
}
이 로그는 Pod 안의 AWS CLI가 장기 Access Key를 사용한 것이 아니라, system:serviceaccount:default:my-sa 주체의 web identity token으로 STS에 AssumeRoleWithWebIdentity를 호출했다는 증거입니다. audience가 sts.amazonaws.com이고, provider가 EKS OIDC Provider이며, 최종 assumedRoleUser.arn이 eksctl-myeks-pod-irsa-s3-readonly-role로 기록됩니다.
마지막으로 S3와 EC2 API 호출을 비교합니다.
kubectl exec -it eks-iam-test3 -- aws s3 ls
kubectl exec -it eks-iam-test3 -- aws ec2 describe-instances --region ap-northeast-2
kubectl exec -it eks-iam-test3 -- aws ec2 describe-vpcs --region ap-northeast-2
S3 조회는 성공합니다.
$ kubectl exec -it eks-iam-test3 -- aws s3 ls
2026-02-12 15:48:19 <BUCKET_NAME_1>
2026-02-12 15:56:29 <BUCKET_NAME_2>
반면 EC2 조회는 실패합니다.
$ kubectl exec -it eks-iam-test3 -- aws ec2 describe-instances --region ap-northeast-2

aws: [ERROR]: An error occurred (UnauthorizedOperation) when calling the DescribeInstances operation: You are not authorized to perform this operation. User: arn:aws:sts::<ACCOUNT_ID>:assumed-role/eksctl-myeks-pod-irsa-s3-readonly-role/botocore-session-<SESSION_ID> is not authorized to perform: ec2:DescribeInstances because no identity-based policy allows the ec2:DescribeInstances action
command terminated with exit code 254

$ kubectl exec -it eks-iam-test3 -- aws ec2 describe-vpcs --region ap-northeast-2

aws: [ERROR]: An error occurred (UnauthorizedOperation) when calling the DescribeVpcs operation: You are not authorized to perform this operation. User: arn:aws:sts::<ACCOUNT_ID>:assumed-role/eksctl-myeks-pod-irsa-s3-readonly-role/botocore-session-<SESSION_ID> is not authorized to perform: ec2:DescribeVpcs because no identity-based policy allows the ec2:DescribeVpcs action
command terminated with exit code 254
예상 결과는 아래와 같습니다.
| 명령 | 예상 결과 | 이유 |
|---|---|---|
aws sts get-caller-identity |
성공 | IRSA로 eksctl-myeks-pod-irsa-s3-readonly-role을 Assume했기 때문입니다. |
aws s3 ls |
성공 | Role에 AmazonS3ReadOnlyAccess가 연결되어 있어 S3 조회 권한이 있습니다. |
aws ec2 describe-instances |
실패 | S3 ReadOnly 정책에는 EC2 조회 권한이 없습니다. |
aws ec2 describe-vpcs |
실패 | S3 ReadOnly 정책에는 EC2/VPC 조회 권한이 없습니다. |
즉, IRSA가 제대로 동작하면 Pod는 노드 IAM Role이 아니라 ServiceAccount에 연결된 IAM Role로 AWS API를 호출합니다. 또한 붙인 IAM Policy가 S3 읽기 전용이므로 S3 조회는 가능하지만 EC2 조회는 UnauthorizedOperation 또는 AccessDenied로 거부되는 것이 정상입니다.
리소스 삭제
마지막으로 S3 ReadOnly IRSA 테스트에 사용한 Pod와 ServiceAccount/IAM Role을 삭제합니다. 여기서는 eks-iam-test3와 default/my-sa만 제거합니다. 앞에서 설치한 AWS Load Balancer Controller용 ServiceAccount와 IAM Role은 삭제하지 않습니다.
kubectl delete pod eks-iam-test3
eksctl delete iamserviceaccount --cluster $CLUSTER_NAME --name my-sa --namespace default

# 삭제 확인
eksctl get iamserviceaccount --cluster $CLUSTER_NAME
kubectl get sa
실행 결과는 아래와 같습니다.
$ kubectl delete pod eks-iam-test3
pod "eks-iam-test3" deleted from default namespace

$ eksctl delete iamserviceaccount --cluster $CLUSTER_NAME --name my-sa --namespace default
2026-04-13 03:23:07 [ℹ]  1 iamserviceaccount (default/my-sa) was included (based on the include/exclude rules)
2026-04-13 03:23:07 [ℹ]  1 task: {
    2 sequential sub-tasks: {
        delete IAM role for serviceaccount "default/my-sa" [async],
        delete serviceaccount "default/my-sa",
    } }
2026-04-13 03:23:07 [ℹ]  will delete stack "eksctl-myeks-addon-iamserviceaccount-default-my-sa"
2026-04-13 03:23:07 [ℹ]  deleted serviceaccount "default/my-sa"

$ eksctl get iamserviceaccount --cluster $CLUSTER_NAME
NAMESPACE       NAME                            ROLE ARN
default         my-sa                           arn:aws:iam::<ACCOUNT_ID>:role/eksctl-myeks-pod-irsa-s3-readonly-role
kube-system     aws-load-balancer-controller    arn:aws:iam::<ACCOUNT_ID>:role/eksctl-myeks-addon-iamserviceaccount-kube-sys-Role1-<SUFFIX>

$ kubectl get sa
NAME      AGE
default   6h41m
여기서 kubectl get sa 결과에는 my-sa가 더 이상 보이지 않습니다. 즉 Kubernetes ServiceAccount는 삭제된 상태입니다.
다만 eksctl delete iamserviceaccount 출력에 delete IAM role ... [async]가 보이듯이 IAM Role과 CloudFormation Stack 삭제는 비동기로 진행됩니다. 그래서 삭제 직후 eksctl get iamserviceaccount를 실행하면 잠시 동안 default/my-sa가 남아 보일 수 있습니다. 잠시 기다린 뒤 다시 조회하면 테스트용 my-sa 항목이 사라지고, AWS Load Balancer Controller용 항목만 남아야 합니다.
$ eksctl get iamserviceaccount --cluster $CLUSTER_NAME
NAMESPACE       NAME                            ROLE ARN
kube-system     aws-load-balancer-controller    arn:aws:iam::<ACCOUNT_ID>:role/eksctl-myeks-addon-iamserviceaccount-kube-sys-Role1-<SUFFIX>
Pod Identity에 대해
EKS Pod Identity는 IRSA처럼 Pod가 장기 Access Key 없이 IAM Role의 임시 자격증명을 사용하게 만드는 기능입니다. 차이는 연결 방식입니다. IRSA는 클러스터별 IAM OIDC Provider와 ServiceAccount annotation을 기반으로 AssumeRoleWithWebIdentity를 호출하지만, Pod Identity는 EKS Pod Identity Association으로 namespace + ServiceAccount + IAM Role을 연결하고, 노드에 배포된 EKS Pod Identity Agent를 통해 자격증명을 전달합니다.
주요 특징은 아래와 같습니다.
- IAM OIDC Provider 구성이 필요하지 않습니다.
- IAM Role trust policy에서 클러스터별 OIDC Provider ARN을 직접 참조하지 않고,
pods.eks.amazonaws.com서비스 principal을 신뢰합니다. - 같은 IAM Role을 여러 EKS 클러스터에서 재사용하기 쉽습니다. 예를 들어 EKS 클러스터 blue/green 교체를 할 때, 새 클러스터의 OIDC Provider ARN을 기존 Role trust policy에 다시 추가하는 작업을 줄일 수 있습니다.
- EKS add-on 형태로 Pod Identity Agent를 배포할 수 있습니다. Agent는 노드에서 동작하므로 Fargate 사용 여부, hostNetwork, add-on 지원 조건 같은 제약은 별도로 확인해야 합니다.
- Pod Identity가 전달하는 세션 태그를 IAM Policy 조건에 활용하면, namespace나 ServiceAccount 기준으로 더 세밀한 권한 제어를 구성할 수 있습니다.
설치와 사용 흐름은 크게 아래 순서입니다.
- Amazon EKS Pod Identity Agent add-on을 설치합니다.
- 필요한 권한을 가진 IAM Role을 만들고 trust policy에서
pods.eks.amazonaws.com을 신뢰하도록 설정합니다. - EKS Pod Identity Association으로 IAM Role을 특정 Kubernetes ServiceAccount에 연결합니다.
- 해당 ServiceAccount를 사용하는 Pod를 재생성하면 Pod Identity Agent 경로로 AWS 임시 자격증명을 사용할 수 있습니다.
IRSA vs EKS Pod Identity
IRSA의 원리를 이해했으니, EKS Pod Identity와도 비교해봅니다. 둘 다 Pod에 장기 Access Key를 넣지 않고 IAM Role 기반 임시 자격증명을 제공한다는 목표는 같습니다. 차이는 AWS와 쿠버네티스 사이의 연결 방식입니다.
| 항목 | IRSA (기존) | EKS Pod Identity (신규) |
|---|---|---|
| 인증 메커니즘 | Pod의 AWS SDK가 STS AssumeRoleWithWebIdentity를 직접 호출 |
Pod의 AWS SDK가 node-local EKS Pod Identity Agent에서 자격증명 조회 |
| 설정 방식 | IAM OIDC Provider와 ServiceAccount annotation 사용 | 기존 ServiceAccount에 EKS Pod Identity Association 연결 |
| 신뢰 관계 (Trust) | EKS OIDC Provider ARN 참조 | pods.eks.amazonaws.com 서비스 principal 참조 |
| 운영 관점 | 오래 사용된 방식이고 기존 자료가 많음 | EKS 전용으로 설정 흐름이 단순함 |
| SDK 지원 | 대부분 지원 | 최신 버전 SDK 필요 |
Pod Identity는 ServiceAccount를 새로 만들어주는 기능이 아닙니다. 이미 존재하는 namespace + ServiceAccount 조합에 IAM Role을 연결하는 EKS Pod Identity Association을 만드는 방식입니다. 이후 해당 ServiceAccount를 사용하는 Pod가 뜨면 EKS가 Pod Identity용 환경변수와 token volume을 주입하고, Pod 안의 AWS SDK는 노드에 떠 있는 EKS Pod Identity Agent에서 임시 자격증명을 받아 사용합니다.
IRSA:
Pod AWS SDK -> STS AssumeRoleWithWebIdentity -> IAM Role 임시 자격증명

EKS Pod Identity:
Pod AWS SDK -> EKS Pod Identity Agent -> EKS Auth API/STS 흐름 -> IAM Role 임시 자격증명
신규 EKS 환경에서는 Pod Identity를 우선 검토할 수 있습니다. 다만 기존에 IRSA로 구성된 워크로드가 있거나, OIDC 기반 흐름을 명확히 사용해야 하는 경우에는 IRSA도 여전히 유효합니다. 이 글에서는 먼저 IRSA의 원리를 이해하고, 이후 Pod Identity가 무엇을 단순화했는지 비교하는 흐름으로 보겠습니다.
pod-identity-agent 설치 및 테스트하기
이번 실습 환경에서는 EKS Pod Identity Agent가 이미 add-on으로 설치되어 있습니다. 먼저 add-on 상태를 확인합니다.
eksctl get addon --cluster $CLUSTER_NAME
$ eksctl get addon --cluster $CLUSTER_NAME
2026-04-13 03:27:49 [ℹ]  Kubernetes version "1.35" in use by cluster "myeks"
2026-04-13 03:27:49 [ℹ]  getting all addons
2026-04-13 03:27:52 [ℹ]  to see issues for an addon run `eksctl get addon --name <addon-name> --cluster <cluster-name>`
NAME                    VERSION                 STATUS  ISSUES  IAMROLE UPDATE AVAILABLE        CONFIGURATION VALUES                    NAMESPACE       POD IDENTITY ASSOCIATION ROLES
cert-manager            v1.20.1-eksbuild.1      ACTIVE  0                                                                               cert-manager
coredns                 v1.13.2-eksbuild.4      ACTIVE  0                                                                               kube-system
eks-pod-identity-agent  v1.3.10-eksbuild.3      ACTIVE  0                                                                               kube-system
external-dns            v0.21.0-eksbuild.1      ACTIVE  0                                       {"policy":"sync","txtOwnerId":"myeks"}  external-dns
kube-proxy              v1.35.3-eksbuild.2      ACTIVE  0                                                                               kube-system
metrics-server          v0.8.1-eksbuild.5       ACTIVE  0                                                                               kube-system
vpc-cni                 v1.21.1-eksbuild.7      ACTIVE  0                                                                               kube-system
eks-pod-identity-agent가 ACTIVE 상태이고, kube-system 네임스페이스에 설치된 것을 볼 수 있습니다. 설치되어 있지 않은 환경이라면 먼저 EKS add-on으로 설치해야 합니다.
eksctl create addon --cluster $CLUSTER_NAME --name eks-pod-identity-agent
다음으로 DaemonSet과 Pod 상태를 확인합니다.
kubectl -n kube-system get daemonset eks-pod-identity-agent
kubectl -n kube-system get pods -l app.kubernetes.io/name=eks-pod-identity-agent
$ kubectl -n kube-system get daemonset eks-pod-identity-agent
NAME                     DESIRED   CURRENT   READY   UP-TO-DATE   AVAILABLE   NODE SELECTOR   AGE
eks-pod-identity-agent   2         2         2       2            2           <none>          6h40m

$ kubectl -n kube-system get pods -l app.kubernetes.io/name=eks-pod-identity-agent
NAME                           READY   STATUS    RESTARTS   AGE
eks-pod-identity-agent-7x79s   1/1     Running   0          6h40m
eks-pod-identity-agent-mlttd   1/1     Running   0          6h40m
노드가 2대이므로 Pod Identity Agent도 DaemonSet으로 2개 떠 있습니다.
DaemonSet YAML에서 중요한 부분만 보면 아래와 같습니다.
kubectl get ds -n kube-system eks-pod-identity-agent -o yaml
metadata:
  labels:
    app.kubernetes.io/name: eks-pod-identity-agent
    app.kubernetes.io/version: 0.1.37
    helm.sh/chart: eks-pod-identity-agent-1.3.10
spec:
  template:
    metadata:
      annotations:
        eks.amazonaws.com/skip-containers: eks-pod-identity-agent,eks-pod-identity-agent-init
    spec:
      affinity:
        nodeAffinity:
          requiredDuringSchedulingIgnoredDuringExecution:
            nodeSelectorTerms:
            - matchExpressions:
              - key: kubernetes.io/os
                operator: In
                values:
                - linux
              - key: kubernetes.io/arch
                operator: In
                values:
                - amd64
                - arm64
              - key: eks.amazonaws.com/compute-type
                operator: NotIn
                values:
                - fargate
                - hybrid
                - auto
      automountServiceAccountToken: false
      containers:
      - command:
        - /go-runner
        - /eks-pod-identity-agent
        - server
        args:
        - --port
        - "80"
        - --cluster-name
        - myeks
        - --probe-port
        - "2703"
        env:
        - name: AWS_REGION
          value: ap-northeast-2
        image: 602401143452.dkr.ecr.ap-northeast-2.amazonaws.com/eks/eks-pod-identity-agent:v0.1.37
        ports:
        - containerPort: 80
          name: proxy
        - containerPort: 2703
          name: probes-port
        securityContext:
          capabilities:
            add:
            - CAP_NET_BIND_SERVICE
      hostNetwork: true
      initContainers:
      - command:
        - /go-runner
        - /eks-pod-identity-agent
        - initialize
        name: eks-pod-identity-agent-init
        securityContext:
          privileged: true
      priorityClassName: system-node-critical
      tolerations:
      - operator: Exists
status:
  currentNumberScheduled: 2
  desiredNumberScheduled: 2
  numberAvailable: 2
  numberReady: 2
여기서 볼 포인트는 다음과 같습니다.
hostNetwork: true로 노드 네트워크 네임스페이스에서 동작합니다.- Agent는
--port 80,--probe-port 2703으로 실행됩니다. - 80번 포트를 바인딩하기 위해
CAP_NET_BIND_SERVICEcapability가 추가되어 있습니다. - 초기화 컨테이너
eks-pod-identity-agent-init는 privileged 권한으로 link-local 주소와 라우팅을 준비합니다. - nodeAffinity에서
eks.amazonaws.com/compute-type이fargate,hybrid,auto인 노드는 제외합니다. 즉 현재 DaemonSet은 일반 EC2 기반 노드에서 동작하는 형태입니다. automountServiceAccountToken: false입니다. Agent 자체가 Kubernetes API용 ServiceAccount 토큰을 자동 마운트하지 않도록 구성되어 있습니다.
네트워크 동작은 노드 안에서 확인해야 합니다. 로컬 터미널에서 sudo ss를 실행하는 것이 아니라, SSM 등으로 워커 노드에 접속한 뒤 확인합니다.
aws ssm start-session --target $NODE1
노드에 접속한 뒤 Pod Identity Agent 프로세스가 어떤 주소와 포트를 listen하는지 확인합니다.
sudo ss -tnlp | grep eks-pod
sh-5.2$ sudo ss -tnlp | grep eks-pod
LISTEN 0      4096        127.0.0.1:2703       0.0.0.0:*    users:(("eks-pod-identit",pid=<PID>,fd=9))
LISTEN 0      4096   169.254.170.23:80         0.0.0.0:*    users:(("eks-pod-identit",pid=<PID>,fd=7))
LISTEN 0      4096   [fd00:ec2::23]:80            [::]:*    users:(("eks-pod-identit",pid=<PID>,fd=4))
LISTEN 0      4096                *:2705             *:*    users:(("eks-pod-identit",pid=<PID>,fd=8))
Pod Identity Agent는 노드의 hostNetwork를 사용하고, link-local 주소에서 동작합니다. IPv4 환경에서는 169.254.170.23:80, IPv6 클러스터에서는 [fd00:ec2::23]:80 주소가 사용됩니다. 127.0.0.1:2703은 health/readiness probe용 포트입니다.
라우팅 테이블에서도 169.254.170.23이 pod-id-link0 인터페이스로 연결된 것을 볼 수 있습니다.
sudo ip -c route
sh-5.2$ sudo ip -c route
default via 192.168.12.1 dev ens5 proto dhcp src 192.168.13.117 metric 512
169.254.170.23 dev pod-id-link0
192.168.0.2 via 192.168.12.1 dev ens5 proto dhcp src 192.168.13.117 metric 512
192.168.12.0/22 dev ens5 proto kernel scope link src 192.168.13.117 metric 512
192.168.12.1 dev ens5 proto dhcp scope link src 192.168.13.117 metric 512
192.168.12.58 dev eni<ENI_ID> scope link
192.168.14.154 dev eni<ENI_ID> scope link
192.168.14.160 dev eni<ENI_ID> scope link
192.168.14.170 dev eni<ENI_ID> scope link
192.168.14.250 dev eni<ENI_ID> scope link
192.168.15.214 dev eni<ENI_ID> scope link
즉 Pod Identity Agent는 각 노드에 DaemonSet으로 배포되고, 노드의 link-local 주소 169.254.170.23을 통해 Pod의 AWS SDK/CLI에 임시 자격증명 전달 경로를 제공합니다. 이후 Pod Identity Association을 만들고 해당 ServiceAccount를 사용하는 Pod를 재생성하면, Pod는 이 Agent 경로를 통해 IAM Role 자격증명을 받아 AWS API를 호출하게 됩니다.
eksctl 로 podidentityassociation 설정
IAM Role 생성 및 쿠버네티스 SA 생성
이제 S3 읽기 전용 권한을 가진 IAM Role을 만들고, default/s3-sa ServiceAccount와 Pod Identity Association으로 연결합니다. --create-service-account를 사용하면 ServiceAccount가 없을 때 함께 생성합니다.
eksctl create podidentityassociation \
  --cluster $CLUSTER_NAME \
  --namespace default \
  --create-service-account \
  --service-account-name s3-sa \
  --role-name s3-eks-pod-identity-role \
  --permission-policy-arns arn:aws:iam::aws:policy/AmazonS3ReadOnlyAccess \
  --region ap-northeast-2
실행 결과는 아래와 같습니다.
$ eksctl create podidentityassociation \
  --cluster $CLUSTER_NAME \
  --namespace default \
  --create-service-account \
  --service-account-name s3-sa \
  --role-name s3-eks-pod-identity-role \
  --permission-policy-arns arn:aws:iam::aws:policy/AmazonS3ReadOnlyAccess \
  --region ap-northeast-2

2026-04-13 03:32:58 [ℹ]  1 task: {
    3 sequential sub-tasks: {
        create IAM role for pod identity association for service account "default/s3-sa",
        create service account "default/s3-sa", if it does not already exist,
        create pod identity association for service account "default/s3-sa",
    } }
2026-04-13 03:32:58 [ℹ]  deploying stack "eksctl-myeks-podidentityrole-default-s3-sa"
2026-04-13 03:32:58 [ℹ]  waiting for CloudFormation stack "eksctl-myeks-podidentityrole-default-s3-sa"
2026-04-13 03:33:29 [ℹ]  created serviceaccount "default/s3-sa"
2026-04-13 03:33:30 [ℹ]  created pod identity association for service account "s3-sa" in namespace "default"
2026-04-13 03:33:30 [ℹ]  all tasks were completed successfully
생성된 ServiceAccount를 확인합니다.
kubectl get sa
kubectl get sa s3-sa -o yaml
$ kubectl get sa
NAME      AGE
default   6h51m
s3-sa     4s
apiVersion: v1
kind: ServiceAccount
metadata:
  creationTimestamp: "2026-04-12T18:33:30Z"
  labels:
    app.kubernetes.io/managed-by: eksctl
  name: s3-sa
  namespace: default
  resourceVersion: "74241"
  uid: abf28b6b-ea0c-478d-b7dd-186a7577f2b1
여기서 IRSA와 다른 점이 바로 보입니다. s3-sa에는 eks.amazonaws.com/role-arn annotation이 없습니다. Pod Identity는 ServiceAccount annotation이 아니라 EKS Pod Identity Association 리소스로 namespace + ServiceAccount + IAM Role 관계를 관리합니다.
Association은 eksctl 또는 AWS CLI로 확인할 수 있습니다.
eksctl get podidentityassociation --cluster $CLUSTER_NAME
aws eks list-pod-identity-associations --cluster-name $CLUSTER_NAME | jq
$ eksctl get podidentityassociation --cluster $CLUSTER_NAME
ASSOCIATION ARN                                                                           NAMESPACE   SERVICE ACCOUNT NAME   IAM ROLE ARN
arn:aws:eks:ap-northeast-2:<ACCOUNT_ID>:podidentityassociation/myeks/a-e23deglsnor1chzar  default     s3-sa                  arn:aws:iam::<ACCOUNT_ID>:role/s3-eks-pod-identity-role
{
  "associations": [
    {
      "clusterName": "myeks",
      "namespace": "default",
      "serviceAccount": "s3-sa",
      "associationArn": "arn:aws:eks:ap-northeast-2:<ACCOUNT_ID>:podidentityassociation/myeks/a-e23deglsnor1chzar",
      "associationId": "a-e23deglsnor1chzar"
    }
  ]
}
마지막으로 Pod Identity용 IAM Role의 trust policy를 확인합니다.
aws iam get-role --query 'Role.AssumeRolePolicyDocument' --role-name s3-eks-pod-identity-role | jq .
{
  "Version": "2012-10-17",
  "Statement": [
    {
      "Effect": "Allow",
      "Principal": {
        "Service": "pods.eks.amazonaws.com"
      },
      "Action": [
        "sts:AssumeRole",
        "sts:TagSession"
      ]
    }
  ]
}
IRSA에서는 trust policy가 EKS OIDC Provider ARN과 system:serviceaccount:<namespace>:<serviceaccount> 조건을 직접 참조했습니다. 반면 Pod Identity에서는 pods.eks.amazonaws.com 서비스 principal을 신뢰하고, EKS Pod Identity Association이 어느 ServiceAccount가 이 Role을 사용할 수 있는지 관리합니다.
sts:TagSession이 함께 들어가는 이유는 Pod Identity가 세션 태그를 사용해 namespace, ServiceAccount 같은 Kubernetes 문맥을 IAM 조건에서 활용할 수 있게 하기 위해서입니다.
테스트용 파드 생성으로 AWS 리소스 호출 확인
AssumeRoleForPodIdentity확인
이제 s3-sa ServiceAccount를 사용하는 테스트 Pod를 생성합니다. 이 ServiceAccount는 앞에서 Pod Identity Association으로 s3-eks-pod-identity-role에 연결해두었습니다.
cat <<EOF | kubectl apply -f -
apiVersion: v1
kind: Pod
metadata:
  name: eks-pod-identity
spec:
  serviceAccountName: s3-sa
  containers:
    - name: my-aws-cli
      image: amazon/aws-cli:latest
      command: ['sleep', '36000']
  restartPolicy: Never
  terminationGracePeriodSeconds: 0
EOF
pod/eks-pod-identity created
Pod Identity Association이 있는 ServiceAccount를 사용하는 Pod가 생성되면 EKS Pod Identity webhook이 Pod spec을 변경합니다. IRSA 때와 달리 AWS_ROLE_ARN, AWS_WEB_IDENTITY_TOKEN_FILE이 아니라, 컨테이너 credential provider용 환경 변수가 들어갑니다.
kubectl get pod eks-pod-identity -o yaml
spec:
  containers:
  - command:
    - sleep
    - "36000"
    env:
    - name: AWS_STS_REGIONAL_ENDPOINTS
      value: regional
    - name: AWS_DEFAULT_REGION
      value: ap-northeast-2
    - name: AWS_REGION
      value: ap-northeast-2
    - name: AWS_CONTAINER_CREDENTIALS_FULL_URI
      value: http://169.254.170.23/v1/credentials
    - name: AWS_CONTAINER_AUTHORIZATION_TOKEN_FILE
      value: /var/run/secrets/pods.eks.amazonaws.com/serviceaccount/eks-pod-identity-token
    image: amazon/aws-cli:latest
    name: my-aws-cli
    volumeMounts:
    - mountPath: /var/run/secrets/kubernetes.io/serviceaccount
      name: kube-api-access-<SUFFIX>
      readOnly: true
    - mountPath: /var/run/secrets/pods.eks.amazonaws.com/serviceaccount
      name: eks-pod-identity-token
      readOnly: true
  serviceAccount: s3-sa
  serviceAccountName: s3-sa
  volumes:
  - name: eks-pod-identity-token
    projected:
      sources:
      - serviceAccountToken:
          audience: pods.eks.amazonaws.com
          expirationSeconds: 80652
          path: eks-pod-identity-token
  - name: kube-api-access-<SUFFIX>
    projected:
      sources:
      - serviceAccountToken:
          expirationSeconds: 3607
          path: token
      - configMap:
          name: kube-root-ca.crt
      - downwardAPI: {}
중요한 차이는 audience입니다. IRSA 토큰은 audience: sts.amazonaws.com였지만, Pod Identity 토큰은 audience: pods.eks.amazonaws.com입니다. 즉 이 토큰은 AWS STS에 직접 전달하는 Web Identity Token이 아니라, Pod Identity Agent와 EKS Auth 경로에서 사용하는 토큰입니다.
실제 Pod 안에서 AWS CLI 호출도 확인합니다.
kubectl exec -it eks-pod-identity -- aws sts get-caller-identity --query Arn
kubectl exec -it eks-pod-identity -- aws s3 ls
kubectl exec -it eks-pod-identity -- env | grep AWS
$ kubectl exec -it eks-pod-identity -- aws sts get-caller-identity --query Arn
"arn:aws:sts::<ACCOUNT_ID>:assumed-role/s3-eks-pod-identity-role/eks-myeks-eks-pod-id-<SESSION_ID>"

$ kubectl exec -it eks-pod-identity -- aws s3 ls
2026-02-12 15:48:19 <BUCKET_NAME_1>
2026-02-12 15:56:29 <BUCKET_NAME_2>

$ kubectl exec -it eks-pod-identity -- env | grep AWS
AWS_DEFAULT_REGION=ap-northeast-2
AWS_REGION=ap-northeast-2
AWS_CONTAINER_CREDENTIALS_FULL_URI=http://169.254.170.23/v1/credentials
AWS_CONTAINER_AUTHORIZATION_TOKEN_FILE=/var/run/secrets/pods.eks.amazonaws.com/serviceaccount/eks-pod-identity-token
AWS_STS_REGIONAL_ENDPOINTS=regional
여기서 AWS_CONTAINER_CREDENTIALS_FULL_URI가 앞에서 노드에서 확인한 link-local 주소 169.254.170.23을 가리킵니다. AWS SDK/CLI는 이 주소의 Pod Identity Agent에서 임시 자격증명을 받아 사용합니다. AWS_CONTAINER_AUTHORIZATION_TOKEN_FILE은 Agent에 요청할 때 사용할 Pod Identity 전용 토큰 경로입니다.
토큰 파일도 확인합니다.
kubectl exec -it eks-pod-identity -- ls /var/run/secrets/pods.eks.amazonaws.com/serviceaccount/
kubectl exec -it eks-pod-identity -- cat /var/run/secrets/pods.eks.amazonaws.com/serviceaccount/eks-pod-identity-token
$ kubectl exec -it eks-pod-identity -- ls /var/run/secrets/pods.eks.amazonaws.com/serviceaccount/
eks-pod-identity-token

$ kubectl exec -it eks-pod-identity -- cat /var/run/secrets/pods.eks.amazonaws.com/serviceaccount/eks-pod-identity-token
<EKS_POD_IDENTITY_TOKEN>
문서에는 토큰 원문을 남기지 않고, 디코딩한 핵심 클레임만 남깁니다.
{
  "alg": "RS256",
  "kid": "4eb2f05f5c2b18c3b1a14705d72defde74669b29",
  "typ": "JWT"
}
{
  "aud": [
    "pods.eks.amazonaws.com"
  ],
  "exp": 1776099553,
  "iat": 1776018901,
  "iss": "https://oidc.eks.ap-northeast-2.amazonaws.com/id/79980C89B3BA24DBE37EBD7C95B5D021",
  "jti": "1a8c16e8-5c4e-4aee-b600-5a22fc40a945",
  "kubernetes.io": {
    "namespace": "default",
    "node": {
      "name": "ip-192-168-13-117.ap-northeast-2.compute.internal",
      "uid": "887cae05-7203-4196-8235-5f895dcf26f2"
    },
    "pod": {
      "name": "eks-pod-identity",
      "uid": "45dffbac-d0df-45d3-a9b5-0af24eff7356"
    },
    "serviceaccount": {
      "name": "s3-sa",
      "uid": "abf28b6b-ea0c-478d-b7dd-186a7577f2b1"
    }
  },
  "nbf": 1776018901,
  "sub": "system:serviceaccount:default:s3-sa"
}
시간값을 UTC 기준으로 풀어보면 iat와 nbf는 2026-04-12T18:35:01Z, exp는 2026-04-13T16:59:13Z입니다.
이 토큰의 핵심은 aud: pods.eks.amazonaws.com와 sub: system:serviceaccount:default:s3-sa입니다. kubernetes.io 클레임에는 이 토큰이 default 네임스페이스의 s3-sa ServiceAccount를 사용하는 eks-pod-identity Pod에 묶여 있다는 정보가 들어갑니다.
CloudTrail에서는 eks-auth.amazonaws.com의 AssumeRoleForPodIdentity 이벤트로 확인됩니다.
{
  "userIdentity": {
    "type": "AssumedRole",
    "arn": "arn:aws:sts::<ACCOUNT_ID>:assumed-role/myeks-ng-1/<INSTANCE_ID>",
    "sessionContext": {
      "sessionIssuer": {
        "type": "Role",
        "arn": "arn:aws:iam::<ACCOUNT_ID>:role/myeks-ng-1",
        "userName": "myeks-ng-1"
      },
      "attributes": {
        "creationDate": "2026-04-12T18:33:04Z",
        "mfaAuthenticated": "false"
      },
      "ec2RoleDelivery": "2.0"
    }
  },
  "eventTime": "2026-04-12T18:35:09Z",
  "eventSource": "eks-auth.amazonaws.com",
  "eventName": "AssumeRoleForPodIdentity",
  "awsRegion": "ap-northeast-2",
  "sourceIPAddress": "<SOURCE_PUBLIC_IP>",
  "userAgent": "aws-sdk-go-v2/1.39.2 ... api/eksauth#1.11.7",
  "requestParameters": {
    "clusterName": "myeks",
    "token": "HIDDEN_DUE_TO_SECURITY_REASONS"
  },
  "readOnly": true,
  "eventType": "AwsApiCall",
  "managementEvent": true,
  "eventCategory": "Management",
  "tlsDetails": {
    "tlsVersion": "TLSv1.3",
    "cipherSuite": "TLS_AES_128_GCM_SHA256",
    "clientProvidedHostHeader": "eks-auth.ap-northeast-2.api.aws"
  }
}
IRSA의 CloudTrail 이벤트가 sts.amazonaws.com의 AssumeRoleWithWebIdentity였던 것과 달리, Pod Identity에서는 EKS Pod Identity Agent가 EKS Auth API로 AssumeRoleForPodIdentity를 호출합니다. 그래서 eventSource가 eks-auth.amazonaws.com으로 기록됩니다. 또한 호출 주체는 Pod 자체의 web identity user가 아니라 노드에서 동작하는 Agent 경로이므로, userIdentity에는 노드 IAM Role인 myeks-ng-1의 assumed role 세션이 보입니다.
추가 확인: Pod Identity Agent 엔드포인트 직접 호출
링크로컬 주소를 통해 워크로드가 자기에게 필요한 정보를 얻는 패턴은 OpenStack metadata, EC2 IMDS, EKS Pod Identity에서 유사하게 보입니다. 다만 Pod Identity는 일반 메타데이터 조회가 아니라 AWS SDK container credential provider가 사용할 IAM 임시 자격증명 제공에 초점이 있습니다. AWS의 내부 구현 세부까지 모두 공개된 것은 아니지만, OpenStack의 메타데이터 서비스 동작 방식은 링크로컬 기반 credential/metadata endpoint 패턴을 이해하는 참고 자료로 볼 수 있습니다.
오픈스택 메타데이터 서비스 흐름:
- VM이
169.254.169.254:80으로 HTTP GET 요청 - DHCP가 설정한 정적 경로에 의해 네트워크 노드의 라우터 네임스페이스로 도달
- iptables가 트래픽을 로컬 포트로 리다이렉트 → HAProxy가 Neutron 메타데이터 에이전트에 전달
- Neutron이 요청자의 IP를 보고 포트-VM 매핑 DB를 조회하여 VM UUID를 특정
X-Instance-ID,X-Tenant-ID헤더를 추가하고 HMAC 서명으로 위변조 방지- Nova 메타데이터 API가 DB에서 해당 VM 정보를 조회해 응답
유사한 패턴: 링크로컬 주소로 요청 → 요청자를 인프라 레벨에서 특정 → 해당 주체에 맞는 metadata 또는 credential 응답
| 항목 | 오픈스택 메타데이터 | AWS EC2 IMDS | EKS Pod Identity |
|---|---|---|---|
| 링크로컬 주소 | 169.254.169.254 |
169.254.169.254 |
169.254.170.23 |
| 요청 주체 | VM (guest OS) | EC2 인스턴스 | Pod (컨테이너) |
| 요청자 식별 | Neutron 포트-IP 매핑 | 하이퍼바이저/IMDS 경로에서 요청 인스턴스 특정 | Pod가 전달한 token을 Agent가 EKS Auth API 경로에서 검증/교환 |
| 정보 제공자 | Nova (VM 정보 DB) | EC2 메타데이터 서비스 | EKS Auth API + Pod Identity Agent (결과는 IAM Role 임시 자격증명) |
| 프록시 | HAProxy + Neutron agent | (내부 구현, 비공개) | DaemonSet의 Pod Identity Agent |
참고:
AWS 문서에 따르면 Pod Identity가 연결된 ServiceAccount로 Pod가 생성되면 EKS는 Pod manifest에 AWS_CONTAINER_CREDENTIALS_FULL_URI, AWS_CONTAINER_AUTHORIZATION_TOKEN_FILE, Pod Identity token volume을 추가합니다. 이후 AWS SDK/CLI는 기본 credential provider chain 중 container credential provider를 통해 169.254.170.23의 Pod Identity Agent에서 임시 자격증명을 가져옵니다.
이 과정을 직접 확인하기 위해 Pod 안에서 shell로 진입합니다.
kubectl exec -it eks-pod-identity -- bash
Pod Identity token은 아래 경로에 있습니다.
cat /var/run/secrets/pods.eks.amazonaws.com/serviceaccount/eks-pod-identity-token
<EKS_POD_IDENTITY_TOKEN>
토큰 원문은 남기지 않습니다. 앞에서 디코딩한 것처럼 이 토큰의 핵심은 aud: pods.eks.amazonaws.com, sub: system:serviceaccount:default:s3-sa입니다.
이 토큰을 Authorization 헤더에 넣어서 Pod Identity Agent endpoint를 직접 호출할 수 있습니다. 실제 애플리케이션에서는 이 작업을 AWS SDK/CLI가 자동으로 수행합니다.
EKS_POD_IDENTITY_TOKEN=$(cat /var/run/secrets/pods.eks.amazonaws.com/serviceaccount/eks-pod-identity-token)
curl -s 169.254.170.23/v1/credentials -H "Authorization: $EKS_POD_IDENTITY_TOKEN" | jq
응답에는 Pod Identity Association으로 연결된 IAM Role의 임시 자격증명이 내려옵니다.
{
  "AccessKeyId": "<REDACTED>",
  "SecretAccessKey": "<REDACTED>",
  "Token": "<REDACTED>",
  "AccountId": "<ACCOUNT_ID>",
  "Expiration": "2026-04-13T00:35:09Z"
}
이 결과는 AWS_CONTAINER_CREDENTIALS_FULL_URI=http://169.254.170.23/v1/credentials가 실제로 자격증명 제공 엔드포인트로 동작한다는 것을 보여줍니다. 이 임시 자격증명은 s3-eks-pod-identity-role을 기반으로 발급된 것이므로 앞에서 aws s3 ls는 성공하고, S3 권한 밖의 API는 거부됩니다.
Pod 안에서 CloudTrail 이벤트를 조회하려고 하면 실패합니다.
EVENT_NAME="AssumeRoleForPodIdentity"
aws cloudtrail lookup-events --lookup-attributes AttributeKey=EventName,AttributeValue=$EVENT_NAME --max-items=1
aws: [ERROR]: An error occurred (AccessDeniedException) when calling the LookupEvents operation: User: arn:aws:sts::<ACCOUNT_ID>:assumed-role/s3-eks-pod-identity-role/eks-myeks-eks-pod-id-<SESSION_ID> is not authorized to perform: cloudtrail:LookupEvents because no identity-based policy allows the cloudtrail:LookupEvents action
이 실패는 정상입니다. 현재 Pod가 사용하는 IAM Role에는 AmazonS3ReadOnlyAccess만 연결되어 있으므로 cloudtrail:LookupEvents 권한이 없습니다. CloudTrail 조회는 관리자 권한을 가진 로컬 AWS 프로필이나 별도 운영자 Role로 수행해야 합니다.
마지막으로 아래 명령은 변수 값이 비어 있어서 CLI 파라미터 검증에서 실패했습니다.
aws eks-auth assume-role-for-pod-identity --cluster-name $EKS_CLUSTER --token $TOKEN
aws: [ERROR]: An error occurred (ParamValidation): argument --cluster-name: expected one argument
여기서는 $EKS_CLUSTER와 $TOKEN이 설정되어 있지 않았기 때문에 --cluster-name에 전달된 값이 없었습니다. 다만 일반 애플리케이션이나 AWS CLI 사용 흐름에서는 이 API를 직접 호출할 필요가 없습니다. Pod Identity Agent와 AWS SDK/CLI의 container credential provider가 이 과정을 대신 처리합니다.
리소스 삭제
Pod Identity Association 테스트에 사용한 리소스를 삭제합니다.
eksctl delete podidentityassociation --cluster $CLUSTER_NAME --namespace default --service-account-name s3-sa
kubectl delete pod eks-pod-identity
kubectl delete sa s3-sa
실행 결과는 아래와 같습니다.
$ eksctl delete podidentityassociation --cluster $CLUSTER_NAME --namespace default --service-account-name s3-sa
2026-04-13 03:51:12 [ℹ]  1 task: {
    2 sequential sub-tasks: {
        delete pod identity association "default/s3-sa",
        delete service account "default/s3-sa", if it exists and is managed by eksctl,
    } }
2026-04-13 03:51:12 [ℹ]  deleting IAM resources stack "eksctl-myeks-podidentityrole-default-s3-sa" for pod identity association "default/s3-sa"
2026-04-13 03:51:13 [ℹ]  will delete stack "eksctl-myeks-podidentityrole-default-s3-sa"
2026-04-13 03:51:13 [ℹ]  waiting for stack "eksctl-myeks-podidentityrole-default-s3-sa" to get deleted
2026-04-13 03:51:13 [ℹ]  waiting for CloudFormation stack "eksctl-myeks-podidentityrole-default-s3-sa"
2026-04-13 03:51:44 [ℹ]  waiting for CloudFormation stack "eksctl-myeks-podidentityrole-default-s3-sa"
2026-04-13 03:51:44 [ℹ]  deleted serviceaccount "default/s3-sa"
2026-04-13 03:51:44 [ℹ]  all tasks were completed successfully

$ kubectl delete pod eks-pod-identity
pod "eks-pod-identity" deleted from default namespace

$ kubectl delete sa s3-sa
Error from server (NotFound): serviceaccounts "s3-sa" not found
s3-sa ServiceAccount는 eksctl delete podidentityassociation 과정에서 이미 삭제되었기 때문에, 뒤에서 kubectl delete sa s3-sa를 실행하면 NotFound가 나오는 것이 정상입니다.
정리
배포한 실습환경을 모두 삭제처리합니다.
kubectl delete ingress -n kube-system kubeopsview
kubectl get ingress -n kube-system

eksctl delete iamserviceaccount --cluster=$CLUSTER_NAME --namespace=kube-system --name=aws-load-balancer-controller
eksctl get iamserviceaccount --cluster $CLUSTER_NAME

terraform destroy -auto-approve
Ingress 삭제 결과입니다.
$ kubectl delete ingress -n kube-system kubeopsview
ingress.networking.k8s.io "kubeopsview" deleted from kube-system namespace

$ kubectl get ingress -n kube-system
No resources found in kube-system namespace.
AWS Load Balancer Controller에서 사용한 IRSA ServiceAccount도 삭제합니다.
$ eksctl delete iamserviceaccount --cluster=$CLUSTER_NAME --namespace=kube-system --name=aws-load-balancer-controller
2026-04-13 03:53:12 [ℹ]  1 iamserviceaccount (kube-system/aws-load-balancer-controller) was included (based on the include/exclude rules)
2026-04-13 03:53:12 [ℹ]  1 task: {
    2 sequential sub-tasks: {
        delete IAM role for serviceaccount "kube-system/aws-load-balancer-controller" [async],
        delete serviceaccount "kube-system/aws-load-balancer-controller",
    } }
2026-04-13 03:53:12 [ℹ]  will delete stack "eksctl-myeks-addon-iamserviceaccount-kube-system-aws-load-balancer-controller"
2026-04-13 03:53:12 [ℹ]  deleted serviceaccount "kube-system/aws-load-balancer-controller"

$ eksctl get iamserviceaccount --cluster $CLUSTER_NAME
NAMESPACE       NAME                            ROLE ARN
kube-system     aws-load-balancer-controller    arn:aws:iam::<ACCOUNT_ID>:role/eksctl-myeks-addon-iamserviceaccount-kube-sys-Role1-<SUFFIX>
eksctl delete iamserviceaccount도 IAM Role 삭제가 비동기로 진행되므로, 삭제 직후에는 eksctl get iamserviceaccount에 항목이 잠시 남아 보일 수 있습니다. 한 번 더 삭제를 실행하면 Kubernetes ServiceAccount는 이미 삭제되었다고 나오고, 이후 조회 시 항목이 사라졌습니다.
$ eksctl delete iamserviceaccount --cluster=$CLUSTER_NAME --namespace=kube-system --name=aws-load-balancer-controller
2026-04-13 03:53:24 [ℹ]  1 iamserviceaccount (kube-system/aws-load-balancer-controller) was included (based on the include/exclude rules)
2026-04-13 03:53:24 [ℹ]  1 task: {
    2 sequential sub-tasks: {
        delete IAM role for serviceaccount "kube-system/aws-load-balancer-controller" [async],
        delete serviceaccount "kube-system/aws-load-balancer-controller",
    } }
2026-04-13 03:53:24 [ℹ]  will delete stack "eksctl-myeks-addon-iamserviceaccount-kube-system-aws-load-balancer-controller"
2026-04-13 03:53:24 [ℹ]  serviceaccount "kube-system/aws-load-balancer-controller" was already deleted

$ eksctl get iamserviceaccount --cluster $CLUSTER_NAME
No iamserviceaccounts found
마지막으로 Terraform으로 생성한 실습 인프라를 삭제합니다.
terraform destroy -auto-approve